


Apache Beam 程式設計指南
Beam 程式設計指南適用於想要使用 Beam SDK 建立資料處理管道的 Beam 使用者。它提供了使用 Beam SDK 類別來建構和測試您的管道的指導。程式設計指南並非旨在作為詳盡的參考,而是作為一種與語言無關、高階的指南,用於以程式方式建構您的 Beam 管道。隨著程式設計指南的內容不斷完善,文本將包含多種語言的程式碼範例,以幫助說明如何在您的管道中實作 Beam 概念。
如果您想在閱讀程式設計指南之前對 Beam 的基本概念有一個簡要的介紹,請查看Beam 模型基礎頁面。
Python SDK 支援 Python 3.8、3.9、3.10、3.11 和 3.12。
Go SDK 支援 Go v1.20+。
Typescript SDK 支援 Node v16+,並且仍處於實驗階段。
YAML 在 Beam 2.52 中開始支援,但仍在積極開發中,建議使用最新的 SDK。
1. 概觀
要使用 Beam,您需要先使用其中一個 Beam SDK 中的類別建立驅動程式。您的驅動程式會定義您的管道,包括所有輸入、轉換和輸出;它還會設定管道的執行選項(通常使用命令列選項傳入)。這些選項包括管道執行器,而管道執行器又決定了您的管道將在哪個後端上執行。
Beam SDK 提供許多抽象概念,簡化了大規模分散式資料處理的機制。相同的 Beam 抽象概念適用於批次和串流資料來源。當您建立 Beam 管道時,您可以根據這些抽象概念來思考您的資料處理任務。它們包括:
Pipeline:Pipeline封裝了您的整個資料處理任務,從開始到結束。這包括讀取輸入資料、轉換該資料以及寫入輸出資料。所有 Beam 驅動程式都必須建立Pipeline。當您建立Pipeline時,您還必須指定執行選項,這些選項會告知Pipeline在何處以及如何執行。PCollection:PCollection代表您的 Beam 管道所操作的分散式資料集。該資料集可以是有界的,表示它來自固定來源(例如檔案),也可以是無界的,表示它來自透過訂閱或其他機制持續更新的來源。您的管道通常透過從外部資料來源讀取資料來建立初始的PCollection,但您也可以在驅動程式內從記憶體中的資料建立PCollection。從那裡開始,PCollection是管道中每個步驟的輸入和輸出。PTransform:PTransform代表您管道中的資料處理操作或步驟。每個PTransform都會將一個或多個PCollection物件作為輸入,對該PCollection的元素執行您提供的處理函式,並產生零個或多個輸出PCollection物件。
Scope:Go SDK 有一個明確的作用域變數,用於建構Pipeline。Pipeline可以使用Root()方法傳回其根作用域。作用域變數會傳遞給PTransform函式,以將它們放置在擁有該Scope的Pipeline中。
- I/O 轉換:Beam 帶有許多「IO」- 讀取或寫入資料到各種外部儲存系統的程式庫
PTransform。
PCollection 要嘛是隱式的(例如,當使用 chain 時),要嘛是透過它們產生的 PTransform 來引用。典型的 Beam 驅動程式的工作方式如下:
- 建立
Pipeline物件並設定管道執行選項,包括管道執行器。 - 為管道資料建立初始的
PCollection,可以使用 IO 從外部儲存系統讀取資料,或者使用Create轉換從記憶體中的資料建構PCollection。 - 將
PTransform套用到每個PCollection。轉換可以變更、篩選、分組、分析或以其他方式處理PCollection中的元素。轉換會建立新的輸出PCollection,而不會修改輸入集合。典型的管道會將後續轉換依次套用到每個新的輸出PCollection,直到處理完成。但是,請注意,管道不必是一條接一條套用的單一直線轉換:將PCollection視為變數,將PTransform視為套用到這些變數的函式:管道的形狀可以是一個任意複雜的處理圖。 - 使用 IO 將最終轉換的
PCollection寫入外部來源。 - 使用指定的管道執行器來執行管道。
當您執行 Beam 驅動程式時,您指定的管道執行器會根據您建立的 PCollection 物件和您套用的轉換來建構管道的工作流程圖。然後,該圖會使用適當的分散式處理後端執行,成為該後端上的非同步「作業」(或等效項目)。
2. 建立管線
Pipeline 抽象概念封裝了您的資料處理任務中的所有資料和步驟。您的 Beam 驅動程式通常首先建構一個 Pipeline Pipeline Pipeline 物件,然後使用該物件作為基礎,將管道的資料集建立為 PCollection,並將其運算建立為 Transform。
要使用 Beam,您的驅動程式必須先建立 Beam SDK 類別 Pipeline 的執行個體(通常在 main() 函式中)。當您建立 Pipeline 時,您還需要設定一些組態選項。您可以透過程式設計方式設定管道的組態選項,但通常更簡單的方法是預先設定選項(或從命令列讀取選項),並在建立物件時將它們傳遞給 Pipeline 物件。
// Start by defining the options for the pipeline.
PipelineOptions options = PipelineOptionsFactory.create();

// Then create the pipeline.
Pipeline p = Pipeline.create(options);
import apache_beam as beam
with beam.Pipeline() as pipeline:
pass # build your pipeline here// beam.Init() is an initialization hook that must be called
// near the beginning of main(), before creating a pipeline.
beam.Init()
// Create the Pipeline object and root scope.
pipeline, scope := beam.NewPipelineWithRoot()await beam.createRunner().run(function pipeline(root) {
// Use root to build a pipeline.
});pipeline:
...
options:
...如需有關在 Python SDK 中建立基本管道的更深入教學,請閱讀並完成此 colab notebook。
2.1. 設定管線選項
使用管道選項來設定管道的不同方面,例如將執行您的管道的管道執行器,以及所選執行器所需的任何特定於執行器的組態。您的管道選項可能會包含諸如您的專案 ID 或儲存檔案位置之類的資訊。
當您在您選擇的執行器上執行管道時,您的程式碼可以使用 PipelineOptions 的副本。例如,如果您將 PipelineOptions 參數新增至 DoFn 的 @ProcessElement 方法,則系統會填入該參數。
2.1.1. 從命令列引數設定 PipelineOptions
雖然您可以透過建立 PipelineOptions 物件並直接設定欄位來設定管道,但 Beam SDK 包含一個命令列剖析器,您可以使用該剖析器透過命令列引數在 PipelineOptions 中設定欄位。
若要從命令列讀取選項,請按照以下程式碼範例所示建構您的 PipelineOptions 物件:
使用 Go 旗標來剖析命令列引數,以設定管道。必須在呼叫 beam.Init() 之前剖析旗標。
任何 Javascript 物件都可以用作管道選項。您可以手動建構一個,但通常也會傳遞從命令列選項(例如 yargs.argv)建立的物件。
管道選項只是一個可選的 YAML 對應屬性,它與管道定義本身是同級的。它將與在命令列上傳遞的任何選項合併。
PipelineOptions options =
    PipelineOptionsFactory.fromArgs(args).withValidation().create();
from apache_beam.options.pipeline_options import PipelineOptions
beam_options = PipelineOptions()// If beamx or Go flags are used, flags must be parsed first,
// before beam.Init() is called.
flag.Parse()const pipeline_options = {
runner: "default",
project: "my_project",
};
const runner = beam.createRunner(pipeline_options);
const runnerFromCommandLineOptions = beam.createRunner(yargs.argv);pipeline:
...
options:
my_pipeline_option: my_value
...這會解譯遵循以下格式的命令列引數:
--<option>=<value>
附加
.withValidation方法會檢查必要的命令列引數並驗證引數值。
以這種方式建構 PipelineOptions 可讓您將任何選項指定為命令列引數。
以這種方式定義旗標變數可讓您將任何選項指定為命令列引數。
注意:WordCount 範例管道示範如何在執行時間使用命令列選項設定管道選項。
2.1.2. 建立自訂選項
除了標準的 PipelineOptions 之外,您還可以新增您自己的自訂選項。
若要新增您自己的選項,請定義一個介面,其中包含每個選項的 getter 和 setter 方法。
以下範例顯示如何新增input 和 output 自訂選項:public interface MyOptions extends PipelineOptions {
String getInput();
void setInput(String input);
String getOutput();
void setOutput(String output);
}from apache_beam.options.pipeline_options import PipelineOptions
class MyOptions(PipelineOptions):
@classmethod
def _add_argparse_args(cls, parser):
parser.add_argument('--input')
parser.add_argument('--output')// Use standard Go flags to define pipeline options.
var (
input = flag.String("input", "", "")
output = flag.String("output", "", "")
)const options = yargs.argv; // Or an alternative command-line parsing library.
// Use options.input and options.output during pipeline construction.
您也可以指定描述(當使用者將 --help 作為命令列引數傳遞時會出現)和預設值。
您可以使用註釋設定描述和預設值,如下所示:
public interface MyOptions extends PipelineOptions {
    @Description("Input for the pipeline")
    @Default.String("gs://my-bucket/input")
    String getInput();
    void setInput(String input);

    @Description("Output for the pipeline")
    @Default.String("gs://my-bucket/output")
    String getOutput();
    void setOutput(String output);
}
from apache_beam.options.pipeline_options import PipelineOptions
class MyOptions(PipelineOptions):
@classmethod
def _add_argparse_args(cls, parser):
parser.add_argument(
'--input',
default='gs://dataflow-samples/shakespeare/kinglear.txt',
help='The file path for the input text to process.')
parser.add_argument(
'--output', required=True, help='The path prefix for output files.')var (
input = flag.String("input", "gs://my-bucket/input", "Input for the pipeline")
output = flag.String("output", "gs://my-bucket/output", "Output for the pipeline")
)對於 Python,您也可以直接使用 argparse 剖析自訂選項;無需建立單獨的 PipelineOptions 子類別。
建議您向 PipelineOptionsFactory 註冊您的介面,然後在建立 PipelineOptions 物件時傳遞該介面。當您向 PipelineOptionsFactory 註冊您的介面時,--help 可以找到您的自訂選項介面,並將其添加到 --help 命令的輸出中。PipelineOptionsFactory 也會驗證您的自訂選項是否與所有其他已註冊的選項相容。
以下範例程式碼示範如何向 PipelineOptionsFactory 註冊您的自訂選項介面
PipelineOptionsFactory.register(MyOptions.class);
MyOptions options = PipelineOptionsFactory.fromArgs(args)
                                                .withValidation()
                                                .as(MyOptions.class);
現在您的管線可以接受 --input=value 和 --output=value 作為命令列引數。
3. PCollections
PCollection PCollection PCollection 抽象概念表示一個潛在分散式、多元素的資料集。您可以將 PCollection 視為「管線」資料;Beam 轉換會使用 PCollection 物件作為輸入和輸出。因此,如果您想在您的管線中使用資料,它必須以 PCollection 的形式存在。
在您建立 Pipeline 之後,您需要先以某種形式建立至少一個 PCollection。您建立的 PCollection 將作為您管線中第一個操作的輸入。
3.1. 建立 PCollection
您可以透過使用 Beam 的 Source API 從外部來源讀取資料來建立 PCollection,或者您可以建立一個 PCollection,其中包含儲存在您驅動程式程式的記憶體內集合類別中的資料。前者通常是生產管線攝取資料的方式;Beam 的 Source API 包含配接器,可協助您從大型雲端檔案、資料庫或訂閱服務等外部來源讀取。後者主要用於測試和除錯目的。
3.1.1. 從外部來源讀取
若要從外部來源讀取,您可以使用 Beam 提供的 I/O 配接器之一。這些配接器的確切使用方式各不相同,但它們都會從某些外部資料來源讀取,並傳回一個 PCollection,其元素代表該來源中的資料記錄。
每個資料來源配接器都有一個 Read 轉換;若要讀取,您必須將該轉換套用至 Pipeline 物件本身。 將此轉換放在管線的 source 或 transforms 部分。 TextIO.Read io.TextFileSource textio.Read textio.ReadFromText, ReadFromText,例如,從外部文字檔案讀取,並傳回一個 PCollection,其元素的類型為 String,其中每個 String 代表文字檔案中的一行。以下是如何將 TextIO.Read io.TextFileSource textio.Read textio.ReadFromText ReadFromText 套用至您的 Pipeline root 以建立 PCollection 的方法
public static void main(String[] args) {
    // Create the pipeline.
    PipelineOptions options =
        PipelineOptionsFactory.fromArgs(args).create();
    Pipeline p = Pipeline.create(options);

    // Create the PCollection 'lines' by applying a 'Read' transform.
    PCollection<String> lines = p.apply(
      "ReadMyFile", TextIO.read().from("gs://some/inputData.txt"));
}
lines = pipeline | 'ReadMyFile' >> beam.io.ReadFromText(
'gs://some/inputData.txt')// Read the file at the URI 'gs://some/inputData.txt' and return
// the lines as a PCollection<string>.
// Notice the scope as the first variable when calling
// the method as is needed when calling all transforms.
lines := textio.Read(scope, "gs://some/inputData.txt")async function pipeline(root: beam.Root) {
// Note that textio.ReadFromText is an AsyncPTransform.
const pcoll: PCollection<string> = await root.applyAsync(
textio.ReadFromText("path/to/text_pattern")
);
}pipeline:
source:
type: ReadFromText
config:
path: ...請參閱 關於 I/O 的章節,以了解更多關於如何從 Beam SDK 支援的各種資料來源讀取。
3.1.2. 從記憶體中的資料建立 PCollection
若要從記憶體內的 Java Collection 建立 PCollection,您可以使用 Beam 提供的 Create 轉換。與資料配接器的 Read 非常相似,您將 Create 直接套用至您的 Pipeline 物件本身。
作為參數,Create 接受 Java Collection 和 Coder 物件。Coder 指定應如何 編碼 Collection 中的元素。
若要從記憶體內的 list 建立 PCollection,您可以使用 Beam 提供的 Create 轉換。將此轉換直接套用至您的 Pipeline 物件本身。
若要從記憶體內的 slice 建立 PCollection,您可以使用 Beam 提供的 beam.CreateList 轉換。將管線 scope 和 slice 傳遞給此轉換。
若要從記憶體內的 array 建立 PCollection,您可以使用 Beam 提供的 Create 轉換。將此轉換直接套用至您的 Root 物件。
若要從記憶體內的 array 建立 PCollection,您可以使用 Beam 提供的 Create 轉換。在管線本身中指定元素。
以下範例程式碼示範如何從記憶體內的 List list slice array 建立 PCollection
public static void main(String[] args) {
    // Create a Java Collection, in this case a List of Strings.
    final List<String> LINES = Arrays.asList(
      "To be, or not to be: that is the question: ",
      "Whether 'tis nobler in the mind to suffer ",
      "The slings and arrows of outrageous fortune, ",
      "Or to take arms against a sea of troubles, ");

    // Create the pipeline.
    PipelineOptions options =
        PipelineOptionsFactory.fromArgs(args).create();
    Pipeline p = Pipeline.create(options);

    // Apply Create, passing the list and the coder, to create the PCollection.
    p.apply(Create.of(LINES)).setCoder(StringUtf8Coder.of());
}
import apache_beam as beam
with beam.Pipeline() as pipeline:
lines = (
pipeline
| beam.Create([
'To be, or not to be: that is the question: ',
"Whether 'tis nobler in the mind to suffer ",
'The slings and arrows of outrageous fortune, ',
'Or to take arms against a sea of troubles, ',
]))lines := []string{
"To be, or not to be: that is the question: ",
"Whether 'tis nobler in the mind to suffer ",
"The slings and arrows of outrageous fortune, ",
"Or to take arms against a sea of troubles, ",
}
// Create the Pipeline object and root scope.
// It's conventional to use p as the Pipeline variable and
// s as the scope variable.
p, s := beam.NewPipelineWithRoot()
// Pass the slice to beam.CreateList, to create the pcollection.
// The scope variable s is used to add the CreateList transform
// to the pipeline.
linesPCol := beam.CreateList(s, lines)function pipeline(root: beam.Root) {
const pcoll = root.apply(
beam.create([
"To be, or not to be: that is the question: ",
"Whether 'tis nobler in the mind to suffer ",
"The slings and arrows of outrageous fortune, ",
"Or to take arms against a sea of troubles, ",
])
);
}pipeline:
transforms:
- type: Create
config:
elements:
- A
- B
- ...3.2. PCollection 特性
PCollection 屬於建立它的特定 Pipeline 物件;多個管線無法共用 PCollection。在某些方面,PCollection 的功能類似於 Collection 類別。但是,PCollection 在幾個關鍵方面可能有所不同:
3.2.1. 元素類型
PCollection 的元素可以是任何類型,但必須全部屬於相同類型。但是,為了支援分散式處理,Beam 需要能夠將每個單獨的元素編碼為位元組字串(以便元素可以傳遞給分散式工作者)。Beam SDK 提供了一個資料編碼機制,其中包含常用類型的內建編碼,以及支援根據需要指定自訂編碼的功能。
3.2.2. 元素 schema
在許多情況下,PCollection 中的元素類型具有可以自省的結構。範例包括 JSON、Protocol Buffer、Avro 和資料庫記錄。結構描述提供了一種將類型表示為一組具名字段的方法,從而允許更具表現力的聚合。
3.2.3. 不可變性
PCollection 是不可變的。一旦建立,您就無法新增、移除或變更個別元素。Beam 轉換可能會處理 PCollection 的每個元素並產生新的管線資料(作為新的 PCollection),但它不會使用或修改原始的輸入集合。
注意:Beam SDK 會避免不必要的元素複製,因此
PCollection的內容在邏輯上是不可變的,而不是在物理上不可變的。對輸入元素的變更對於在同一個套件中執行的其他 DoFn 可能是可見的,並且可能會導致正確性問題。一般而言,修改提供給 DoFn 的值是不安全的。
3.2.4. 隨機存取
PCollection 不支援對個別元素的隨機存取。相反地,Beam 轉換會單獨考慮 PCollection 中的每個元素。
3.2.5. 大小和有界性
PCollection 是一個大型、不可變的元素「袋子」。PCollection 可以包含的元素數量沒有上限;任何給定的 PCollection 都可能適合單一電腦上的記憶體,或者它可能代表由持續性資料儲存區支援的非常大型的分散式資料集。
PCollection 的大小可以是 有界限的 或 無界限的。有界限的 PCollection 代表已知、固定大小的資料集,而 無界限的 PCollection 代表大小不受限制的資料集。PCollection 是有界限還是無界限取決於它所代表的資料集的來源。從批次資料來源(例如檔案或資料庫)讀取會建立有界限的 PCollection。從串流或持續更新的資料來源(例如 Pub/Sub 或 Kafka)讀取會建立無界限的 PCollection(除非您明確指示不要這樣做)。
您的 PCollection 的有界限(或無界限)性質會影響 Beam 處理資料的方式。有界限的 PCollection 可以使用批次作業來處理,批次作業可能會讀取整個資料集一次,並在有限長度的作業中執行處理。無界限的 PCollection 必須使用連續執行的串流作業來處理,因為整個集合永遠無法在任何時間點都可供處理。
Beam 使用 視窗化 將持續更新的無界限 PCollection 分割成有限大小的邏輯視窗。這些邏輯視窗由與資料元素相關聯的某些特性(例如 時間戳記)決定。聚合轉換(例如 GroupByKey 和 Combine)以每個視窗為基礎運作 — 隨著資料集的產生,它們會將每個 PCollection 處理為一系列這些有限的視窗。
3.2.6. 元素時間戳記
PCollection 中的每個元素都有一個相關聯的內在 時間戳記。每個元素的時間戳記最初是由建立 PCollection 的 Source 所指派。建立無界限 PCollection 的來源通常會為每個新元素指派一個時間戳記,該時間戳記對應於讀取或新增元素的時間。
注意:建立固定資料集有界限
PCollection的來源也會自動指派時間戳記,但最常見的行為是為每個元素指派相同的時間戳記 (Long.MIN_VALUE)。
時間戳記對於包含具有時間固有概念的元素的 PCollection 很有用。如果您的管線正在讀取事件串流(例如推文或其他社群媒體訊息),則每個元素可能會使用事件發佈的時間作為元素時間戳記。
如果來源沒有為您執行此操作,您可以手動將時間戳記指派給 PCollection 的元素。如果元素具有內在的時間戳記,但時間戳記位於元素本身的結構中(例如伺服器記錄項目中的「時間」欄位),您就會想要這樣做。Beam 具有 Transforms,它們會採用 PCollection 作為輸入並輸出一個帶有時間戳記的相同 PCollection;請參閱 新增時間戳記,以了解更多關於如何執行此操作的資訊。
4. 轉換
轉換是在您的管線中的操作,並提供通用的處理框架。您以函數物件(俗稱「使用者程式碼」)的形式提供處理邏輯,並且您的使用者程式碼會應用於輸入 PCollection 的每個元素(或多個 PCollection)。根據您選擇的管線執行器和後端,叢集中的許多不同工作者可能會並行執行您的使用者程式碼的實例。在每個工作者上執行的使用者程式碼會產生最終添加到轉換所產生的最終輸出 PCollection 的輸出元素。
當學習 Beam 的轉換時,聚合是一個需要理解的重要概念。有關聚合的簡介,請參閱 Beam 模型的基本概念 聚合章節。
Beam SDK 包含許多不同的轉換,您可以將其應用於管線的 PCollection。這些包括通用的核心轉換,例如 ParDo 或 Combine。SDK 中還包含預先撰寫的 複合轉換,它們以有用的處理模式組合一個或多個核心轉換,例如計數或組合集合中的元素。您也可以定義自己更複雜的複合轉換,以符合您的管線的確切使用案例。
如需在 Python SDK 中應用各種轉換的更深入教學,請閱讀並完成 這個 colab 筆記本。
4.1. 套用轉換
若要調用轉換,您必須將其應用到輸入 PCollection。Beam SDK 中的每個轉換都有一個通用的 apply 方法(或管道運算子 |)。調用多個 Beam 轉換類似於方法鏈,但有一個細微的差異:您將轉換應用於輸入 PCollection,將轉換本身作為參數傳遞,並且操作會傳回輸出 PCollection。array 在 YAML 中,透過列出輸入來應用轉換。這採用以下一般形式
[Output PCollection] = [Input PCollection].apply([Transform])[Output PCollection] = [Input PCollection] | [Transform][Output PCollection] := beam.ParDo(scope, [Transform], [Input PCollection])[Output PCollection] = [Input PCollection].apply([Transform])
[Output PCollection] = await [Input PCollection].applyAsync([AsyncTransform])pipeline:
transforms:
...
- name: ProducingTransform
type: ProducingTransformType
...
- name: MyTransform
type: MyTransformType
input: ProducingTransform
...如果一個轉換有多個(非錯誤)輸出,則可以透過明確給定輸出名稱來識別各種輸出。
pipeline:
  transforms:
    ...
    - name: ProducingTransform
      type: ProducingTransformType
      ...

    - name: MyTransform
      type: MyTransformType
      input: ProducingTransform.output_name
      ...

    - name: MyTransform
      type: MyTransformType
      input: ProducingTransform.another_output_name
      ...
對於線性管線,可以透過指定並將類型設定為 chain,根據轉換的排序來隱式確定輸入,進一步簡化此操作。例如
pipeline:
  type: chain
  transforms:
    - name: ProducingTransform
      type: ReadTransform
      config: ...

    - name: MyTransform
      type: MyTransformType
      config: ...

    - name: ConsumingTransform
      type: WriteTransform
      config: ...
因為 Beam 對於 PCollection 使用通用的 apply 方法,您可以按順序串連轉換,也可以應用包含其他巢狀轉換的轉換(在 Beam SDK 中稱為 複合轉換)。
建議為每個新的 PCollection 建立一個新變數,以按順序轉換輸入資料。Scope 可以用來建立包含其他轉換的函式(在 Beam SDK 中稱為 複合轉換)。
您應用管線轉換的方式決定了管線的結構。思考管線的最佳方式是將其視為有向無環圖,其中 PTransform 節點是接受 PCollection 節點作為輸入並發出 PCollection 節點作為輸出的子程式。例如,您可以將轉換串連在一起,以建立一個連續修改輸入資料的管線:例如,您可以連續呼叫 PCollection 上的轉換來修改輸入資料:
[Final Output PCollection] = [Initial Input PCollection].apply([First Transform])
.apply([Second Transform])
.apply([Third Transform])[Final Output PCollection] = ([Initial Input PCollection] | [First Transform]
| [Second Transform]
| [Third Transform])[Second PCollection] := beam.ParDo(scope, [First Transform], [Initial Input PCollection])
[Third PCollection] := beam.ParDo(scope, [Second Transform], [Second PCollection])
[Final Output PCollection] := beam.ParDo(scope, [Third Transform], [Third PCollection])[Final Output PCollection] = [Initial Input PCollection].apply([First Transform])
.apply([Second Transform])
.apply([Third Transform])此管線的圖形如下所示

圖 1:具有三個循序轉換的線性管線。
但是,請注意,轉換不會消耗或以其他方式變更輸入集合 — 請記住,根據定義,PCollection 是不可變的。這表示您可以將多個轉換應用於相同的輸入 PCollection 以建立分支管線,如下所示
[PCollection of database table rows] = [Database Table Reader].apply([Read Transform])
[PCollection of 'A' names] = [PCollection of database table rows].apply([Transform A])
[PCollection of 'B' names] = [PCollection of database table rows].apply([Transform B])[PCollection of database table rows] = [Database Table Reader] | [Read Transform]
[PCollection of 'A' names] = [PCollection of database table rows] | [Transform A]
[PCollection of 'B' names] = [PCollection of database table rows] | [Transform B][PCollection of database table rows] = beam.ParDo(scope, [Read Transform], [Database Table Reader])
[PCollection of 'A' names] = beam.ParDo(scope, [Transform A], [PCollection of database table rows])
[PCollection of 'B' names] = beam.ParDo(scope, [Transform B], [PCollection of database table rows])[PCollection of database table rows] = [Database Table Reader].apply([Read Transform])
[PCollection of 'A' names] = [PCollection of database table rows].apply([Transform A])
[PCollection of 'B' names] = [PCollection of database table rows].apply([Transform B])此分支管線的圖形如下所示

圖 2:分支管線。兩個轉換應用於單一的資料庫表格列 PCollection。
您也可以建立自己的 複合轉換,將多個轉換巢狀置於單一、較大的轉換內。複合轉換對於建立可在許多不同位置重複使用的一系列簡單步驟特別有用。
管道語法允許將 PTransform 應用於 PCollection 的 tuple 和 dict,對於那些接受多個輸入的轉換(例如 Flatten 和 CoGroupByKey)。
PTransform 也可以應用於任何 PValue,其中包括 Root 物件、PCollection、PValue 的陣列以及具有 PValue 值的物件。可以使用 beam.P 包裝它們,將轉換應用於這些複合類型,例如 beam.P({left: pcollA, right: pcollB}).apply(transformExpectingTwoPCollections)。
PTransform 有兩種形式,同步和非同步,取決於其應用是否涉及非同步調用。必須使用 applyAsync 應用 AsyncTransform,並傳回一個 Promise,該 Promise 必須在進一步的管線建構之前等待。
4.2. 核心 Beam 轉換
Beam 提供以下核心轉換,每個轉換代表不同的處理範例
ParDoGroupByKeyCoGroupByKeyCombineFlattenPartition
Typescript SDK 提供其中一些最基本的轉換,作為 PCollection 本身的方法。
4.2.1. ParDo
ParDo 是用於通用並行處理的 Beam 轉換。ParDo 處理範例類似於 Map/Shuffle/Reduce 樣式演算法的「Map」階段:ParDo 轉換會考慮輸入 PCollection 中的每個元素,對該元素執行一些處理函式(您的使用者程式碼),並將零個、一個或多個元素發送到輸出 PCollection。
ParDo 對於各種常見的資料處理操作很有用,包括
- 篩選資料集。 您可以使用
ParDo來考慮PCollection中的每個元素,並將該元素輸出到新集合或將其丟棄。 - 格式化或類型轉換資料集中的每個元素。 如果您的輸入
PCollection包含的元素類型或格式與您想要的類型或格式不同,則可以使用ParDo對每個元素執行轉換,並將結果輸出到新的PCollection。 - 擷取資料集中每個元素的部分。 例如,如果您有一個包含多個欄位的記錄
PCollection,則可以使用ParDo來剖析您只想考慮的欄位到新的PCollection中。 - 對資料集中的每個元素執行計算。 您可以使用
ParDo對PCollection的每個元素或某些元素執行簡單或複雜的計算,並將結果輸出為新的PCollection。
在這些角色中,ParDo 是管線中常見的中間步驟。您可以使用它來從一組原始輸入記錄中擷取某些欄位,或將原始輸入轉換為不同的格式;您也可以使用 ParDo 將處理過的資料轉換為適合輸出的格式,例如資料庫表格列或可列印的字串。
當您應用 ParDo 轉換時,您需要以 DoFn 物件的形式提供使用者程式碼。DoFn 是一個 Beam SDK 類別,它定義一個分散式處理函式。
在 Beam YAML 中,ParDo 操作由 MapToFields、Filter 和 Explode 轉換類型表示。這些類型可以使用您選擇的語言的 UDF,而不是引入 DoFn 的概念。有關更多詳細資訊,請參閱關於對應函式的頁面。
當您建立
DoFn的子類別時,請注意您的子類別應遵循 撰寫 Beam 轉換使用者程式碼的要求。
所有 DoFn 都應使用通用的 register.DoFnXxY[...] 函式註冊。這允許 Go SDK 從任何輸入/輸出推斷編碼,註冊 DoFn 以在遠端執行器上執行,並透過反映最佳化 DoFn 的執行階段執行。
// ComputeWordLengthFn is a DoFn that computes the word length of string elements.
type ComputeWordLengthFn struct{}

// ProcessElement computes the length of word and emits the result.
// When creating structs as a DoFn, the ProcessElement method performs the
// work of this step in the pipeline.
func (fn *ComputeWordLengthFn) ProcessElement(ctx context.Context, word string) int {
   ...
}

func init() {
  // 2 inputs and 1 output => DoFn2x1
  // Input/output types are included in order in the brackets
	register.DoFn2x1[context.Context, string, int](&ComputeWordLengthFn{})
}
4.2.1.1. 應用 ParDo
與所有 Beam 轉換一樣,您可以透過呼叫輸入 PCollection 的 apply 方法並將 ParDo 作為參數傳遞來應用 ParDo,如下面的範例程式碼所示
與所有 Beam 轉換一樣,您可以透過呼叫輸入 PCollection 上的 beam.ParDo 並將 DoFn 作為參數傳遞來應用 ParDo,如下面的範例程式碼所示
beam.ParDo 將傳入的 DoFn 參數應用於輸入 PCollection,如下面的範例程式碼所示
// The input PCollection of Strings.
PCollection<String> words = ...;

// The DoFn to perform on each element in the input PCollection.
static class ComputeWordLengthFn extends DoFn<String, Integer> { ... }

// Apply a ParDo to the PCollection "words" to compute lengths for each word.
PCollection<Integer> wordLengths = words.apply(
    ParDo
    .of(new ComputeWordLengthFn()));        // The DoFn to perform on each element, which
                                            // we define above.
# The input PCollection of Strings.
words = ...

# The DoFn to perform on each element in the input PCollection.

class ComputeWordLengthFn(beam.DoFn):
  def process(self, element):
    return [len(element)]


# Apply a ParDo to the PCollection "words" to compute lengths for each word.
word_lengths = words | beam.ParDo(ComputeWordLengthFn())
// ComputeWordLengthFn is the DoFn to perform on each element in the input PCollection.
type ComputeWordLengthFn struct{}
// ProcessElement is the method to execute for each element.
func (fn *ComputeWordLengthFn) ProcessElement(word string, emit func(int)) {
emit(len(word))
}
// DoFns must be registered with beam.
func init() {
beam.RegisterType(reflect.TypeOf((*ComputeWordLengthFn)(nil)))
// 2 inputs and 0 outputs => DoFn2x0
// 1 input => Emitter1
// Input/output types are included in order in the brackets
register.DoFn2x0[string, func(int)](&ComputeWordLengthFn{})
register.Emitter1[int]()
}
// words is an input PCollection of strings
var words beam.PCollection = ...
wordLengths := beam.ParDo(s, &ComputeWordLengthFn{}, words)# The input PCollection of Strings.
const words : PCollection<string> = ...
# The DoFn to perform on each element in the input PCollection.
function computeWordLengthFn(): beam.DoFn<string, number> {
return {
process: function* (element) {
yield element.length;
},
};
}
const result = words.apply(beam.parDo(computeWordLengthFn()));在此範例中,我們的輸入 PCollection 包含 String string 值。我們應用一個 ParDo 轉換,該轉換指定一個函式 (ComputeWordLengthFn) 來計算每個字串的長度,並將結果輸出到一個新的 PCollection,其中包含 Integer int 值,用於儲存每個字的長度。
4.2.1.2. 建立 DoFn
您傳遞給 ParDo 的 DoFn 物件包含應用於輸入集合中元素的處理邏輯。當您使用 Beam 時,您通常會撰寫的最重要的程式碼是這些 DoFn — 它們定義了您的管線的確切資料處理任務。
注意: 當您建立
DoFn時,請注意 撰寫 Beam 轉換使用者程式碼的要求,並確保您的程式碼遵循這些要求。您應該避免在DoFn.Setup中執行耗時的操作,例如讀取大型檔案。
DoFn 一次處理輸入 PCollection 中的一個元素。當您建立 DoFn 的子類別時,您需要提供與輸入和輸出元素的類型相符的類型參數。如果您的 DoFn 處理傳入的 String 元素並為輸出集合產生 Integer 元素(就像我們之前的範例 ComputeWordLengthFn 一樣),您的類別宣告會如下所示
DoFn 會一次處理來自輸入 PCollection 的一個元素。當您建立 DoFn 結構時,您需要提供與 ProcessElement 方法中輸入和輸出元素的類型相符的類型參數。如果您的 DoFn 處理傳入的 string 元素,並為輸出集合產生 int 元素(如同我們之前的範例 ComputeWordLengthFn),您的 dofn 可能會像這樣:
static class ComputeWordLengthFn extends DoFn<String, Integer> { ... }// ComputeWordLengthFn is a DoFn that computes the word length of string elements.
type ComputeWordLengthFn struct{}
// ProcessElement computes the length of word and emits the result.
// When creating structs as a DoFn, the ProcessElement method performs the
// work of this step in the pipeline.
func (fn *ComputeWordLengthFn) ProcessElement(word string, emit func(int)) {
...
}
func init() {
// 2 inputs and 0 outputs => DoFn2x0
// 1 input => Emitter1
// Input/output types are included in order in the brackets
register.Function2x0(&ComputeWordLengthFn{})
register.Emitter1[int]()
}在您的 DoFn 子類別中,您會編寫一個以 @ProcessElement 註釋的方法,您可以在其中提供實際的處理邏輯。您不需要手動從輸入集合中提取元素;Beam SDK 會為您處理。您的 @ProcessElement 方法應接受一個以 @Element 標記的參數,該參數將會被填入輸入元素。為了輸出元素,該方法也可以採用 OutputReceiver 類型的參數,該參數提供了一個發射元素的方法。參數類型必須與您的 DoFn 的輸入和輸出類型相符,否則框架會引發錯誤。注意:@Element 和 OutputReceiver 是在 Beam 2.5.0 中引入的;如果使用較早版本的 Beam,則應改用 ProcessContext 參數。
在您的 DoFn 子類別中,您會編寫一個 process 方法,您可以在其中提供實際的處理邏輯。您不需要手動從輸入集合中提取元素;Beam SDK 會為您處理。您的 process 方法應接受一個 element 引數,該引數是輸入元素,並返回一個包含其輸出值的可迭代物件。您可以透過使用 yield 陳述式發射個別元素來完成此操作,並使用 yield from 發射來自可迭代物件(例如清單或產生器)的所有元素。只要您不在同一個 process 方法中混合使用 yield 和 return 陳述式,使用具有可迭代物件的 return 陳述式也是可以接受的,因為這會導致不正確的行為。
對於您的 DoFn 類型,您會編寫一個 ProcessElement 方法,您可以在其中提供實際的處理邏輯。您不需要手動從輸入集合中提取元素;Beam SDK 會為您處理。您的 ProcessElement 方法應接受一個參數 element,該參數是輸入元素。為了輸出元素,該方法也可以採用一個函數參數,可以呼叫該參數來發射元素。參數類型必須與您的 DoFn 的輸入和輸出類型相符,否則框架會引發錯誤。
static class ComputeWordLengthFn extends DoFn<String, Integer> {
  @ProcessElement
  public void processElement(@Element String word, OutputReceiver<Integer> out) {
    // Use OutputReceiver.output to emit the output element.
    out.output(word.length());
  }
}
class ComputeWordLengthFn(beam.DoFn):
def process(self, element):
return [len(element)]// ComputeWordLengthFn is the DoFn to perform on each element in the input PCollection.
type ComputeWordLengthFn struct{}
// ProcessElement is the method to execute for each element.
func (fn *ComputeWordLengthFn) ProcessElement(word string, emit func(int)) {
emit(len(word))
}
// DoFns must be registered with beam.
func init() {
beam.RegisterType(reflect.TypeOf((*ComputeWordLengthFn)(nil)))
// 2 inputs and 0 outputs => DoFn2x0
// 1 input => Emitter1
// Input/output types are included in order in the brackets
register.DoFn2x0[string, func(int)](&ComputeWordLengthFn{})
register.Emitter1[int]()
}function computeWordLengthFn(): beam.DoFn<string, number> {
return {
process: function* (element) {
yield element.length;
},
};
}簡單的 DoFn 也可以寫成函數。
func ComputeWordLengthFn(word string, emit func(int)) { ... }

func init() {
  // 2 inputs and 0 outputs => DoFn2x0
  // 1 input => Emitter1
  // Input/output types are included in order in the brackets
  register.DoFn2x0[string, func(int)](&ComputeWordLengthFn{})
  register.Emitter1[int]()
}注意:無論是使用結構化的
DoFn類型還是函數式的DoFn,都應在init區塊中向 beam 註冊。否則它們可能無法在分散式執行器上執行。
注意:如果輸入
PCollection中的元素是鍵/值對,您可以分別使用element.getKey()或element.getValue()來存取鍵或值。
注意:如果輸入
PCollection中的元素是鍵/值對,您的處理元素方法必須有兩個參數,分別用於鍵和值。同樣地,鍵/值對也作為單個emitter function的單獨參數輸出。
給定的 DoFn 實例通常會被調用一次或多次以處理一些任意的元素捆綁。但是,Beam 不保證確切的調用次數;它可能會在給定的工作節點上多次調用,以處理故障和重試。因此,您可以在對處理方法的多次調用中快取資訊,但如果這樣做,請確保實作不依賴於調用次數。
在您的處理方法中,您還需要滿足一些不可變性要求,以確保 Beam 和處理後端可以安全地序列化和快取管道中的值。您的方法應滿足以下要求:
- 您不應以任何方式修改
@Element註釋或ProcessContext.sideInput()返回的元素(來自輸入集合的傳入元素)。 - 一旦您使用
OutputReceiver.output()輸出值,您就不應以任何方式修改該值。
- 您不應以任何方式修改提供給
process方法的element引數,或任何側輸入。 - 一旦您使用
yield或return輸出值,您就不應以任何方式修改該值。
- 您不應以任何方式修改提供給
ProcessElement方法的參數,或任何側輸入。 - 一旦您使用
emitter function輸出值,您就不應以任何方式修改該值。
4.2.1.3. 輕量級 DoFn 和其他抽象
如果您的函數相對簡單,您可以透過提供內聯的輕量級 DoFn 來簡化對 ParDo 的使用,如匿名內部類別實例 lambda 函數 匿名函數 傳遞給 PCollection.map 或 PCollection.flatMap 的函數。
以下是之前的範例,具有 ComputeLengthWordsFn 的 ParDo,其中 DoFn 指定為匿名內部類別實例 lambda 函數 匿名函數 函數
// The input PCollection.
PCollection<String> words = ...;

// Apply a ParDo with an anonymous DoFn to the PCollection words.
// Save the result as the PCollection wordLengths.
PCollection<Integer> wordLengths = words.apply(
  "ComputeWordLengths",                     // the transform name
  ParDo.of(new DoFn<String, Integer>() {    // a DoFn as an anonymous inner class instance
      @ProcessElement
      public void processElement(@Element String word, OutputReceiver<Integer> out) {
        out.output(word.length());
      }
    }));
# The input PCollection of strings.
words = ...
# Apply a lambda function to the PCollection words.
# Save the result as the PCollection word_lengths.
word_lengths = words | beam.FlatMap(lambda word: [len(word)])The Go SDK cannot support anonymous functions outside of the deprecated Go Direct runner.
// words is the input PCollection of strings
var words beam.PCollection = ...
lengths := beam.ParDo(s, func (word string, emit func(int)) {
emit(len(word))
}, words)// The input PCollection of strings.
words = ...
const result = words.flatMap((word) => [word.length]);如果您的 ParDo 執行輸入元素到輸出元素的一對一映射,也就是說,對於每個輸入元素,它會應用一個產生正好一個輸出元素的函數,您可以直接返回該元素。您可以使用更高層級的 MapElementsMap 轉換。MapElements 可以接受匿名 Java 8 lambda 函數以增加簡潔性。
以下是使用 MapElements Map直接返回的先前範例
// The input PCollection.
PCollection<String> words = ...;

// Apply a MapElements with an anonymous lambda function to the PCollection words.
// Save the result as the PCollection wordLengths.
PCollection<Integer> wordLengths = words.apply(
  MapElements.into(TypeDescriptors.integers())
             .via((String word) -> word.length()));
# The input PCollection of string.
words = ...
# Apply a Map with a lambda function to the PCollection words.
# Save the result as the PCollection word_lengths.
word_lengths = words | beam.Map(len)The Go SDK cannot support anonymous functions outside of the deprecated Go Direct runner.
func wordLengths(word string) int { return len(word) }
func init() { register.Function1x1(wordLengths) }
func applyWordLenAnon(s beam.Scope, words beam.PCollection) beam.PCollection {
return beam.ParDo(s, wordLengths, words)
}// The input PCollection of string.
words = ...
const result = words.map((word) => word.length);注意:您可以將 Java 8 lambda 函數與其他幾個 Beam 轉換一起使用,包括
Filter、FlatMapElements和Partition。
注意:匿名函數 DoFn 無法在分散式執行器上運作。建議使用具名函數,並在
init()區塊中透過register.FunctionXxY註冊它們。
4.2.1.4. DoFn 生命週期
以下是一個序列圖,顯示在執行 ParDo 轉換期間 DoFn 的生命週期。這些註解為管道開發人員提供了有用的資訊,例如適用於物件的限制或特定情況,例如故障轉移或實例重用。它們也提供了實例化的用例。需要注意的三個重點是:
- 拆解是盡力而為的,因此不保證一定會執行。
- 在執行期間建立的 DoFn 實例數量取決於執行器。
- 對於 Python SDK,管道內容(例如 DoFn 使用者程式碼)會序列化為位元組碼。因此,
DoFn不應引用不可序列化的物件,例如鎖定。若要管理同一進程中多個DoFn實例的單個物件實例,請使用shared.py 模組中的公用程式。

4.2.2. GroupByKey
GroupByKey 是一個用於處理鍵/值對集合的 Beam 轉換。它是一個並行縮減操作,類似於 Map/Shuffle/Reduce 樣式演算法的 Shuffle 階段。GroupByKey 的輸入是一個鍵/值對集合,表示一個多重對應,其中集合包含多個具有相同鍵但不同值的配對。給定這樣一個集合,您可以使用 GroupByKey 來收集與每個唯一鍵關聯的所有值。
GroupByKey 是一種聚合具有共同點的資料的好方法。例如,如果您有一個儲存客戶訂單記錄的集合,您可能想要將來自同一郵遞區號的所有訂單分組在一起(其中鍵/值對的「鍵」是郵遞區號欄位,而「值」是記錄的其餘部分)。
讓我們使用一個簡單的範例案例來檢視 GroupByKey 的機制,其中我們的資料集由文字檔中的單字以及它們出現的行號組成。我們想要將共用相同單字(鍵)的所有行號(值)分組在一起,讓我們可以看到特定單字在文字中出現的所有位置。
我們的輸入是一個鍵/值對的 PCollection,其中每個單字都是一個鍵,而值是單字出現在檔案中的行號。以下是輸入集合中鍵/值對的清單:
cat, 1
dog, 5
and, 1
jump, 3
tree, 2
cat, 5
dog, 2
and, 2
cat, 9
and, 6
...
GroupByKey 會收集所有具有相同鍵的值,並輸出一個新的配對,其中包含唯一的鍵以及輸入集合中與該鍵關聯的所有值的集合。如果我們將 GroupByKey 應用於上面的輸入集合,則輸出集合將如下所示:
cat, [1,5,9]
dog, [5,2]
and, [1,2,6]
jump, [3]
tree, [2]
...
因此,GroupByKey 表示從多重對應(多個鍵對應到個別值)到單一對應(唯一鍵對應到值的集合)的轉換。
使用 GroupByKey 很簡單:
雖然所有 SDK 都有 GroupByKey 轉換,但使用 GroupBy 通常更自然。GroupBy 轉換可以透過屬性的名稱(用於分組 PCollection 的元素)或以每個元素作為輸入的函數(將其對應到執行分組的鍵)來進行參數化。
// The input PCollection.
 PCollection<KV<String, String>> mapped = ...;

// Apply GroupByKey to the PCollection mapped.
// Save the result as the PCollection reduced.
PCollection<KV<String, Iterable<String>>> reduced =
 mapped.apply(GroupByKey.<String, String>create());
# The input PCollection of (`string`, `int`) tuples.
words_and_counts = ...
grouped_words = words_and_counts | beam.GroupByKey()// CreateAndSplit creates and returns a PCollection with <K,V>
// from an input slice of stringPair (struct with K, V string fields).
pairs := CreateAndSplit(s, input)
keyed := beam.GroupByKey(s, pairs)// A PCollection of elements like
// {word: "cat", score: 1}, {word: "dog", score: 5}, {word: "cat", score: 5}, ...
const scores : PCollection<{word: string, score: number}> = ...
// This will produce a PCollection with elements like
// {key: "cat", value: [{ word: "cat", score: 1 },
// { word: "cat", score: 5 }, ...]}
// {key: "dog", value: [{ word: "dog", score: 5 }, ...]}
const grouped_by_word = scores.apply(beam.groupBy("word"));
// This will produce a PCollection with elements like
// {key: 3, value: [{ word: "cat", score: 1 },
// { word: "dog", score: 5 },
// { word: "cat", score: 5 }, ...]}
const by_word_length = scores.apply(beam.groupBy((x) => x.word.length));type: Combine
config:
group_by: animal
combine:
weight: group4.2.2.1 GroupByKey 和無界 PCollection
如果您使用的是無邊界的 PCollection,您必須使用非全域視窗化或聚合觸發器,才能執行 GroupByKey 或 CoGroupByKey。這是因為有邊界的 GroupByKey 或 CoGroupByKey 必須等待收集具有特定鍵的所有資料,但對於無邊界的集合,資料是無限的。視窗化和/或觸發器允許分組在無邊界資料串流中的邏輯、有限資料捆綁包上運作。
如果您將 GroupByKey 或 CoGroupByKey 應用於一組無邊界的 PCollection,而沒有為每個集合設定非全域視窗化策略、觸發策略或兩者,Beam 會在管道建構時產生 IllegalStateException 錯誤。
當使用 GroupByKey 或 CoGroupByKey 來分組已套用視窗化策略的 PCollection 時,您要分組的所有 PCollection必須使用相同的視窗化策略和視窗大小。例如,您要合併的所有集合必須使用(假設)相同的 5 分鐘固定視窗,或每 30 秒開始的 4 分鐘滑動視窗。
如果您的管道嘗試使用 GroupByKey 或 CoGroupByKey 合併具有不相容視窗的 PCollection,Beam 會在管道建構時產生 IllegalStateException 錯誤。
4.2.3. CoGroupByKey
CoGroupByKey 會對具有相同鍵類型的兩個或多個鍵/值 PCollection 執行關係聯結。設計您的管道顯示一個使用聯結的範例管道。
如果您有多個資料集提供有關相關事物的信息,請考慮使用 CoGroupByKey。例如,假設您有兩個不同的使用者資料檔案:一個檔案包含姓名和電子郵件地址;另一個檔案包含姓名和電話號碼。您可以使用使用者名稱作為通用鍵,其他資料作為關聯值,來聯結這兩個資料集。聯結後,您將擁有一個資料集,其中包含與每個名稱相關的所有資訊(電子郵件地址和電話號碼)。
也可以考慮使用 SqlTransform 執行聯結。
如果您使用的是無邊界的 PCollection,您必須使用非全域視窗化或聚合觸發器,才能執行 CoGroupByKey。如需更多詳細資訊,請參閱GroupByKey 和無邊界的 PCollection。
在 Java 的 Beam SDK 中,CoGroupByKey 接受鍵值 PCollection (PCollection<KV<K, V>>) 的 Tuple 作為輸入。為了類型安全,SDK 要求您將每個 PCollection 作為 KeyedPCollectionTuple 的一部分傳遞。您必須為要傳遞給 CoGroupByKey 的 KeyedPCollectionTuple 中的每個輸入 PCollection 宣告一個 TupleTag。作為輸出,CoGroupByKey 會傳回 PCollection<KV<K, CoGbkResult>>,它會根據它們的通用鍵分組來自所有輸入 PCollection 的值。每個鍵(所有鍵的類型都是 K)都會有一個不同的 CoGbkResult,它是從 TupleTag<T> 到 Iterable<T> 的對應。您可以使用您在初始集合中提供的 TupleTag 來存取 CoGbkResult 物件中的特定集合。
在 Python 的 Beam SDK 中,CoGroupByKey 接受鍵值 PCollection 的字典作為輸入。作為輸出,CoGroupByKey 會建立一個單一的輸出 PCollection,其中包含輸入 PCollection 中每個鍵的一個鍵/值 Tuple。每個鍵的值是一個字典,它將每個標籤對應到相應 PCollection 中該鍵下的值的可迭代物件。
在 Beam Go SDK 中,CoGroupByKey 接受任意數量的 PCollection 作為輸入。作為輸出,CoGroupByKey 會建立一個單一的輸出 PCollection,它將每個鍵與每個輸入 PCollection 的值迭代器函式分組。迭代器函式會按照它們提供給 CoGroupByKey 的相同順序對應到輸入 PCollection。
以下概念範例使用兩個輸入集合來顯示 CoGroupByKey 的機制。
第一組資料有一個名為 emailsTag 的 TupleTag<String>,包含姓名和電子郵件地址。第二組資料有一個名為 phonesTag 的 TupleTag<String>,包含姓名和電話號碼。
第一組資料包含姓名和電子郵件地址。第二組資料包含姓名和電話號碼。
final List<KV<String, String>> emailsList =
    Arrays.asList(
        KV.of("amy", "amy@example.com"),
        KV.of("carl", "carl@example.com"),
        KV.of("julia", "julia@example.com"),
        KV.of("carl", "carl@email.com"));

final List<KV<String, String>> phonesList =
    Arrays.asList(
        KV.of("amy", "111-222-3333"),
        KV.of("james", "222-333-4444"),
        KV.of("amy", "333-444-5555"),
        KV.of("carl", "444-555-6666"));

PCollection<KV<String, String>> emails = p.apply("CreateEmails", Create.of(emailsList));
PCollection<KV<String, String>> phones = p.apply("CreatePhones", Create.of(phonesList));
emails_list = [
('amy', 'amy@example.com'),
('carl', 'carl@example.com'),
('julia', 'julia@example.com'),
('carl', 'carl@email.com'),
]
phones_list = [
('amy', '111-222-3333'),
('james', '222-333-4444'),
('amy', '333-444-5555'),
('carl', '444-555-6666'),
]
emails = p | 'CreateEmails' >> beam.Create(emails_list)
phones = p | 'CreatePhones' >> beam.Create(phones_list)type stringPair struct {
K, V string
}
func splitStringPair(e stringPair) (string, string) {
return e.K, e.V
}
func init() {
// Register DoFn.
register.Function1x2(splitStringPair)
}
// CreateAndSplit is a helper function that creates
func CreateAndSplit(s beam.Scope, input []stringPair) beam.PCollection {
initial := beam.CreateList(s, input)
return beam.ParDo(s, splitStringPair, initial)
}
var emailSlice = []stringPair{
{"amy", "amy@example.com"},
{"carl", "carl@example.com"},
{"julia", "julia@example.com"},
{"carl", "carl@email.com"},
}
var phoneSlice = []stringPair{
{"amy", "111-222-3333"},
{"james", "222-333-4444"},
{"amy", "333-444-5555"},
{"carl", "444-555-6666"},
}
emails := CreateAndSplit(s.Scope("CreateEmails"), emailSlice)
phones := CreateAndSplit(s.Scope("CreatePhones"), phoneSlice)const emails_list = [
{ name: "amy", email: "amy@example.com" },
{ name: "carl", email: "carl@example.com" },
{ name: "julia", email: "julia@example.com" },
{ name: "carl", email: "carl@email.com" },
];
const phones_list = [
{ name: "amy", phone: "111-222-3333" },
{ name: "james", phone: "222-333-4444" },
{ name: "amy", phone: "333-444-5555" },
{ name: "carl", phone: "444-555-6666" },
];
const emails = root.apply(
beam.withName("createEmails", beam.create(emails_list))
);
const phones = root.apply(
beam.withName("createPhones", beam.create(phones_list))
);- type: Create
name: CreateEmails
config:
elements:
- { name: "amy", email: "amy@example.com" }
- { name: "carl", email: "carl@example.com" }
- { name: "julia", email: "julia@example.com" }
- { name: "carl", email: "carl@email.com" }
- type: Create
name: CreatePhones
config:
elements:
- { name: "amy", phone: "111-222-3333" }
- { name: "james", phone: "222-333-4444" }
- { name: "amy", phone: "333-444-5555" }
- { name: "carl", phone: "444-555-6666" }在 CoGroupByKey 之後,產生的資料包含來自任何輸入集合的每個唯一鍵的所有關聯資料。
final TupleTag<String> emailsTag = new TupleTag<>();
final TupleTag<String> phonesTag = new TupleTag<>();

final List<KV<String, CoGbkResult>> expectedResults =
    Arrays.asList(
        KV.of(
            "amy",
            CoGbkResult.of(emailsTag, Arrays.asList("amy@example.com"))
                .and(phonesTag, Arrays.asList("111-222-3333", "333-444-5555"))),
        KV.of(
            "carl",
            CoGbkResult.of(emailsTag, Arrays.asList("carl@email.com", "carl@example.com"))
                .and(phonesTag, Arrays.asList("444-555-6666"))),
        KV.of(
            "james",
            CoGbkResult.of(emailsTag, Arrays.asList())
                .and(phonesTag, Arrays.asList("222-333-4444"))),
        KV.of(
            "julia",
            CoGbkResult.of(emailsTag, Arrays.asList("julia@example.com"))
                .and(phonesTag, Arrays.asList())));
results = [
(
'amy',
{
'emails': ['amy@example.com'],
'phones': ['111-222-3333', '333-444-5555']
}),
(
'carl',
{
'emails': ['carl@email.com', 'carl@example.com'],
'phones': ['444-555-6666']
}),
('james', {
'emails': [], 'phones': ['222-333-4444']
}),
('julia', {
'emails': ['julia@example.com'], 'phones': []
}),
]results := beam.CoGroupByKey(s, emails, phones)
contactLines := beam.ParDo(s, formatCoGBKResults, results)
// Synthetic example results of a cogbk.
results := []struct {
Key string
Emails, Phones []string
}{
{
Key: "amy",
Emails: []string{"amy@example.com"},
Phones: []string{"111-222-3333", "333-444-5555"},
}, {
Key: "carl",
Emails: []string{"carl@email.com", "carl@example.com"},
Phones: []string{"444-555-6666"},
}, {
Key: "james",
Emails: []string{},
Phones: []string{"222-333-4444"},
}, {
Key: "julia",
Emails: []string{"julia@example.com"},
Phones: []string{},
},
}const results = [
{
name: "amy",
values: {
emails: [{ name: "amy", email: "amy@example.com" }],
phones: [
{ name: "amy", phone: "111-222-3333" },
{ name: "amy", phone: "333-444-5555" },
],
},
},
{
name: "carl",
values: {
emails: [
{ name: "carl", email: "carl@example.com" },
{ name: "carl", email: "carl@email.com" },
],
phones: [{ name: "carl", phone: "444-555-6666" }],
},
},
{
name: "james",
values: {
emails: [],
phones: [{ name: "james", phone: "222-333-4444" }],
},
},
{
name: "julia",
values: {
emails: [{ name: "julia", email: "julia@example.com" }],
phones: [],
},
},
];以下程式碼範例使用 CoGroupByKey 聯結兩個 PCollection,然後使用 ParDo 來使用結果。然後,程式碼會使用標籤來查找和格式化來自每個集合的資料。
以下程式碼範例使用 CoGroupByKey 聯結兩個 PCollection,然後使用 ParDo 來使用結果。DoFn 迭代器參數的順序對應到 CoGroupByKey 輸入的順序。
PCollection<KV<String, CoGbkResult>> results =
    KeyedPCollectionTuple.of(emailsTag, emails)
        .and(phonesTag, phones)
        .apply(CoGroupByKey.create());

PCollection<String> contactLines =
    results.apply(
        ParDo.of(
            new DoFn<KV<String, CoGbkResult>, String>() {
              @ProcessElement
              public void processElement(ProcessContext c) {
                KV<String, CoGbkResult> e = c.element();
                String name = e.getKey();
                Iterable<String> emailsIter = e.getValue().getAll(emailsTag);
                Iterable<String> phonesIter = e.getValue().getAll(phonesTag);
                String formattedResult =
                    Snippets.formatCoGbkResults(name, emailsIter, phonesIter);
                c.output(formattedResult);
              }
            }));
# The result PCollection contains one key-value element for each key in the
# input PCollections. The key of the pair will be the key from the input and
# the value will be a dictionary with two entries: 'emails' - an iterable of
# all values for the current key in the emails PCollection and 'phones': an
# iterable of all values for the current key in the phones PCollection.
results = ({'emails': emails, 'phones': phones} | beam.CoGroupByKey())
def join_info(name_info):
(name, info) = name_info
return '%s; %s; %s' %\
(name, sorted(info['emails']), sorted(info['phones']))
contact_lines = results | beam.Map(join_info)func formatCoGBKResults(key string, emailIter, phoneIter func(*string) bool) string {
var s string
var emails, phones []string
for emailIter(&s) {
emails = append(emails, s)
}
for phoneIter(&s) {
phones = append(phones, s)
}
// Values have no guaranteed order, sort for deterministic output.
sort.Strings(emails)
sort.Strings(phones)
return fmt.Sprintf("%s; %s; %s", key, formatStringIter(emails), formatStringIter(phones))
}
func init() {
register.Function3x1(formatCoGBKResults)
// 1 input of type string => Iter1[string]
register.Iter1[string]()
}
// Synthetic example results of a cogbk.
results := []struct {
Key string
Emails, Phones []string
}{
{
Key: "amy",
Emails: []string{"amy@example.com"},
Phones: []string{"111-222-3333", "333-444-5555"},
}, {
Key: "carl",
Emails: []string{"carl@email.com", "carl@example.com"},
Phones: []string{"444-555-6666"},
}, {
Key: "james",
Emails: []string{},
Phones: []string{"222-333-4444"},
}, {
Key: "julia",
Emails: []string{"julia@example.com"},
Phones: []string{},
},
}const formatted_results_pcoll = beam
.P({ emails, phones })
.apply(beam.coGroupBy("name"))
.map(function formatResults({ key, values }) {
const emails = values.emails.map((x) => x.email).sort();
const phones = values.phones.map((x) => x.phone).sort();
return `${key}; [${emails}]; [${phones}]`;
});- type: MapToFields
name: PrepareEmails
input: CreateEmails
config:
language: python
fields:
name: name
email: "[email]"
phone: "[]"
- type: MapToFields
name: PreparePhones
input: CreatePhones
config:
language: python
fields:
name: name
email: "[]"
phone: "[phone]"
- type: Combine
name: CoGropuBy
input: [PrepareEmails, PreparePhones]
config:
group_by: [name]
combine:
email: concat
phone: concat
- type: MapToFields
name: FormatResults
input: CoGropuBy
config:
language: python
fields:
formatted:
"'%s; %s; %s' % (name, sorted(email), sorted(phone))"格式化的資料如下所示
final List<String> formattedResults =
    Arrays.asList(
        "amy; ['amy@example.com']; ['111-222-3333', '333-444-5555']",
        "carl; ['carl@email.com', 'carl@example.com']; ['444-555-6666']",
        "james; []; ['222-333-4444']",
        "julia; ['julia@example.com']; []");
formatted_results = [
"amy; ['amy@example.com']; ['111-222-3333', '333-444-5555']",
"carl; ['carl@email.com', 'carl@example.com']; ['444-555-6666']",
"james; []; ['222-333-4444']",
"julia; ['julia@example.com']; []",
]formattedResults := []string{
"amy; ['amy@example.com']; ['111-222-3333', '333-444-5555']",
"carl; ['carl@email.com', 'carl@example.com']; ['444-555-6666']",
"james; []; ['222-333-4444']",
"julia; ['julia@example.com']; []",
}const formatted_results = [
"amy; [amy@example.com]; [111-222-3333,333-444-5555]",
"carl; [carl@email.com,carl@example.com]; [444-555-6666]",
"james; []; [222-333-4444]",
"julia; [julia@example.com]; []",
];"amy; ['amy@example.com']; ['111-222-3333', '333-444-5555']",
"carl; ['carl@email.com', 'carl@example.com']; ['444-555-6666']",
"james; []; ['222-333-4444']",
"julia; ['julia@example.com']; []",4.2.4. Combine
Combine Combine Combine Combine 是一個 Beam 轉換,用於合併資料中的元素或值集合。Combine 有在整個 PCollection 上運作的變體,以及一些合併鍵值對 PCollection 中每個鍵的值的變體。
當您應用 Combine 轉換時,您必須提供包含合併元素或值邏輯的函式。合併函式應為可交換和可結合的,因為不一定會在給定鍵的所有值上確切呼叫該函式一次。由於輸入資料(包括值集合)可能會分散在多個工作者之間,因此可能會多次呼叫合併函式,以對值集合的子集執行部分合併。Beam SDK 也為常見的數值合併運算(例如總和、最小值和最大值)提供了一些預先建立的合併函式。
簡單的合併運算(例如總和)通常可以實作為一個簡單的函式。更複雜的合併運算可能需要您建立 CombineFn 的子類別,其累積類型與輸入/輸出類型不同。
CombineFn 的可結合性和可交換性允許執行器自動應用一些最佳化
- 合併器提升:這是最重要的最佳化。輸入元素會在被隨機播放之前按鍵和視窗合併,因此隨機播放的資料量可能會減少許多數量級。此最佳化的另一個術語是「映射器端合併」。
- 增量合併:當您的
CombineFn大幅縮減資料大小時,在元素從串流隨機播放中出現時合併它們會很有用。這會分散在串流計算可能處於閒置狀態的時間內進行合併的成本。增量合併也會減少中間累加器的儲存空間。
4.2.4.1. 使用簡單函式的簡單合併
Beam YAML 具有以下內建的 CombineFn:count、sum、min、max、mean、any、all、group 和 concat。也可以參照其他語言的 CombineFn,如(關於聚合的完整文件)[https://beam.dev.org.tw/documentation/sdks/yaml-combine/]中所述。以下範例程式碼顯示一個簡單的合併函式。合併是透過使用 `combining` 方法修改分組轉換來完成的。此方法採用三個參數:要合併的值(作為輸入元素的具名屬性,或整個輸入的函式)、合併運算(二元函式或 `CombineFn`),以及最終輸出物件中合併值的名稱。// Sum a collection of Integer values. The function SumInts implements the interface SerializableFunction.
public static class SumInts implements SerializableFunction<Iterable<Integer>, Integer> {
@Override
public Integer apply(Iterable<Integer> input) {
int sum = 0;
for (int item : input) {
sum += item;
}
return sum;
}
}pc = [1, 10, 100, 1000]
def bounded_sum(values, bound=500):
return min(sum(values), bound)
small_sum = pc | beam.CombineGlobally(bounded_sum) # [500]
large_sum = pc | beam.CombineGlobally(bounded_sum, bound=5000) # [1111]func sumInts(a, v int) int {
return a + v
}
func init() {
register.Function2x1(sumInts)
}
func globallySumInts(s beam.Scope, ints beam.PCollection) beam.PCollection {
return beam.Combine(s, sumInts, ints)
}
type boundedSum struct {
Bound int
}
func (fn *boundedSum) MergeAccumulators(a, v int) int {
sum := a + v
if fn.Bound > 0 && sum > fn.Bound {
return fn.Bound
}
return sum
}
func init() {
register.Combiner1[int](&boundedSum{})
}
func globallyBoundedSumInts(s beam.Scope, bound int, ints beam.PCollection) beam.PCollection {
return beam.Combine(s, &boundedSum{Bound: bound}, ints)
}const pcoll = root.apply(beam.create([1, 10, 100, 1000]));
const result = pcoll.apply(
beam
.groupGlobally()
.combining((c) => c, (x, y) => x + y, "sum")
.combining((c) => c, (x, y) => x * y, "product")
);
const expected = { sum: 1111, product: 1000000 }type: Combine
config:
language: python
group_by: animal
combine:
biggest:
fn:
type: 'apache_beam.transforms.combiners.TopCombineFn'
config:
n: 2
value: weight所有合併器都應使用泛型 register.CombinerX[...] 函式註冊。這允許 Go SDK 從任何輸入/輸出推斷編碼,註冊合併器以在遠端執行器上執行,並透過反射最佳化合併器的執行階段執行。
當您的累加器、輸入和輸出都是同一類型時,應使用 Combiner1。可以使用 register.Combiner1[T](&CustomCombiner{}) 呼叫它,其中 T 是輸入/累加器/輸出的類型。
當您的累加器、輸入和輸出是 2 種不同的類型時,應使用 Combiner2。可以使用 register.Combiner2[T1, T2](&CustomCombiner{}) 呼叫它,其中 T1 是累加器的類型,而 T2 是其他類型。
當您的累加器、輸入和輸出是 3 種不同的類型時,應使用 Combiner3。可以使用 register.Combiner3[T1, T2, T3](&CustomCombiner{}) 呼叫它,其中 T1 是累加器的類型,T2 是輸入的類型,而 T3 是輸出的類型。
4.2.4.2. 使用 CombineFn 的進階合併
對於更複雜的合併函式,您可以定義 CombineFn 的子類別。如果合併函式需要更複雜的累加器、必須執行其他前處理或後處理、可能會變更輸出類型或考慮鍵,則應使用 CombineFn。
一般合併運算包含五個運算。當您建立 CombineFn 的子類別時,您必須透過覆寫對應的方法來提供五個運算。只有 MergeAccumulators 是必要的方法。其他方法將根據累加器類型具有預設的解釋。生命週期方法是
建立累加器 建立一個新的「本機」累加器。在範例案例中,取平均值,本機累加器會追蹤值的執行總和(最終平均除法的分子值)和目前加總的值數(分母值)。它可能會以分散式方式被呼叫任意次數。
新增輸入 將輸入元素新增至累加器,並傳回累加器值。在我們的範例中,它會更新總和並增加計數。它也可以平行調用。
合併累加器 將多個累加器合併到單一累加器中;這是在最終計算之前合併多個累加器中的資料的方式。在計算平均值的情況下,代表除法每個部分的累加器會合併在一起。它可能會再次在其輸出上被呼叫任意次數。
擷取輸出 執行最終計算。在計算平均值的情況下,這表示將所有值的合併總和除以加總的值數。它會在最終、合併的累加器上被呼叫一次。
Compact 會回傳累加器的更精簡表示法。此方法會在累加器透過網路傳送之前呼叫,在將值緩衝或以其他方式延遲處理並加入累加器的情況下,會非常實用。Compact 應回傳一個等效的累加器(可能經過修改)。在大多數情況下,Compact 並非必要。如需使用 Compact 的實際範例,請參閱 Python SDK 中 TopCombineFn 的實作。
以下範例程式碼示範如何定義一個計算平均值的 CombineFn
public class AverageFn extends CombineFn<Integer, AverageFn.Accum, Double> {
  public static class Accum {
    int sum = 0;
    int count = 0;
  }

  @Override
  public Accum createAccumulator() { return new Accum(); }

  @Override
  public Accum addInput(Accum accum, Integer input) {
      accum.sum += input;
      accum.count++;
      return accum;
  }

  @Override
  public Accum mergeAccumulators(Iterable<Accum> accums) {
    Accum merged = createAccumulator();
    for (Accum accum : accums) {
      merged.sum += accum.sum;
      merged.count += accum.count;
    }
    return merged;
  }

  @Override
  public Double extractOutput(Accum accum) {
    return ((double) accum.sum) / accum.count;
  }

  // No-op
  @Override
  public Accum compact(Accum accum) { return accum; }
}
pc = ...
class AverageFn(beam.CombineFn):
def create_accumulator(self):
return (0.0, 0)
def add_input(self, sum_count, input):
(sum, count) = sum_count
return sum + input, count + 1
def merge_accumulators(self, accumulators):
sums, counts = zip(*accumulators)
return sum(sums), sum(counts)
def extract_output(self, sum_count):
(sum, count) = sum_count
return sum / count if count else float('NaN')
def compact(self, accumulator):
# No-op
return accumulatortype averageFn struct{}
type averageAccum struct {
Count, Sum int
}
func (fn *averageFn) CreateAccumulator() averageAccum {
return averageAccum{0, 0}
}
func (fn *averageFn) AddInput(a averageAccum, v int) averageAccum {
return averageAccum{Count: a.Count + 1, Sum: a.Sum + v}
}
func (fn *averageFn) MergeAccumulators(a, v averageAccum) averageAccum {
return averageAccum{Count: a.Count + v.Count, Sum: a.Sum + v.Sum}
}
func (fn *averageFn) ExtractOutput(a averageAccum) float64 {
if a.Count == 0 {
return math.NaN()
}
return float64(a.Sum) / float64(a.Count)
}
func (fn *averageFn) Compact(a averageAccum) averageAccum {
// No-op
return a
}
func init() {
register.Combiner3[averageAccum, int, float64](&averageFn{})
}const meanCombineFn: beam.CombineFn<number, [number, number], number> =
{
createAccumulator: () => [0, 0],
addInput: ([sum, count]: [number, number], i: number) => [
sum + i,
count + 1,
],
mergeAccumulators: (accumulators: [number, number][]) =>
accumulators.reduce(([sum0, count0], [sum1, count1]) => [
sum0 + sum1,
count0 + count1,
]),
extractOutput: ([sum, count]: [number, number]) => sum / count,
};4.2.4.3. 將 PCollection 合併為單一值
使用全域合併將給定 PCollection 中的所有元素轉換為單一值,並在您的管線中表示為包含一個元素的新 PCollection。以下範例程式碼示範如何套用 Beam 提供的總和合併函數,為整數的 PCollection 產生單一總和值。
// Sum.SumIntegerFn() combines the elements in the input PCollection. The resulting PCollection, called sum,
// contains one value: the sum of all the elements in the input PCollection.
PCollection<Integer> pc = ...;
PCollection<Integer> sum = pc.apply(
   Combine.globally(new Sum.SumIntegerFn()));
# sum combines the elements in the input PCollection.
# The resulting PCollection, called result, contains one value: the sum of all
# the elements in the input PCollection.
pc = ...
average = pc | beam.CombineGlobally(AverageFn())average := beam.Combine(s, &averageFn{}, ints)const pcoll = root.apply(beam.create([4, 5, 6]));
const result = pcoll.apply(
beam.groupGlobally().combining((c) => c, meanCombineFn, "mean")
);type: Combine
config:
group_by: []
combine:
weight: sum4.2.4.4. 合併和全域視窗化
如果您的輸入 PCollection 使用預設的全域視窗化,則預設行為是回傳一個包含一個項目的 PCollection。該項目的值來自您在套用 Combine 時指定的合併函數中的累加器。例如,Beam 提供的總和合併函數會回傳零值(空輸入的總和),而最小值合併函數會回傳最大值或無限值。
若要讓 Combine 在輸入為空時改為回傳空的 PCollection,請在套用 Combine 轉換時指定 .withoutDefaults,如下列程式碼範例所示
PCollection<Integer> pc = ...;
PCollection<Integer> sum = pc.apply(
  Combine.globally(new Sum.SumIntegerFn()).withoutDefaults());
pc = ...
sum = pc | beam.CombineGlobally(sum).without_defaults()func returnSideOrDefault(d float64, iter func(*float64) bool) float64 {
var c float64
if iter(&c) {
// Side input has a value, so return it.
return c
}
// Otherwise, return the default
return d
}
func init() { register.Function2x1(returnSideOrDefault) }
func globallyAverageWithDefault(s beam.Scope, ints beam.PCollection) beam.PCollection {
// Setting combine defaults has requires no helper function in the Go SDK.
average := beam.Combine(s, &averageFn{}, ints)
// To add a default value:
defaultValue := beam.Create(s, float64(0))
return beam.ParDo(s, returnSideOrDefault, defaultValue, beam.SideInput{Input: average})
}const pcoll = root.apply(
beam.create([
{ player: "alice", accuracy: 1.0 },
{ player: "bob", accuracy: 0.99 },
{ player: "eve", accuracy: 0.5 },
{ player: "eve", accuracy: 0.25 },
])
);
const result = pcoll.apply(
beam
.groupGlobally()
.combining("accuracy", combiners.mean, "mean")
.combining("accuracy", combiners.max, "max")
);
const expected = [{ max: 1.0, mean: 0.685 }];4.2.4.5. 合併和非全域視窗化
如果您的 PCollection 使用任何非全域視窗化函數,Beam 不會提供預設行為。您必須在套用 Combine 時指定下列其中一個選項
- 指定
.withoutDefaults,其中輸入PCollection中為空的視窗,在輸出集合中也會為空。 - 指定
.asSingletonView,其中輸出會立即轉換為PCollectionView,當用作側邊輸入時,會為每個空的視窗提供預設值。通常只有在您管線的Combine結果要在稍後的管線中用作側邊輸入時,才需要使用此選項。
如果您的 PCollection 使用任何非全域視窗化函數,Beam Go SDK 的行為方式與全域視窗化相同。輸入 PCollection 中為空的視窗,在輸出集合中也會為空。
4.2.4.6. 合併帶鍵 PCollection 中的值
在建立帶鍵 PCollection(例如,使用 GroupByKey 轉換)之後,常見的模式是將與每個鍵相關聯的值集合合併為單一合併值。參考先前來自 GroupByKey 的範例,一個名為 groupedWords 的鍵分組 PCollection 看起來像這樣
  cat, [1,5,9]
  dog, [5,2]
  and, [1,2,6]
  jump, [3]
  tree, [2]
  ...
在上述 PCollection 中,每個元素都有一個字串鍵(例如「cat」)和一個整數的可迭代值(在第一個元素中,包含 [1, 5, 9])。如果我們管線的下一個處理步驟合併值(而不是單獨考慮它們),您可以合併整數的可迭代值,以建立要與每個鍵配對的單一合併值。這種 GroupByKey 後接合併值集合的模式等同於 Beam 的 Combine PerKey 轉換。您提供給 Combine PerKey 的合併函數必須是關聯歸納函數或 CombineFn 的 子類別。
// PCollection is grouped by key and the Double values associated with each key are combined into a Double.
PCollection<KV<String, Double>> salesRecords = ...;
PCollection<KV<String, Double>> totalSalesPerPerson =
  salesRecords.apply(Combine.<String, Double, Double>perKey(
    new Sum.SumDoubleFn()));

// The combined value is of a different type than the original collection of values per key. PCollection has
// keys of type String and values of type Integer, and the combined value is a Double.
PCollection<KV<String, Integer>> playerAccuracy = ...;
PCollection<KV<String, Double>> avgAccuracyPerPlayer =
  playerAccuracy.apply(Combine.<String, Integer, Double>perKey(
    new MeanInts())));
# PCollection is grouped by key and the numeric values associated with each key
# are averaged into a float.
player_accuracies = ...
avg_accuracy_per_player = (
player_accuracies
| beam.CombinePerKey(beam.combiners.MeanCombineFn()))// PCollection is grouped by key and the numeric values associated with each key
// are averaged into a float64.
playerAccuracies := ... // PCollection<string,int>
avgAccuracyPerPlayer := stats.MeanPerKey(s, playerAccuracies)
// avgAccuracyPerPlayer is a PCollection<string,float64>
const pcoll = root.apply(
  beam.create([
    { player: "alice", accuracy: 1.0 },
    { player: "bob", accuracy: 0.99 },
    { player: "eve", accuracy: 0.5 },
    { player: "eve", accuracy: 0.25 },
  ])
);
const result = pcoll.apply(
  beam
    .groupBy("player")
    .combining("accuracy", combiners.mean, "mean")
    .combining("accuracy", combiners.max, "max")
);
const expected = [
  { player: "alice", mean: 1.0, max: 1.0 },
  { player: "bob", mean: 0.99, max: 0.99 },
  { player: "eve", mean: 0.375, max: 0.5 },
];type: Combine
config:
group_by: [animal]
combine:
total_weight:
fn: sum
value: weight
average_weight:
fn: mean
value: weight4.2.5. Flatten
Flatten Flatten Flatten Flatten 是 Beam 用於儲存相同資料類型之 PCollection 物件的轉換。Flatten 會將多個 PCollection 物件合併為單一邏輯 PCollection。
以下範例示範如何套用 Flatten 轉換以合併多個 PCollection 物件。
// Flatten takes a PCollectionList of PCollection objects of a given type.
// Returns a single PCollection that contains all of the elements in the PCollection objects in that list.
PCollection<String> pc1 = ...;
PCollection<String> pc2 = ...;
PCollection<String> pc3 = ...;
PCollectionList<String> collections = PCollectionList.of(pc1).and(pc2).and(pc3);

PCollection<String> merged = collections.apply(Flatten.<String>pCollections());
也可以使用 FlattenWith 轉換,以更相容於鏈結的方式將 PCollections 合併到輸出 PCollection 中。
PCollection<String> merged = pc1
    .apply(...)
    // Merges the elements of pc2 in at this point...
    .apply(FlattenWith.of(pc2))
    .apply(...)
    // and the elements of pc3 at this point.
    .apply(FlattenWith.of(pc3))
    .apply(...);
# Flatten takes a tuple of PCollection objects.
# Returns a single PCollection that contains all of the elements in the PCollection objects in that tuple.
merged = (
(pcoll1, pcoll2, pcoll3)
# A list of tuples can be "piped" directly into a Flatten transform.
| beam.Flatten())也可以使用 FlattenWith 轉換,以更相容於鏈結的方式將 PCollections 合併到輸出 PCollection 中。
merged = (
    pcoll1
    | SomeTransform()
    | beam.FlattenWith(pcoll2, pcoll3)
    | SomeOtherTransform())
FlattenWith 可以採用根 PCollection 生產轉換(例如 Create 和 Read)以及已建構的 PCollection,並將它們套用並將它們的輸出展平到產生的輸出 PCollection 中。
merged = (
    pcoll
    | SomeTransform()
    | beam.FlattenWith(beam.Create(['x', 'y', 'z']))
    | SomeOtherTransform())
// Flatten accepts any number of PCollections of the same element type.
// Returns a single PCollection that contains all of the elements in input PCollections.
merged := beam.Flatten(s, pcol1, pcol2, pcol3)// Flatten taken an array of PCollection objects, wrapped in beam.P(...)
// Returns a single PCollection that contains a union of all of the elements in all input PCollections.
const fib = root.apply(
beam.withName("createFib", beam.create([1, 1, 2, 3, 5, 8]))
);
const pow = root.apply(
beam.withName("createPow", beam.create([1, 2, 4, 8, 16, 32]))
);
const result = beam.P([fib, pow]).apply(beam.flatten());- type: Flatten
input: [SomeProducingTransform, AnotherProducingTransform]在 Beam YAML 中,通常不需要明確的展平,因為可以為任何轉換列出多個輸入,這些輸入會隱式展平。
4.2.5.1. 合併集合中的資料編碼
預設情況下,輸出 PCollection 的編碼器與輸入 PCollectionList 中第一個 PCollection 的編碼器相同。但是,輸入 PCollection 物件可以使用不同的編碼器,只要它們在您選擇的語言中都包含相同的資料類型即可。
4.2.5.2. 合併視窗化集合
當使用 Flatten 合併已套用視窗化策略的 PCollection 物件時,您要合併的所有 PCollection 物件都必須使用相容的視窗化策略和視窗大小。例如,您要合併的所有集合都必須全部使用(假設)相同的 5 分鐘固定視窗或每 30 秒開始的 4 分鐘滑動視窗。
如果您的管線嘗試使用 Flatten 合併具有不相容視窗的 PCollection 物件,Beam 會在建構管線時產生 IllegalStateException 錯誤。
4.2.6. Partition
Partition Partition Partition Partition 是 Beam 用於儲存相同資料類型之 PCollection 物件的轉換。Partition 會將單一 PCollection 分割為固定數量的較小集合。
通常在 Typescript SDK 中,使用 Split 轉換會更自然。
Partition 會根據您提供的分割函數分割 PCollection 的元素。分割函數包含邏輯,決定如何將輸入 PCollection 的元素分割成每個產生的分割區 PCollection。分割區的數量必須在圖表建構時確定。例如,您可以在執行階段將分割區數量作為命令列選項傳遞(然後將用於建構您的管線圖表),但您無法在管線中途確定分割區數量(根據在您的管線圖表建構後計算的資料)。
以下範例將 PCollection 分割成百分位數群組。
// Provide an int value with the desired number of result partitions, and a PartitionFn that represents the
// partitioning function. In this example, we define the PartitionFn in-line. Returns a PCollectionList
// containing each of the resulting partitions as individual PCollection objects.
PCollection<Student> students = ...;
// Split students up into 10 partitions, by percentile:
PCollectionList<Student> studentsByPercentile =
    students.apply(Partition.of(10, new PartitionFn<Student>() {
        public int partitionFor(Student student, int numPartitions) {
            return student.getPercentile()  // 0..99
                 * numPartitions / 100;
        }}));

// You can extract each partition from the PCollectionList using the get method, as follows:
PCollection<Student> fortiethPercentile = studentsByPercentile.get(4);
# Provide an int value with the desired number of result partitions, and a partitioning function (partition_fn in this example).
# Returns a tuple of PCollection objects containing each of the resulting partitions as individual PCollection objects.
students = ...
def partition_fn(student, num_partitions):
return int(get_percentile(student) * num_partitions / 100)
by_decile = students | beam.Partition(partition_fn, 10)
# You can extract each partition from the tuple of PCollection objects as follows:
fortieth_percentile = by_decile[4]func decileFn(student Student) int {
return int(float64(student.Percentile) / float64(10))
}
func init() {
register.Function1x1(decileFn)
}
// Partition returns a slice of PCollections
studentsByPercentile := beam.Partition(s, 10, decileFn, students)
// Each partition can be extracted by indexing into the slice.
fortiethPercentile := studentsByPercentile[4]const deciles: PCollection<Student>[] = students.apply(
beam.partition(
(student, numPartitions) =>
Math.floor((getPercentile(student) / 100) * numPartitions),
10
)
);
const topDecile: PCollection<Student> = deciles[9];type: Partition
config:
by: str(percentile // 10)
language: python
outputs: ["0", "1", "2", "3", "4", "5", "6", "7", "8", "9", "10"]請注意,在 Beam YAML 中,PCollections 是透過字串值而非整數值來分割。
4.3. 編寫 Beam 轉換使用者程式碼的要求
當您為 Beam 轉換建構使用者程式碼時,應牢記執行的分散式性質。例如,您的函數可能會有很多副本在許多不同的機器上平行執行,而這些副本會獨立運作,不會與任何其他副本通訊或共用狀態。根據您為管線選擇的管線執行器和處理後端,您的使用者程式碼函數的每個副本可能會重試或執行多次。因此,您應謹慎在使用者程式碼中加入狀態相依性之類的東西。
一般而言,您的使用者程式碼必須至少滿足以下要求
- 您的函數物件必須是可序列化的。
- 您的函數物件必須是執行緒相容的,並且知道Beam SDK 不是執行緒安全的。
此外,建議您讓函數物件具有等冪性。Beam 支援非等冪函數,但需要額外思考,以確保在有外部副作用時的正確性。
注意:這些要求適用於
DoFn的子類別(與 ParDo 轉換一起使用的函數物件)、CombineFn(與 Combine 轉換一起使用的函數物件)和WindowFn(與 Window 轉換一起使用的函數物件)。
注意:這些要求適用於
DoFn(與 ParDo 轉換一起使用的函數物件)、CombineFn(與 Combine 轉換一起使用的函數物件)和WindowFn(與 Window 轉換一起使用的函數物件)。
4.3.1. 可序列化性
您提供給轉換的任何函數物件都必須是完全可序列化的。這是因為函數的副本需要被序列化並傳輸到您處理叢集中的遠端工作節點。使用者程式碼的基底類別,例如 DoFn、CombineFn 和 WindowFn,已經實作了 Serializable;但是,您的子類別不得新增任何不可序列化的成員。 只要函數已向 register.FunctionXxY(用於簡單函數)或 register.DoFnXxY(用於結構化 DoFn)註冊,並且不是閉包,函數就可序列化。結構化的 DoFn 會序列化所有匯出的欄位。未匯出的欄位無法序列化,並且會被靜默忽略。 Typescript SDK 使用 ts-serialize-closures 來序列化函數(和其他物件)。這對於非閉包的函數來說是開箱即用的,並且對於閉包也有效,只要相關的函數(以及它引用的任何閉包)是使用 ts-closure-transform hooks 編譯的(例如,使用 ttsc 代替 tsc)。另一種方法是呼叫 requireForSerialization("importableModuleDefiningFunc", {func}) 來直接按名稱註冊函數,這樣可以減少錯誤。請注意,如果函數 func 返回包含閉包的物件(這在 Javascript 中很常見),則僅註冊 func 本身是不夠的,如果使用了其返回值,則必須註冊其返回值。
您還應該記住一些其他的可序列化因素:
- 暫時性(Transient)未匯出的函數物件中的欄位不會傳輸到工作節點實例,因為它們不會自動序列化。
- 避免在序列化之前載入大量資料的欄位。
- 您的函數物件的個別實例無法共享資料。
- 在套用函數物件之後對其進行變更將不會有任何效果。
注意:當您使用匿名內部類別實例以內嵌方式宣告函數物件時,請小心。在非靜態內容中,您的內部類別實例將隱式包含指向封閉類別及其狀態的指標。該封閉類別也會被序列化,因此適用於函數物件本身的注意事項也適用於這個外部類別。
注意:無法偵測函數是否為閉包。閉包會導致執行階段錯誤和管線失敗。盡可能避免使用匿名函數。
4.3.2. 執行緒相容性
您的函數物件應該是執行緒相容的。在工作節點實例上,您的函數物件的每個實例一次都只能由一個執行緒存取,除非您明確建立自己的執行緒。但是,請注意,Beam SDK 不是執行緒安全的。如果您在使用者程式碼中建立自己的執行緒,則必須提供自己的同步機制。請注意,您的函數物件中的靜態成員不會傳遞到工作節點實例,並且可以從不同的執行緒存取函數的多個實例。
4.3.3. 冪等性
建議您使函數物件具有冪等性,也就是說,它可以根據需要重複或重試多次,而不會產生意外的副作用。雖然支援非冪等的函數,但 Beam 模型不保證您的使用者程式碼可能會被調用或重試的次數;因此,保持函數物件的冪等性可以使管線的輸出具有確定性,並且使轉換的行為更可預測且更容易偵錯。
4.4. 側輸入
除了主要的輸入 PCollection 之外,您還可以側輸入的形式為 ParDo 轉換提供額外的輸入。側輸入是一種額外的輸入,您的 DoFn 每次在處理輸入 PCollection 中的元素時都可以存取。當您指定側輸入時,您可以建立一些其他資料的視圖,可以在 ParDo 轉換的 DoFn 中讀取這些資料,同時處理每個元素。
如果您的 ParDo 在處理輸入 PCollection 中的每個元素時需要注入額外的資料,但是額外的資料需要在執行階段確定(而不是硬編碼),則側輸入很有用。這些值可以由輸入資料確定,或取決於管線的不同分支。
所有側輸入的可迭代物件都應該使用泛型 register.IterX[...] 函數註冊。這優化了可迭代物件的執行階段執行。
4.4.1. 將側輸入傳遞至 ParDo
  // Pass side inputs to your ParDo transform by invoking .withSideInputs.
  // Inside your DoFn, access the side input by using the method DoFn.ProcessContext.sideInput.

  // The input PCollection to ParDo.
  PCollection<String> words = ...;

  // A PCollection of word lengths that we'll combine into a single value.
  PCollection<Integer> wordLengths = ...; // Singleton PCollection

  // Create a singleton PCollectionView from wordLengths using Combine.globally and View.asSingleton.
  final PCollectionView<Integer> maxWordLengthCutOffView =
     wordLengths.apply(Combine.globally(new Max.MaxIntFn()).asSingletonView());


  // Apply a ParDo that takes maxWordLengthCutOffView as a side input.
  PCollection<String> wordsBelowCutOff =
  words.apply(ParDo
      .of(new DoFn<String, String>() {
          @ProcessElement
          public void processElement(@Element String word, OutputReceiver<String> out, ProcessContext c) {
            // In our DoFn, access the side input.
            int lengthCutOff = c.sideInput(maxWordLengthCutOffView);
            if (word.length() <= lengthCutOff) {
              out.output(word);
            }
          }
      }).withSideInputs(maxWordLengthCutOffView)
  );
# Side inputs are available as extra arguments in the DoFn's process method or Map / FlatMap's callable.
# Optional, positional, and keyword arguments are all supported. Deferred arguments are unwrapped into their
# actual values. For example, using pvalue.AsIteor(pcoll) at pipeline construction time results in an iterable
# of the actual elements of pcoll being passed into each process invocation. In this example, side inputs are
# passed to a FlatMap transform as extra arguments and consumed by filter_using_length.
words = ...
# Callable takes additional arguments.
def filter_using_length(word, lower_bound, upper_bound=float('inf')):
if lower_bound <= len(word) <= upper_bound:
yield word
# Construct a deferred side input.
avg_word_len = (
words
| beam.Map(len)
| beam.CombineGlobally(beam.combiners.MeanCombineFn()))
# Call with explicit side inputs.
small_words = words | 'small' >> beam.FlatMap(filter_using_length, 0, 3)
# A single deferred side input.
larger_than_average = (
words | 'large' >> beam.FlatMap(
filter_using_length, lower_bound=pvalue.AsSingleton(avg_word_len))
)
# Mix and match.
small_but_nontrivial = words | beam.FlatMap(
filter_using_length,
lower_bound=2,
upper_bound=pvalue.AsSingleton(avg_word_len))
# We can also pass side inputs to a ParDo transform, which will get passed to its process method.
# The first two arguments for the process method would be self and element.
class FilterUsingLength(beam.DoFn):
def process(self, element, lower_bound, upper_bound=float('inf')):
if lower_bound <= len(element) <= upper_bound:
yield element
small_words = words | beam.ParDo(FilterUsingLength(), 0, 3)
...// Side inputs are provided using `beam.SideInput` in the DoFn's ProcessElement method.
// Side inputs can be arbitrary PCollections, which can then be iterated over per element
// in a DoFn.
// Side input parameters appear after main input elements, and before any output emitters.
words = ...
// avgWordLength is a PCollection containing a single element, a singleton.
avgWordLength := stats.Mean(s, wordLengths)
// Side inputs are added as with the beam.SideInput option to beam.ParDo.
wordsAboveCutOff := beam.ParDo(s, filterWordsAbove, words, beam.SideInput{Input: avgWordLength})
wordsBelowCutOff := beam.ParDo(s, filterWordsBelow, words, beam.SideInput{Input: avgWordLength})
// filterWordsAbove is a DoFn that takes in a word,
// and a singleton side input iterator as of a length cut off
// and only emits words that are beneath that cut off.
//
// If the iterator has no elements, an error is returned, aborting processing.
func filterWordsAbove(word string, lengthCutOffIter func(*float64) bool, emitAboveCutoff func(string)) error {
var cutOff float64
ok := lengthCutOffIter(&cutOff)
if !ok {
return fmt.Errorf("no length cutoff provided")
}
if float64(len(word)) > cutOff {
emitAboveCutoff(word)
}
return nil
}
// filterWordsBelow is a DoFn that takes in a word,
// and a singleton side input of a length cut off
// and only emits words that are beneath that cut off.
//
// If the side input isn't a singleton, a runtime panic will occur.
func filterWordsBelow(word string, lengthCutOff float64, emitBelowCutoff func(string)) {
if float64(len(word)) <= lengthCutOff {
emitBelowCutoff(word)
}
}
func init() {
register.Function3x1(filterWordsAbove)
register.Function3x0(filterWordsBelow)
// 1 input of type string => Emitter1[string]
register.Emitter1[string]()
// 1 input of type float64 => Iter1[float64]
register.Iter1[float64]()
}
// The Go SDK doesn't support custom ViewFns.
// See https://github.com/apache/beam/issues/18602 for details
// on how to contribute them!
// Side inputs are provided by passing an extra context object to
// `map`, `flatMap`, or `parDo` transforms.  This object will get passed as an
// extra argument to the provided function (or `process` method of the `DoFn`).
// `SideInputParam` properties (generally created with `pardo.xxxSideInput(...)`)
// have a `lookup` method that can be invoked from within the process method.

// Let words be a PCollection of strings.
const words : PCollection<string> = ...

// meanLengthPColl will contain a single number whose value is the
// average length of the words
const meanLengthPColl: PCollection<number> = words
  .apply(
    beam
      .groupGlobally<string>()
      .combining((word) => word.length, combiners.mean, "mean")
  )
  .map(({ mean }) => mean);

// Now we use this as a side input to yield only words that are
// smaller than average.
const smallWords = words.flatMap(
  // This is the function, taking context as a second argument.
  function* keepSmall(word, context) {
    if (word.length < context.meanLength.lookup()) {
      yield word;
    }
  },
  // This is the context that will be passed as a second argument.
  { meanLength: pardo.singletonSideInput(meanLengthPColl) }
);
4.4.2. 側輸入和視窗化
視窗化的 PCollection 可能是無限的,因此無法壓縮為單一值(或單一集合類別)。當您建立視窗化 PCollection 的 PCollectionView 時,PCollectionView 表示每個視窗的單一實體(每個視窗一個單例、每個視窗一個列表等等)。
Beam 使用主要輸入元素的視窗來查找側輸入元素的適當視窗。Beam 將主要輸入元素的視窗投影到側輸入的視窗集合中,然後使用來自結果視窗的側輸入。如果主要輸入和側輸入具有相同的視窗,則投影會提供完全對應的視窗。但是,如果輸入具有不同的視窗,則 Beam 會使用投影來選擇最適合的側輸入視窗。
例如,如果主要輸入使用一分鐘的固定時間視窗進行視窗化,而側輸入使用一小時的固定時間視窗進行視窗化,則 Beam 會將主要輸入視窗投影到側輸入視窗集,並從適當的一小時側輸入視窗中選擇側輸入值。
如果主要輸入元素存在於多個視窗中,則會多次呼叫 processElement,每個視窗呼叫一次。每次呼叫 processElement 都會投影主要輸入元素的「目前」視窗,因此每次都可能會提供不同的側輸入視圖。
如果側輸入有多個觸發器觸發,則 Beam 會使用最新觸發器觸發的值。如果您使用具有單一全域視窗且指定觸發器的側輸入,則此功能特別有用。
4.5. 額外輸出
雖然 ParDo 總是會產生主要的輸出 PCollection(作為 apply 的返回值),但您的 ParDo 也可以產生任意數量的額外輸出 PCollection。如果您選擇有多個輸出,則 ParDo 會傳回所有輸出 PCollection(包括主要輸出)捆綁在一起。
雖然 beam.ParDo 總是會產生輸出 PCollection,但您的 DoFn 可以產生任意數量的額外輸出 PCollection,甚至可以不產生任何輸出。如果您選擇有多個輸出,則需要使用與輸出數量相符的 ParDo 函數來呼叫 DoFn。beam.ParDo2 用於兩個輸出 PCollection,beam.ParDo3 用於三個輸出,依此類推,直到 beam.ParDo7。如果需要更多,可以使用 beam.ParDoN,它會返回 []beam.PCollection。
雖然 ParDo 總是會產生主要的輸出 PCollection(作為 apply 的返回值)。如果您想要有多個輸出,請在您的 ParDo 操作中發出具有不同屬性的物件,然後執行 Split 操作以將其分割為多個 PCollection。
在 Beam YAML 中,可以透過將所有輸出發送到單一 PCollection(可能會帶有一個額外欄位),然後使用 Partition 將此單一 PCollection 分割為多個不同的 PCollection 輸出來獲得多個輸出。
4.5.1. 多個輸出的標籤
Split PTransform 會取得一個 {tagA?: A, tagB?: B, ...} 形式的元素 PCollection,並傳回一個 {tagA: PCollection<A>, tagB: PCollection<B>, ...} 物件。預期的標籤集合會傳遞給操作;可以透過傳遞非預設的 SplitOptions 實例來指定如何處理多個或未知標籤。
Go SDK 不使用輸出標籤,而是使用位置順序來表示多個輸出 PCollection。
// To emit elements to multiple output PCollections, create a TupleTag object to identify each collection
// that your ParDo produces. For example, if your ParDo produces three output PCollections (the main output
// and two additional outputs), you must create three TupleTags. The following example code shows how to
// create TupleTags for a ParDo with three output PCollections.

  // Input PCollection to our ParDo.
  PCollection<String> words = ...;

  // The ParDo will filter words whose length is below a cutoff and add them to
  // the main output PCollection<String>.
  // If a word is above the cutoff, the ParDo will add the word length to an
  // output PCollection<Integer>.
  // If a word starts with the string "MARKER", the ParDo will add that word to an
  // output PCollection<String>.
  final int wordLengthCutOff = 10;

  // Create three TupleTags, one for each output PCollection.
  // Output that contains words below the length cutoff.
  final TupleTag<String> wordsBelowCutOffTag =
      new TupleTag<String>(){};
  // Output that contains word lengths.
  final TupleTag<Integer> wordLengthsAboveCutOffTag =
      new TupleTag<Integer>(){};
  // Output that contains "MARKER" words.
  final TupleTag<String> markedWordsTag =
      new TupleTag<String>(){};

// Passing Output Tags to ParDo:
// After you specify the TupleTags for each of your ParDo outputs, pass the tags to your ParDo by invoking
// .withOutputTags. You pass the tag for the main output first, and then the tags for any additional outputs
// in a TupleTagList. Building on our previous example, we pass the three TupleTags for our three output
// PCollections to our ParDo. Note that all of the outputs (including the main output PCollection) are
// bundled into the returned PCollectionTuple.

  PCollectionTuple results =
      words.apply(ParDo
          .of(new DoFn<String, String>() {
            // DoFn continues here.
            ...
          })
          // Specify the tag for the main output.
          .withOutputTags(wordsBelowCutOffTag,
          // Specify the tags for the two additional outputs as a TupleTagList.
                          TupleTagList.of(wordLengthsAboveCutOffTag)
                                      .and(markedWordsTag)));
# To emit elements to multiple output PCollections, invoke with_outputs() on the ParDo, and specify the
# expected tags for the outputs. with_outputs() returns a DoOutputsTuple object. Tags specified in
# with_outputs are attributes on the returned DoOutputsTuple object. The tags give access to the
# corresponding output PCollections.
results = (
words
| beam.ParDo(ProcessWords(), cutoff_length=2, marker='x').with_outputs(
'above_cutoff_lengths',
'marked strings',
main='below_cutoff_strings'))
below = results.below_cutoff_strings
above = results.above_cutoff_lengths
marked = results['marked strings'] # indexing works as well
# The result is also iterable, ordered in the same order that the tags were passed to with_outputs(),
# the main tag (if specified) first.
below, above, marked = (words
| beam.ParDo(
ProcessWords(), cutoff_length=2, marker='x')
.with_outputs('above_cutoff_lengths',
'marked strings',
main='below_cutoff_strings'))// beam.ParDo3 returns PCollections in the same order as
// the emit function parameters in processWords.
below, above, marked := beam.ParDo3(s, processWords, words)
// processWordsMixed uses both a standard return and an emitter function.
// The standard return produces the first PCollection from beam.ParDo2,
// and the emitter produces the second PCollection.
length, mixedMarked := beam.ParDo2(s, processWordsMixed, words)# Create three PCollections from a single input PCollection.
const { below, above, marked } = to_split.apply(
beam.split(["below", "above", "marked"])
);4.5.2. 在您的 DoFn 中發射到多個輸出
根據需要呼叫發射器函數,為其對應的 PCollection 產生 0 個或多個元素。可以使用多個發射器發出相同的值。像平常一樣,不要在從任何發射器發出值之後變更它們。
所有發射器都應該使用泛型 register.EmitterX[...] 函數註冊。這優化了發射器的執行階段執行。
DoFn 也可以透過標準傳回傳回單一元素。標準傳回始終是從 beam.ParDo 傳回的第一個 PCollection。其他發射器會依照其定義的參數順序輸出到它們自己的 PCollection。
MapToFields 始終是一對一的。若要執行一對多映射,可以先將欄位映射到可迭代類型,然後使用 Explode 轉換,該轉換會發出多個值,每個值對應於爆炸欄位的一個值。
// Inside your ParDo's DoFn, you can emit an element to a specific output PCollection by providing a
// MultiOutputReceiver to your process method, and passing in the appropriate TupleTag to obtain an OutputReceiver.
// After your ParDo, extract the resulting output PCollections from the returned PCollectionTuple.
// Based on the previous example, this shows the DoFn emitting to the main output and two additional outputs.

  .of(new DoFn<String, String>() {
     public void processElement(@Element String word, MultiOutputReceiver out) {
       if (word.length() <= wordLengthCutOff) {
         // Emit short word to the main output.
         // In this example, it is the output with tag wordsBelowCutOffTag.
         out.get(wordsBelowCutOffTag).output(word);
       } else {
         // Emit long word length to the output with tag wordLengthsAboveCutOffTag.
         out.get(wordLengthsAboveCutOffTag).output(word.length());
       }
       if (word.startsWith("MARKER")) {
         // Emit word to the output with tag markedWordsTag.
         out.get(markedWordsTag).output(word);
       }
     }}));
# Inside your ParDo's DoFn, you can emit an element to a specific output by wrapping the value and the output tag (str).
# using the pvalue.OutputValue wrapper class.
# Based on the previous example, this shows the DoFn emitting to the main output and two additional outputs.
class ProcessWords(beam.DoFn):
def process(self, element, cutoff_length, marker):
if len(element) <= cutoff_length:
# Emit this short word to the main output.
yield element
else:
# Emit this word's long length to the 'above_cutoff_lengths' output.
yield pvalue.TaggedOutput('above_cutoff_lengths', len(element))
if element.startswith(marker):
# Emit this word to a different output with the 'marked strings' tag.
yield pvalue.TaggedOutput('marked strings', element)
# Producing multiple outputs is also available in Map and FlatMap.
# Here is an example that uses FlatMap and shows that the tags do not need to be specified ahead of time.
def even_odd(x):
yield pvalue.TaggedOutput('odd' if x % 2 else 'even', x)
if x % 10 == 0:
yield x
results = numbers | beam.FlatMap(even_odd).with_outputs()
evens = results.even
odds = results.odd
tens = results[None] # the undeclared main output// processWords is a DoFn that has 3 output PCollections. The emitter functions
// are matched in positional order to the PCollections returned by beam.ParDo3.
func processWords(word string, emitBelowCutoff, emitAboveCutoff, emitMarked func(string)) {
const cutOff = 5
if len(word) < cutOff {
emitBelowCutoff(word)
} else {
emitAboveCutoff(word)
}
if isMarkedWord(word) {
emitMarked(word)
}
}
// processWordsMixed demonstrates mixing an emitter, with a standard return.
// If a standard return is used, it will always be the first returned PCollection,
// followed in positional order by the emitter functions.
func processWordsMixed(word string, emitMarked func(string)) int {
if isMarkedWord(word) {
emitMarked(word)
}
return len(word)
}
func init() {
register.Function4x0(processWords)
register.Function2x1(processWordsMixed)
// 1 input of type string => Emitter1[string]
register.Emitter1[string]()
}const to_split = words.flatMap(function* (word) {
if (word.length < 5) {
yield { below: word };
} else {
yield { above: word };
}
if (isMarkedWord(word)) {
yield { marked: word };
}
});- type: MapToFields
input: SomeProducingTransform
config:
language: python
fields:
word: "line.split()"
- type: Explode
input: MapToFields
config:
fields: word4.5.3. 在您的 DoFn 中存取其他參數
除了元素和 OutputReceiver 之外,Beam 還會將其他參數填入 DoFn 的 @ProcessElement 方法。任何這些參數的組合都可以以任何順序新增到您的處理方法中。
除了元素之外,Beam 還會將其他參數填入 DoFn 的 process 方法。任何這些參數的組合都可以以任何順序新增到您的處理方法中。
除了元素之外,Beam 還會將其他參數填入 DoFn 的 process 方法。這些參數可以透過在內容引數中放置存取子來使用,就像側輸入一樣。
除了元素之外,Beam 還會將其他參數填入 DoFn 的 ProcessElement 方法。任何這些參數的組合都可以以標準順序新增到您的處理方法中。
context.Context:為了支援整合的日誌記錄和使用者定義的指標,可以要求一個 context.Context 參數。依照 Go 的慣例,如果存在此參數,則必須是 DoFn 方法的第一個參數。
func MyDoFn(ctx context.Context, word string) string { ... }Timestamp:若要存取輸入元素的時間戳記,請新增一個以 @Timestamp 註解的 Instant 類型的參數。例如
Timestamp:若要存取輸入元素的時間戳記,請新增一個預設為 DoFn.TimestampParam 的關鍵字參數。例如
Timestamp:若要存取輸入元素的時間戳記,請在元素之前新增一個 beam.EventTime 參數。例如
Timestamp:若要存取輸入元素所屬的視窗,請將 pardo.windowParam() 新增至內容引數。
.of(new DoFn<String, String>() {
     public void processElement(@Element String word, @Timestamp Instant timestamp) {
  }})
import apache_beam as beam
class ProcessRecord(beam.DoFn):
def process(self, element, timestamp=beam.DoFn.TimestampParam):
# access timestamp of element.
passfunc MyDoFn(ts beam.EventTime, word string) string { ... }function processFn(element, context) {
return context.timestamp.lookup();
}
pcoll.map(processFn, { timestamp: pardo.timestampParam() });Window:若要存取輸入元素所屬的視窗,請新增一個與輸入 PCollection 所用視窗類型相同的參數。如果參數是與輸入 PCollection 不符的視窗類型(BoundedWindow 的子類別),則會引發錯誤。如果元素落在多個視窗中(例如,當使用 SlidingWindows 時會發生這種情況),則會為該元素多次調用 @ProcessElement 方法,每個視窗調用一次。例如,當使用固定視窗時,視窗的類型為 IntervalWindow。
視窗 (Window): 若要存取輸入元素所屬的視窗,請新增一個關鍵字參數,其預設值為 DoFn.WindowParam。如果一個元素落在多個視窗中(例如,使用 SlidingWindows 時會發生這種情況),則 process 方法將會針對該元素多次調用,每個視窗調用一次。
視窗 (Window): 若要存取輸入元素所屬的視窗,請在元素之前新增一個 beam.Window 參數。如果一個元素落在多個視窗中(例如,使用 SlidingWindows 時會發生這種情況),則 ProcessElement 方法將會針對該元素多次調用,每個視窗調用一次。由於 beam.Window 是一個介面,因此可以類型斷言為視窗的具體實作。例如,當使用固定視窗時,視窗的類型為 window.IntervalWindow。
視窗 (Window): 若要存取輸入元素所屬的視窗,請將 pardo.windowParam() 新增至 context 參數。如果一個元素落在多個視窗中(例如,使用 SlidingWindows 時會發生這種情況),則該函數將會針對該元素多次調用,每個視窗調用一次。
.of(new DoFn<String, String>() {
     public void processElement(@Element String word, IntervalWindow window) {
  }})
import apache_beam as beam
class ProcessRecord(beam.DoFn):
def process(self, element, window=beam.DoFn.WindowParam):
# access window e.g. window.end.micros
passfunc MyDoFn(w beam.Window, word string) string {
iw := w.(window.IntervalWindow)
...
}pcoll.map(processWithWindow, { timestamp: pardo.windowParam() });PaneInfo: 當使用觸發器時,Beam 提供一個 PaneInfo 物件,其中包含有關目前觸發的資訊。使用 PaneInfo,您可以判斷這是否為提前或延遲觸發,以及此視窗已針對此鍵觸發多少次。
PaneInfo: 當使用觸發器時,Beam 提供一個 DoFn.PaneInfoParam 物件,其中包含有關目前觸發的資訊。使用 DoFn.PaneInfoParam,您可以判斷這是否為提前或延遲觸發,以及此視窗已針對此鍵觸發多少次。Python SDK 中此功能的實作尚未完全完成;請參閱 Issue 17821 了解更多資訊。
PaneInfo: 當使用觸發器時,Beam 提供 beam.PaneInfo 物件,其中包含有關目前觸發的資訊。使用 beam.PaneInfo,您可以判斷這是否為提前或延遲觸發,以及此視窗已針對此鍵觸發多少次。
視窗 (Window): 若要存取輸入元素所屬的視窗,請將 pardo.paneInfoParam() 新增至 context 參數。使用 beam.PaneInfo,您可以判斷這是否為提前或延遲觸發,以及此視窗已針對此鍵觸發多少次。
.of(new DoFn<String, String>() {
     public void processElement(@Element String word, PaneInfo paneInfo) {
  }})
import apache_beam as beam
class ProcessRecord(beam.DoFn):
def process(self, element, pane_info=beam.DoFn.PaneInfoParam):
# access pane info, e.g. pane_info.is_first, pane_info.is_last, pane_info.timing
passfunc extractWordsFn(pn beam.PaneInfo, line string, emitWords func(string)) {
if pn.Timing == typex.PaneEarly || pn.Timing == typex.PaneOnTime {
// ... perform operation ...
}
if pn.Timing == typex.PaneLate {
// ... perform operation ...
}
if pn.IsFirst {
// ... perform operation ...
}
if pn.IsLast {
// ... perform operation ...
}
words := strings.Split(line, " ")
for _, w := range words {
emitWords(w)
}
}pcoll.map(processWithPaneInfo, { timestamp: pardo.paneInfoParam() });PipelineOptions: 您可以透過將 PipelineOptions 作為參數新增到處理方法中,隨時存取目前管道的 PipelineOptions。
.of(new DoFn<String, String>() {
     public void processElement(@Element String word, PipelineOptions options) {
  }})
@OnTimer 方法也可以存取許多這些參數。時間戳記、視窗、鍵、PipelineOptions、OutputReceiver 和 MultiOutputReceiver 參數都可以在 @OnTimer 方法中存取。此外,@OnTimer 方法可以使用類型為 TimeDomain 的參數,該參數會告知計時器是基於事件時間還是處理時間。有關計時器的更詳細說明,請參閱 使用 Apache Beam 進行及時(且有狀態)處理 部落格文章。
計時器和狀態: 除了上述參數外,使用者定義的計時器和狀態參數也可以在有狀態的 DoFn 中使用。有關計時器和狀態的更詳細說明,請參閱 使用 Apache Beam 進行及時(且有狀態)處理 部落格文章。
計時器和狀態: 使用者定義的狀態和計時器參數可以在有狀態的 DoFn 中使用。有關計時器和狀態的更詳細說明,請參閱 使用 Apache Beam 進行及時(且有狀態)處理 部落格文章。
計時器和狀態: 此功能尚未在 Typescript SDK 中實作,但我們歡迎 貢獻。同時,希望使用狀態和計時器的 Typescript 管道可以使用 跨語言轉換 來實現。
class StatefulDoFn(beam.DoFn):
  """An example stateful DoFn with state and timer"""

  BUFFER_STATE_1 = BagStateSpec('buffer1', beam.BytesCoder())
  BUFFER_STATE_2 = BagStateSpec('buffer2', beam.VarIntCoder())
  WATERMARK_TIMER = TimerSpec('watermark_timer', TimeDomain.WATERMARK)

  def process(self,
              element,
              timestamp=beam.DoFn.TimestampParam,
              window=beam.DoFn.WindowParam,
              buffer_1=beam.DoFn.StateParam(BUFFER_STATE_1),
              buffer_2=beam.DoFn.StateParam(BUFFER_STATE_2),
              watermark_timer=beam.DoFn.TimerParam(WATERMARK_TIMER)):

    # Do your processing here
    key, value = element
    # Read all the data from buffer1
    all_values_in_buffer_1 = [x for x in buffer_1.read()]

    if StatefulDoFn._is_clear_buffer_1_required(all_values_in_buffer_1):
        # clear the buffer data if required conditions are met.
        buffer_1.clear()

    # add the value to buffer 2
    buffer_2.add(value)

    if StatefulDoFn._all_condition_met():
      # Clear the timer if certain condition met and you don't want to trigger
      # the callback method.
      watermark_timer.clear()

    yield element

  @on_timer(WATERMARK_TIMER)
  def on_expiry_1(self,
                  timestamp=beam.DoFn.TimestampParam,
                  window=beam.DoFn.WindowParam,
                  key=beam.DoFn.KeyParam,
                  buffer_1=beam.DoFn.StateParam(BUFFER_STATE_1),
                  buffer_2=beam.DoFn.StateParam(BUFFER_STATE_2)):
    # Window and key parameters are really useful especially for debugging issues.
    yield 'expired1'

  @staticmethod
  def _all_condition_met():
      # some logic
      return True

  @staticmethod
  def _is_clear_buffer_1_required(buffer_1_data):
      # Some business logic
      return True
// stateAndTimersFn is an example stateful DoFn with state and a timer.
type stateAndTimersFn struct {
Buffer1 state.Bag[string]
Buffer2 state.Bag[int64]
Watermark timers.EventTime
}
func (s *stateAndTimersFn) ProcessElement(sp state.Provider, tp timers.Provider, w beam.Window, key string, value int64, emit func(string, int64)) error {
// ... handle processing elements here, set a callback timer...
// Read all the data from Buffer1 in this window.
vals, ok, err := s.Buffer1.Read(sp)
if err != nil {
return err
}
if ok && s.shouldClearBuffer(vals) {
// clear the buffer data if required conditions are met.
s.Buffer1.Clear(sp)
}
// Add the value to Buffer2.
s.Buffer2.Add(sp, value)
if s.allConditionsMet() {
// Clear the timer if certain condition met and you don't want to trigger
// the callback method.
s.Watermark.Clear(tp)
}
emit(key, value)
return nil
}
func (s *stateAndTimersFn) OnTimer(sp state.Provider, tp timers.Provider, w beam.Window, key string, timer timers.Context, emit func(string, int64)) error {
// Window and key parameters are really useful especially for debugging issues.
switch timer.Family {
case s.Watermark.Family:
// timer expired, emit a different signal
emit(key, -1)
}
return nil
}
func (s *stateAndTimersFn) shouldClearBuffer([]string) bool {
// some business logic
return false
}
func (s *stateAndTimersFn) allConditionsMet() bool {
// other business logic
return true
}// Not yet implemented.
4.6. 複合轉換
轉換可以具有巢狀結構,其中複雜的轉換執行多個較簡單的轉換(例如多個 ParDo、Combine、GroupByKey 甚至其他複合轉換)。這些轉換稱為複合轉換。在單個複合轉換中巢狀多個轉換可以使您的程式碼更模組化且更容易理解。
Beam SDK 包含許多有用的複合轉換。請參閱 API 參考頁面以取得轉換清單。
4.6.1. 複合轉換範例
WordCount 範例程式 中的 CountWords 轉換是複合轉換的一個範例。CountWords 是一個 PTransform 子類別,由多個巢狀轉換組成。
在其 expand 方法中,CountWords 轉換會應用下列轉換操作
- 它會在文字行的輸入
PCollection上應用ParDo,產生個別單字的輸出PCollection。 - 它會在單字的
PCollection上套用 Beam SDK 程式庫轉換Count,產生鍵/值對的PCollection。每個鍵表示文字中的一個單字,每個值表示該單字在原始資料中出現的次數。
  public static class CountWords extends PTransform<PCollection<String>,
      PCollection<KV<String, Long>>> {
    @Override
    public PCollection<KV<String, Long>> expand(PCollection<String> lines) {

      // Convert lines of text into individual words.
      PCollection<String> words = lines.apply(
          ParDo.of(new ExtractWordsFn()));

      // Count the number of times each word occurs.
      PCollection<KV<String, Long>> wordCounts =
          words.apply(Count.<String>perElement());

      return wordCounts;
    }
  }
# The CountWords Composite Transform inside the WordCount pipeline.
@beam.ptransform_fn
def CountWords(pcoll):
return (
pcoll
# Convert lines of text into individual words.
| 'ExtractWords' >> beam.ParDo(ExtractWordsFn())
# Count the number of times each word occurs.
| beam.combiners.Count.PerElement()
# Format each word and count into a printable string.
| 'FormatCounts' >> beam.ParDo(FormatCountsFn()))// CountWords is a function that builds a composite PTransform
// to count the number of times each word appears.
func CountWords(s beam.Scope, lines beam.PCollection) beam.PCollection {
// A subscope is required for a function to become a composite transform.
// We assign it to the original scope variable s to shadow the original
// for the rest of the CountWords function.
s = s.Scope("CountWords")
// Since the same subscope is used for the following transforms,
// they are in the same composite PTransform.
// Convert lines of text into individual words.
words := beam.ParDo(s, extractWordsFn, lines)
// Count the number of times each word occurs.
wordCounts := stats.Count(s, words)
// Return any PCollections that should be available after
// the composite transform.
return wordCounts
}function countWords(lines: PCollection<string>) {
return lines //
.map((s: string) => s.toLowerCase())
.flatMap(function* splitWords(line: string) {
yield* line.split(/[^a-z]+/);
})
.apply(beam.countPerElement());
}
const counted = lines.apply(countWords);注意:由於
Count本身是一個複合轉換,因此CountWords也是一個巢狀複合轉換。
4.6.2. 建立複合轉換
Typescript SDK 中的 PTransform 只是一個接受和傳回 PValue(例如 PCollection)的函數。
若要建立您自己的複合轉換,請建立 PTransform 類別的子類別,並覆寫 expand 方法以指定實際的處理邏輯。然後,您可以像使用 Beam SDK 中的內建轉換一樣使用此轉換。
對於 PTransform 類別類型參數,您傳遞您的轉換作為輸入和輸出所採用的 PCollection 類型。若要將多個 PCollection 作為輸入或產生多個 PCollection 作為輸出,請針對相關的類型參數使用多個集合類型之一。
若要建立您自己的複合 PTransform,請在目前的管道範圍變數上呼叫 Scope 方法。傳遞此新子 Scope 的轉換將會是同一複合 PTransform 的一部分。
若要能夠重複使用您的複合元件,請在普通的 Go 函數或方法中建置它。此函數會傳遞一個範圍和輸入 PCollection,並傳回它產生的任何輸出 PCollection。注意: 此類函數無法直接傳遞給 ParDo 函數。
下列程式碼範例顯示如何宣告一個 PTransform,該轉換接受一個 String 的 PCollection 作為輸入,並輸出一個 Integer 的 PCollection
  static class ComputeWordLengths
    extends PTransform<PCollection<String>, PCollection<Integer>> {
    ...
  }
class ComputeWordLengths(beam.PTransform):
def expand(self, pcoll):
# Transform logic goes here.
return pcoll | beam.Map(lambda x: len(x))// CountWords is a function that builds a composite PTransform
// to count the number of times each word appears.
func CountWords(s beam.Scope, lines beam.PCollection) beam.PCollection {
// A subscope is required for a function to become a composite transform.
// We assign it to the original scope variable s to shadow the original
// for the rest of the CountWords function.
s = s.Scope("CountWords")
// Since the same subscope is used for the following transforms,
// they are in the same composite PTransform.
// Convert lines of text into individual words.
words := beam.ParDo(s, extractWordsFn, lines)
// Count the number of times each word occurs.
wordCounts := stats.Count(s, words)
// Return any PCollections that should be available after
// the composite transform.
return wordCounts
}在您的 PTransform 子類別中,您需要覆寫 expand 方法。expand 方法是您新增 PTransform 處理邏輯的地方。您對 expand 的覆寫必須接受適當類型的輸入 PCollection 作為參數,並將輸出 PCollection 指定為傳回值。
下列程式碼範例顯示如何為先前範例中宣告的 ComputeWordLengths 類別覆寫 expand
下列程式碼範例顯示如何呼叫 CountWords 複合 PTransform,並將其新增至您的管道
  static class ComputeWordLengths
      extends PTransform<PCollection<String>, PCollection<Integer>> {
    @Override
    public PCollection<Integer> expand(PCollection<String>) {
      ...
      // transform logic goes here
      ...
    }
class ComputeWordLengths(beam.PTransform):
def expand(self, pcoll):
# Transform logic goes here.
return pcoll | beam.Map(lambda x: len(x))lines := ... // a PCollection of strings.
// A Composite PTransform function is called like any other function.
wordCounts := CountWords(s, lines) // returns a PCollection<KV<string,int>>
只要您在 PTransform 子類別中覆寫 expand 方法以接受適當的輸入 PCollection 並傳回對應的輸出 PCollection,您就可以包含任意多個轉換。這些轉換可以包含核心轉換、複合轉換,或 Beam SDK 程式庫中包含的轉換。
您的複合 PTransform 可以包含任意多個轉換。這些轉換可以包含核心轉換、其他複合轉換,或 Beam SDK 程式庫中包含的轉換。它們也可以使用和傳回所需的任意多個 PCollection。
即使轉換的中繼資料多次變更類型,您複合轉換的參數和傳回值也必須與整個轉換的初始輸入類型和最終傳回類型相符。
注意: PTransform 的 expand 方法並非旨在由轉換的使用者直接調用。相反地,您應該使用轉換作為引數,在 PCollection 本身呼叫 apply 方法。這允許將轉換巢狀於管道的結構中。
4.6.3. PTransform 風格指南
PTransform 樣式指南包含此處未包含的其他資訊,例如樣式指南、記錄和測試指南以及特定語言的考量。當您想要撰寫新的複合 PTransform 時,本指南是一個有用的起點。
5. 管線 I/O
當您建立管道時,通常需要從某個外部來源(例如檔案或資料庫)讀取資料。同樣地,您可能希望管道將其結果資料輸出到外部儲存系統。Beam 為許多常見的資料儲存類型提供讀取和寫入轉換。如果您希望管道從不支援內建轉換的資料儲存格式讀取或寫入資料,您可以實作您自己的讀取和寫入轉換。
5.1. 讀取輸入資料
讀取轉換會從外部來源讀取資料,並傳回 PCollection 形式的資料表示,以供管道使用。您可以在建構管道的任何時間點使用讀取轉換來建立新的 PCollection,儘管它最常見於管道的開頭。
PCollection<String> lines = p.apply(TextIO.read().from("gs://some/inputData.txt"));lines = pipeline | beam.io.ReadFromText('gs://some/inputData.txt')lines := textio.Read(scope, 'gs://some/inputData.txt')
5.2. 寫入輸出資料
寫入轉換會將 PCollection 中的資料寫入外部資料來源。您最常在管道的結尾使用寫入轉換來輸出管道的最終結果。但是,您可以使用寫入轉換來輸出管道中任何點的 PCollection 資料。
output.apply(TextIO.write().to("gs://some/outputData"));output | beam.io.WriteToText('gs://some/outputData')textio.Write(scope, 'gs://some/inputData.txt', output)
5.3. 基於檔案的輸入和輸出資料
5.3.1. 從多個位置讀取
許多讀取轉換都支援從多個符合您提供的 glob 運算子的輸入檔案讀取。請注意,glob 運算子是檔案系統特定的,並遵守檔案系統特定的執行模型。以下 TextIO 範例使用 glob 運算子 (*) 來讀取給定位置中具有字首「input-」和字尾「.csv」的所有相符輸入檔案
p.apply("ReadFromText",
    TextIO.read().from("protocol://my_bucket/path/to/input-*.csv"));
lines = pipeline | 'ReadFromText' >> beam.io.ReadFromText(
'path/to/input-*.csv')lines := textio.Read(scope, "path/to/input-*.csv")若要將不同來源的資料讀取到單一 PCollection 中,請獨立讀取每個來源,然後使用 Flatten 轉換來建立單一 PCollection。
5.3.2. 寫入到多個輸出檔案
對於基於檔案的輸出資料,寫入轉換預設會寫入多個輸出檔案。當您將輸出檔案名稱傳遞給寫入轉換時,該檔案名稱將用作寫入轉換產生的所有輸出檔案的字首。您可以透過指定字尾,在每個輸出檔案中附加字尾。
下列寫入轉換範例會將多個輸出檔案寫入某個位置。每個檔案都有字首「numbers」、一個數字標籤,以及字尾「.csv」。
records.apply("WriteToText",
    TextIO.write().to("protocol://my_bucket/path/to/numbers")
                .withSuffix(".csv"));
filtered_words | 'WriteToText' >> beam.io.WriteToText(
'/path/to/numbers', file_name_suffix='.csv')// The Go SDK textio doesn't support sharding on writes yet.
// See https://github.com/apache/beam/issues/21031 for ways
// to contribute a solution.
5.4. Beam 提供的 I/O 轉換
請參閱Beam 提供的 I/O 轉換頁面,以取得目前可用的 I/O 轉換清單。
6. Schema
通常,正在處理的記錄類型具有明顯的結構。常見的 Beam 來源會產生 JSON、Avro、Protocol Buffer 或資料庫列物件;所有這些類型都有明確定義的結構,這些結構通常可以透過檢查類型來確定。即使在 SDK 管道中,簡單的 Java POJO(或其他語言中的等效結構)也經常被用作中間類型,這些類型也具有清晰的結構,可以透過檢查類別來推斷。透過了解管道記錄的結構,我們可以為資料處理提供更簡潔的 API。
6.1. 什麼是 schema?
大多數結構化記錄都有一些共同的特性
- 它們可以細分為單獨的命名欄位。欄位通常具有字串名稱,但有時(如索引元組的情況)則具有數字索引。
- 欄位可以擁有的原始類型列表是有限的。這些類型通常與大多數程式語言中的原始類型相符:int、long、string 等。
- 通常,欄位類型可以標記為可選(有時稱為可為 null)或必填。
記錄通常具有巢狀結構。當欄位本身具有子欄位時,就會出現巢狀結構,因此欄位的類型本身具有架構。屬於陣列或地圖類型的欄位也是這些結構化記錄的常見功能。
例如,考慮以下架構,代表一家虛構電子商務公司的動作
購買
| 欄位名稱 | 欄位類型 |
|---|---|
| userId | 字串 |
| itemId | INT64 |
| shippingAddress | 列(ShippingAddress) |
| cost | INT64 |
| transactions | 陣列[列(Transaction)] |
ShippingAddress
| 欄位名稱 | 欄位類型 |
|---|---|
| streetAddress | 字串 |
| city | 字串 |
| state | 可為 null 字串 |
| country | 字串 |
| postCode | 字串 |
Transaction
| 欄位名稱 | 欄位類型 |
|---|---|
| bank | 字串 |
| purchaseAmount | DOUBLE |
購買事件記錄由上述購買架構表示。每個購買事件都包含一個運送地址,這是一個包含自身架構的巢狀列。每個購買也包含一個信用卡交易陣列(一個清單,因為一個購買可能分散在多張信用卡上);交易清單中的每個項目都是一個具有自身架構的列。
這提供了一種抽象的類型描述,與任何特定的程式語言無關。
架構為我們提供了一個 Beam 記錄的類型系統,該系統獨立於任何特定的程式語言類型。可能有多個 Java 類別都具有相同的架構(例如 Protocol-Buffer 類別或 POJO 類別),而 Beam 將允許我們在這些類型之間無縫轉換。架構還提供了一種簡單的方法,可以在不同的程式語言 API 之間推斷類型。
具有架構的 PCollection 不需要指定 Coder,因為 Beam 知道如何編碼和解碼架構列;Beam 使用特殊的編碼器來編碼架構類型。
6.2. 程式語言類型的 schema
雖然架構本身與語言無關,但它們旨在自然地嵌入到所使用的 Beam SDK 的程式語言中。這使 Beam 使用者可以繼續使用原生類型,同時獲得讓 Beam 了解其元素架構的優勢。
在 Java 中,您可以使用以下類別集來表示購買架構。Beam 會根據類別的成員自動推斷正確的架構。
在 Python 中,您可以使用以下類別集來表示購買架構。Beam 會根據類別的成員自動推斷正確的架構。
在 Go 中,架構編碼預設用於結構類型,匯出的欄位會成為架構的一部分。Beam 將根據結構的欄位和欄位標籤及其順序自動推斷架構。
在 Typescript 中,JSON 物件用於表示具有架構的資料。遺憾的是,Typescript 中的類型資訊不會傳播到執行階段層,因此需要在某些地方手動指定(例如,在使用跨語言管道時)。
在 Beam YAML 中,所有轉換都會產生並接受用於驗證管道的具有架構的資料。
在某些情況下,Beam 無法找出對應函數的輸出類型。在這種情況下,您可以使用 JSON 架構語法手動指定。
@DefaultSchema(JavaBeanSchema.class)
public class Purchase {
  public String getUserId();  // Returns the id of the user who made the purchase.
  public long getItemId();  // Returns the identifier of the item that was purchased.
  public ShippingAddress getShippingAddress();  // Returns the shipping address, a nested type.
  public long getCostCents();  // Returns the cost of the item.
  public List<Transaction> getTransactions();  // Returns the transactions that paid for this purchase (returns a list, since the purchase might be spread out over multiple credit cards).

  @SchemaCreate
  public Purchase(String userId, long itemId, ShippingAddress shippingAddress, long costCents,
                  List<Transaction> transactions) {
      ...
  }
}

@DefaultSchema(JavaBeanSchema.class)
public class ShippingAddress {
  public String getStreetAddress();
  public String getCity();
  @Nullable public String getState();
  public String getCountry();
  public String getPostCode();

  @SchemaCreate
  public ShippingAddress(String streetAddress, String city, @Nullable String state, String country,
                         String postCode) {
     ...
  }
}

@DefaultSchema(JavaBeanSchema.class)
public class Transaction {
  public String getBank();
  public double getPurchaseAmount();

  @SchemaCreate
  public Transaction(String bank, double purchaseAmount) {
     ...
  }
}
import typing
class Purchase(typing.NamedTuple):
user_id: str # The id of the user who made the purchase.
item_id: int # The identifier of the item that was purchased.
shipping_address: ShippingAddress # The shipping address, a nested type.
cost_cents: int # The cost of the item
transactions: typing.Sequence[Transaction] # The transactions that paid for this purchase (a list, since the purchase might be spread out over multiple credit cards).
class ShippingAddress(typing.NamedTuple):
street_address: str
city: str
state: typing.Optional[str]
country: str
postal_code: str
class Transaction(typing.NamedTuple):
bank: str
purchase_amount: floattype Purchase struct {
// ID of the user who made the purchase.
UserID string `beam:"userId"`
// Identifier of the item that was purchased.
ItemID int64 `beam:"itemId"`
// The shipping address, a nested type.
ShippingAddress ShippingAddress `beam:"shippingAddress"`
// The cost of the item in cents.
Cost int64 `beam:"cost"`
// The transactions that paid for this purchase.
// A slice since the purchase might be spread out over multiple
// credit cards.
Transactions []Transaction `beam:"transactions"`
}
type ShippingAddress struct {
StreetAddress string `beam:"streetAddress"`
City string `beam:"city"`
State *string `beam:"state"`
Country string `beam:"country"`
PostCode string `beam:"postCode"`
}
type Transaction struct {
Bank string `beam:"bank"`
PurchaseAmount float64 `beam:"purchaseAmount"`
}const pcoll = root
.apply(
beam.create([
{ intField: 1, stringField: "a" },
{ intField: 2, stringField: "b" },
])
)
// Let beam know the type of the elements by providing an exemplar.
.apply(beam.withRowCoder({ intField: 0, stringField: "" }));type: MapToFields
config:
language: python
fields:
new_field:
expression: "hex(weight)"
output_type: { "type": "string" }如上所述,使用 JavaBean 類別是將架構對應到 Java 類別的一種方法。但是,多個 Java 類別可能具有相同的架構,在這種情況下,不同的 Java 類型通常可以互換使用。Beam 會在具有相符架構的類型之間新增隱式轉換。例如,上面的 Transaction 類別與以下類別具有相同的架構
@DefaultSchema(JavaFieldSchema.class)
public class TransactionPojo {
  public String bank;
  public double purchaseAmount;
}
因此,如果我們有兩個 PCollection 如下所示
PCollection<Transaction> transactionBeans = readTransactionsAsJavaBean();
PCollection<TransactionPojos> transactionPojos = readTransactionsAsPojo();
那麼這兩個 PCollection 將具有相同的架構,即使它們的 Java 類型會不同。這表示例如以下兩個程式碼片段是有效的
transactionBeans.apply(ParDo.of(new DoFn<...>() {
   @ProcessElement public void process(@Element TransactionPojo pojo) {
      ...
   }
}));
和
transactionPojos.apply(ParDo.of(new DoFn<...>() {
   @ProcessElement public void process(@Element Transaction row) {
    }
}));即使在這兩種情況下,@Element 參數都與 PCollection 的 Java 類型不同,由於架構相同,Beam 會自動進行轉換。內建的 Convert 轉換也可以用於在具有相等架構的 Java 類型之間進行轉換,如下詳述。
6.3. Schema 定義
PCollection 的架構將該 PCollection 的元素定義為命名欄位的有序列表。每個欄位都有一個名稱、一個類型,並且可能有一組使用者選項。欄位的類型可以是原始類型或複合類型。以下是目前 Beam 支援的原始類型
| 類型 | 描述 |
|---|---|
| BYTE | 一個 8 位元的帶正負號值 |
| INT16 | 一個 16 位元的帶正負號值 |
| INT32 | 一個 32 位元的帶正負號值 |
| INT64 | INT64 |
| 一個 64 位元的帶正負號值 | DECIMAL |
| 任意精度的十進制類型 | FLOAT |
| DOUBLE | 一個 32 位元的 IEEE 754 浮點數 |
| 字串 | DOUBLE |
| 一個 64 位元的 IEEE 754 浮點數 | 字串 |
| DATETIME | 一個以 epoch 以來的毫秒數表示的時間戳記 |
| BOOLEAN | 一個布林值 |
BYTES
一個原始位元組陣列
- 欄位也可以參考巢狀架構。在這種情況下,欄位的類型將為列,而巢狀架構將是此欄位類型的屬性。
- 支援三種集合類型作為欄位類型:陣列、可疊代和地圖
- 陣列:這表示重複的值類型,其中重複的元素可以具有任何支援的類型。支援巢狀列的陣列,以及陣列的陣列。
6.4. 邏輯類型
可疊代:這與陣列類型非常相似,它表示重複的值,但只有在疊代時才會知道項目的完整清單。這適用於可疊代可能大於可用記憶體且由外部儲存支援的情況(例如,這可能發生在 GroupByKey 傳回的可疊代時)。重複的元素可以具有任何支援的類型。
6.4.1. 定義邏輯類型
地圖:這表示從索引鍵到值的關聯地圖。所有架構類型都支援索引鍵和值。包含地圖類型的值不能用作任何分組操作中的索引鍵。
使用者可以擴充架構類型系統,以新增可用作欄位的自訂邏輯類型。邏輯類型由唯一識別碼和引數識別。邏輯類型還指定要用於儲存的基礎架構類型,以及與該類型之間的轉換。例如,邏輯聯集始終可以表示為具有可為 null 欄位的列,其中使用者確保一次只設定其中一個欄位。但是,這可能很繁瑣且難以管理。OneOf 邏輯類型提供了一個值類別,可以更容易地將類型作為聯集管理,同時仍然使用具有可為 null 欄位的列作為其基礎儲存。每個邏輯類型也有一個唯一的識別碼,因此它們也可以被其他語言解讀。下面列出更多邏輯類型的範例。
若要定義邏輯類型,您必須指定一個架構類型,用於表示基礎類型,以及該類型的唯一識別碼。邏輯類型會在架構類型之上強制執行額外的語意。例如,用於表示奈秒時間戳記的邏輯類型表示為包含 INT64 和 INT32 欄位的架構。單獨此架構並未說明如何解讀此類型,但是邏輯類型會告訴您這表示奈秒時間戳記,其中 INT64 欄位表示秒,INT32 欄位表示奈秒。
邏輯類型也由引數指定,這允許建立相關類型的類別。例如,有限精度的十進制類型會具有一個整數引數,表示所表示的精確位數。引數由架構類型表示,因此本身可以是複雜的類型。
在 Java 中,邏輯類型指定為 LogicalType 類別的子類別。可以指定自訂 Java 類別來表示邏輯類型,並且必須提供轉換函數,以在該 Java 類別與基礎架構類型表示之間來回轉換。例如,表示奈秒時間戳記的邏輯類型可以實作如下
// A Logical type using java.time.Instant to represent the logical type.
public class TimestampNanos implements LogicalType<Instant, Row> {
  // The underlying schema used to represent rows.
  private final Schema SCHEMA = Schema.builder().addInt64Field("seconds").addInt32Field("nanos").build();
  @Override public String getIdentifier() { return "timestampNanos"; }
  @Override public FieldType getBaseType() { return schema; }

  // Convert the representation type to the underlying Row type. Called by Beam when necessary.
  @Override public Row toBaseType(Instant instant) {
    return Row.withSchema(schema).addValues(instant.getEpochSecond(), instant.getNano()).build();
  }

  // Convert the underlying Row type to an Instant. Called by Beam when necessary.
  @Override public Instant toInputType(Row base) {
    return Instant.of(row.getInt64("seconds"), row.getInt32("nanos"));
  }

     ...
}
// Define a logical provider like so:
// TimestampNanos is a logical type using time.Time, but
// encodes as a schema type.
type TimestampNanos time.Time
func (tn TimestampNanos) Seconds() int64 {
return time.Time(tn).Unix()
}
func (tn TimestampNanos) Nanos() int32 {
return int32(time.Time(tn).UnixNano() % 1000000000)
}
// tnStorage is the storage schema for TimestampNanos.
type tnStorage struct {
Seconds int64 `beam:"seconds"`
Nanos int32 `beam:"nanos"`
}
var (
// reflect.Type of the Value type of TimestampNanos
tnType = reflect.TypeOf((*TimestampNanos)(nil)).Elem()
tnStorageType = reflect.TypeOf((*tnStorage)(nil)).Elem()
)
// TimestampNanosProvider implements the beam.SchemaProvider interface.
type TimestampNanosProvider struct{}
// FromLogicalType converts checks if the given type is TimestampNanos, and if so
// returns the storage type.
func (p *TimestampNanosProvider) FromLogicalType(rt reflect.Type) (reflect.Type, error) {
if rt != tnType {
return nil, fmt.Errorf("unable to provide schema.LogicalType for type %v, want %v", rt, tnType)
}
return tnStorageType, nil
}
// BuildEncoder builds a Beam schema encoder for the TimestampNanos type.
func (p *TimestampNanosProvider) BuildEncoder(rt reflect.Type) (func(any, io.Writer) error, error) {
if _, err := p.FromLogicalType(rt); err != nil {
return nil, err
}
enc, err := coder.RowEncoderForStruct(tnStorageType)
if err != nil {
return nil, err
}
return func(iface any, w io.Writer) error {
v := iface.(TimestampNanos)
return enc(tnStorage{
Seconds: v.Seconds(),
Nanos: v.Nanos(),
}, w)
}, nil
}
// BuildDecoder builds a Beam schema decoder for the TimestampNanos type.
func (p *TimestampNanosProvider) BuildDecoder(rt reflect.Type) (func(io.Reader) (any, error), error) {
if _, err := p.FromLogicalType(rt); err != nil {
return nil, err
}
dec, err := coder.RowDecoderForStruct(tnStorageType)
if err != nil {
return nil, err
}
return func(r io.Reader) (any, error) {
s, err := dec(r)
if err != nil {
return nil, err
}
tn := s.(tnStorage)
return TimestampNanos(time.Unix(tn.Seconds, int64(tn.Nanos))), nil
}, nil
}
// Register it like so:
beam.RegisterSchemaProvider(tnType, &TimestampNanosProvider{})// Register a logical type:
class Foo {
constructor(public value: string) {}
}
requireForSerialization("apache-beam", { Foo });
row_coder.registerLogicalType({
urn: "beam:logical_type:typescript_foo:v1",
reprType: row_coder.RowCoder.inferTypeFromJSON("string", false),
toRepr: (foo) => foo.value,
fromRepr: (value) => new Foo(value),
});
// And use it as follows:
const pcoll = root
.apply(beam.create([new Foo("a"), new Foo("b")]))
// Use beamLogicalType in the exemplar to indicate its use.
.apply(
beam.withRowCoder({
beamLogicalType: "beam:logical_type:typescript_foo:v1",
} as any)
);6.4.2. 有用的邏輯類型
在 Go 中,邏輯類型使用 beam.SchemaProvider 介面的自訂實作來指定。例如,表示奈秒時間戳記的邏輯類型提供者可以實作如下
在 Typescript 中,邏輯類型由 LogicalTypeInfo 介面定義,該介面將邏輯類型的 URN 與其表示方式及其與此表示方式之間的轉換相關聯。
目前,Python SDK 除了處理 MicrosInstant 之外,還提供最少的便利邏輯類型。
目前,Go SDK 除了處理額外的整數原始類型和 time.Time 之外,還提供最少的便利邏輯類型。
EnumerationType
此便利建構器尚未存在於 Python SDK 中。
Schema schema = Schema.builder()
               …
     .addLogicalTypeField("color", EnumerationType.create("RED", "GREEN", "BLUE"))
     .build();
此便利建構器尚未存在於 Go SDK 中。
EnumerationType.Value enumValue = enumType.valueOf("RED");
enumValue.getValue();  // Returns 0, the integer value of the constant.
enumValue.toString();  // Returns "RED", the string value of the constant
此邏輯類型允許建立由一組命名常數組成的列舉類型。
EnumerationType.Value enumValue = row.getLogicalTypeValue("color", EnumerationType.Value.class);此欄位的值在列中儲存為 INT32 類型,但是邏輯類型定義了一種值類型,可讓您將列舉作為字串或值存取。例如
給定具有列舉欄位的列物件,您也可以將欄位擷取為列舉值。
目前,Go SDK 除了處理額外的整數原始類型和 time.Time 之外,還提供最少的便利邏輯類型。
EnumerationType
從 Java POJO 和 JavaBean 自動進行架構推斷會自動將 Java 列舉轉換為 EnumerationType 邏輯類型。
Schema schema = Schema.builder()
               …
     .addLogicalTypeField("oneOfField",
        OneOfType.create(Field.of("intField", FieldType.INT32),
                         Field.of("stringField", FieldType.STRING),
                         Field.of("bytesField", FieldType.BYTES)))
      .build();
OneOfType
// Returns an enumeration indicating all possible case values for the enum.
// For the above example, this will be
// EnumerationType.create("intField", "stringField", "bytesField");
EnumerationType oneOfEnum = onOfType.getCaseEnumType();

// Creates an instance of the union with the string field set.
OneOfType.Value oneOfValue = oneOfType.createValue("stringField", "foobar");

// Handle the oneof
switch (oneOfValue.getCaseEnumType().toString()) {
  case "intField":
    return processInt(oneOfValue.getValue(Integer.class));
  case "stringField":
    return processString(oneOfValue.getValue(String.class));
  case "bytesField":
    return processBytes(oneOfValue.getValue(bytes[].class));
}
OneOfType 允許在架構欄位集合上建立不相交的聯集類型。例如
6.5. 建立 Schema
為了利用 Schema,您的 PCollection 必須附加 Schema。通常,來源本身會將 Schema 附加到 PCollection。例如,當使用 AvroIO 讀取 Avro 檔案時,來源可以自動從 Avro Schema 推斷出 Beam Schema,並將其附加到 Beam PCollection。然而,並非所有來源都會產生 Schema。此外,Beam 管道通常會有中間階段和類型,這些階段和類型也可以從 Schema 的表達能力中獲益。
6.5.1. 推斷 schema
遺憾的是,Beam 無法在執行時存取 Typescript 的類型資訊。必須使用 beam.withRowCoder 手動宣告 Schema。另一方面,可以不宣告明確的 Schema 就使用像 GroupBy 這樣感知 Schema 的操作。
Beam 能夠從各種常見的 Java 類型推斷出 Schema。可以使用 @DefaultSchema 註解來告知 Beam 從特定類型推斷 Schema。該註解接受 SchemaProvider 作為參數,而 SchemaProvider 類別已經為常見的 Java 類型內建。對於註解 Java 類型本身不實用的情況,也可以透過程式設計方式調用 SchemaRegistry。
Java POJO
POJO (Plain Old Java Object) 是一個 Java 物件,除了 Java 語言規範之外,不受任何限制。POJO 可以包含基本類型、其他 POJO 或其集合、映射或陣列的成員變數。POJO 不必擴展預先指定的類別或擴展任何特定的介面。
如果 POJO 類別使用 @DefaultSchema(JavaFieldSchema.class) 註解,Beam 將會自動推斷此類別的 Schema。支援巢狀類別以及具有 List、陣列和 Map 欄位的類別。
例如,對以下類別進行註解會告知 Beam 從此 POJO 類別推斷 Schema,並將其應用於任何 PCollection<TransactionPojo>。
@DefaultSchema(JavaFieldSchema.class)
public class TransactionPojo {
  public final String bank;
  public final double purchaseAmount;
  @SchemaCreate
  public TransactionPojo(String bank, double purchaseAmount) {
    this.bank = bank;
    this.purchaseAmount = purchaseAmount;
  }
}
// Beam will automatically infer the correct schema for this PCollection. No coder is needed as a result.
PCollection<TransactionPojo> pojos = readPojos();
@SchemaCreate 註解告知 Beam 此建構子可以用於建立 TransactionPojo 的實例,前提是建構子參數的名稱與欄位名稱相同。@SchemaCreate 也可用於註解類別上的靜態工廠方法,允許建構子保持私有。如果沒有 @SchemaCreate 註解,則所有欄位必須是非 final,並且該類別必須具有零參數建構子。
還有一些其他有用的註解會影響 Beam 如何推斷 Schema。預設情況下,推斷出的 Schema 欄位名稱將與類別欄位名稱相符。但是,可以使用 @SchemaFieldName 來指定用於 Schema 欄位的不同名稱。可以使用 @SchemaIgnore 將特定的類別欄位標記為從推斷的 Schema 中排除。例如,通常在類別中會有不應包含在 Schema 中的臨時欄位(例如,快取雜湊值以防止昂貴的雜湊重新計算),並且可以使用 @SchemaIgnore 來排除這些欄位。請注意,忽略的欄位將不會包含在這些記錄的編碼中。
在某些情況下,註解 POJO 類別並不方便,例如,如果 POJO 位於 Beam 管道作者不擁有的不同套件中。在這些情況下,可以在管道的 main 函數中以程式設計方式觸發 Schema 推斷,如下所示:
pipeline.getSchemaRegistry().registerPOJO(TransactionPOJO.class);Java Bean
Java Bean 是在 Java 中建立可重複使用的屬性類別的事實標準。雖然完整的標準具有許多特性,但關鍵特性是所有屬性都透過 getter 和 setter 類別存取,並且這些 getter 和 setter 的名稱格式是標準化的。可以使用 @DefaultSchema(JavaBeanSchema.class) 註解 Java Bean 類別,並且 Beam 將會自動推斷此類別的 Schema。例如:
@DefaultSchema(JavaBeanSchema.class)
public class TransactionBean {
  public TransactionBean() { … }
  public String getBank() { … }
  public void setBank(String bank) { … }
  public double getPurchaseAmount() { … }
  public void setPurchaseAmount(double purchaseAmount) { … }
}
// Beam will automatically infer the correct schema for this PCollection. No coder is needed as a result.
PCollection<TransactionBean> beans = readBeans();
@SchemaCreate 註解可以用於指定建構子或靜態工廠方法,在這種情況下,可以省略 setter 和零參數建構子。
@DefaultSchema(JavaBeanSchema.class)
public class TransactionBean {
  @SchemaCreate
  Public TransactionBean(String bank, double purchaseAmount) { … }
  public String getBank() { … }
  public double getPurchaseAmount() { … }
}
與 POJO 類別一樣,可以使用 @SchemaFieldName 和 @SchemaIgnore 來變更推斷的 Schema。
AutoValue
Java 值類別的正確產生非常困難。為了正確實作值類別,您必須建立許多樣板程式碼。AutoValue 是一個流行的程式庫,可透過實作簡單的抽象基底類別輕鬆產生此類類別。
Beam 可以從 AutoValue 類別推斷 Schema。例如:
@DefaultSchema(AutoValueSchema.class)
@AutoValue
public abstract class TransactionValue {
  public abstract String getBank();
  public abstract double getPurchaseAmount();
}
這就是產生簡單 AutoValue 類別所需的一切,並且上面的 @DefaultSchema 註解告知 Beam 從中推斷 Schema。這也允許在 PCollection 中使用 AutoValue 元素。
可以使用 @SchemaFieldName 和 @SchemaIgnore 來變更推斷的 Schema。
Beam 有幾種不同的機制可以從 Python 程式碼推斷 Schema。
NamedTuple 類別
NamedTuple 類別是一個 Python 類別,它包裝一個 tuple,為每個元素分配一個名稱並將其限制為特定類型。Beam 將自動推斷具有 NamedTuple 輸出類型的 PCollection 的 Schema。例如:
class Transaction(typing.NamedTuple):
  bank: str
  purchase_amount: float

pc = input | beam.Map(lambda ...).with_output_types(Transaction)
beam.Row 和 Select
還有一些方法可以用於建立臨時的 Schema 宣告。首先,您可以使用一個 lambda 來返回 beam.Row 的實例:
input_pc = ... # {"bank": ..., "purchase_amount": ...}
output_pc = input_pc | beam.Map(lambda item: beam.Row(bank=item["bank"],
                                                      purchase_amount=item["purchase_amount"])
有時,使用 Select 轉換來表達相同的邏輯會更簡潔:
input_pc = ... # {"bank": ..., "purchase_amount": ...}
output_pc = input_pc | beam.Select(bank=lambda item: item["bank"],
                                   purchase_amount=lambda item: item["purchase_amount"])
請注意,這些宣告不包含有關 bank 和 purchase_amount 欄位類型的任何特定資訊,因此 Beam 將嘗試推斷類型資訊。如果無法推斷,它將回退到泛型類型 Any。有時,這並非理想情況,您可以使用轉換來確保 Beam 使用 beam.Row 或 Select 正確推斷類型:
input_pc = ... # {"bank": ..., "purchase_amount": ...}
output_pc = input_pc | beam.Map(lambda item: beam.Row(bank=str(item["bank"]),
                                                      purchase_amount=float(item["purchase_amount"])))
Beam 目前僅推斷 Go 結構中匯出欄位的 Schema。
結構
Beam 將自動推斷用作 PCollection 元素的所有 Go 結構的 Schema,並預設使用 Schema 編碼對其進行編碼。
type Transaction struct{
  Bank string
  PurchaseAmount float64

  checksum []byte // ignored
}
未匯出的欄位會被忽略,並且無法自動推斷為 Schema 的一部分。func、channel、unsafe.Pointer 或 uintptr 類型的欄位會被推斷忽略。介面類型的欄位會被忽略,除非為它們註冊了 Schema 提供者。
預設情況下,Schema 欄位名稱將與匯出的結構欄位名稱相符。在上面的範例中,「Bank」和「PurchaseAmount」是 Schema 欄位名稱。可以使用欄位的結構標籤來覆寫 Schema 欄位名稱。
type Transaction struct{
  Bank           string  `beam:"bank"`
  PurchaseAmount float64 `beam:"purchase_amount"`
}
覆寫 Schema 欄位名稱對於跨語言轉換的相容性很有用,因為 Schema 欄位可能與 Go 匯出欄位具有不同的要求或限制。
6.6. 使用 Schema 轉換
PCollection 上的 Schema 啟用了各種豐富的關係轉換。每個記錄都由命名欄位組成的事實允許以名稱引用欄位的簡單且可讀的彙總,類似於 SQL 運算式中的彙總。
Beam 尚未在 Go 中原生支援 Schema 轉換。但是,它將透過以下行為實作。
6.6.1. 欄位選取語法
Schema 的優勢在於它們允許按名稱引用元素欄位。Beam 提供了一種選擇語法來引用欄位,包括巢狀欄位和重複欄位。當引用它們所操作的欄位時,所有 Schema 轉換都使用此語法。此語法也可以在 DoFn 內部使用,以指定要處理的 Schema 欄位。
按名稱定址欄位仍然保留類型安全性,因為 Beam 會在建構管道圖時檢查 Schema 是否匹配。如果指定的欄位不存在於 Schema 中,則管道將無法啟動。此外,如果指定的欄位類型與 Schema 中該欄位的類型不符,則管道將無法啟動。
以下字元不允許出現在欄位名稱中:. * [ ] { }
最上層欄位
為了選擇 Schema 最上層的欄位,請指定欄位的名稱。例如,為了僅從購買的 PCollection 中選擇使用者 ID,可以編寫(使用 Select 轉換):
purchases.apply(Select.fieldNames("userId"));input_pc = ... # {"user_id": ...,"bank": ..., "purchase_amount": ...}
output_pc = input_pc | beam.Select("user_id")巢狀欄位
尚未為 Python SDK 開發巢狀欄位的支援。
尚未為 Go SDK 開發巢狀欄位的支援。
可以使用點運算子指定個別的巢狀欄位。例如,為了僅從送貨地址中選擇郵遞區號,可以編寫:
purchases.apply(Select.fieldNames("shippingAddress.postCode"));萬用字元
尚未為 Python SDK 開發萬用字元的支援。
尚未為 Go SDK 開發萬用字元的支援。
可以在任何巢狀層級指定 * 運算子,以表示該層級的所有欄位。例如,為了選擇所有送貨地址欄位,可以編寫:
purchases.apply(Select.fieldNames("shippingAddress.*"));陣列
陣列欄位 (其中陣列元素類型為列) 也可以定址元素類型的子欄位。選取後,結果會是所選子欄位類型的陣列。例如:
尚未為 Python SDK 開發陣列欄位的支援。
尚未為 Go SDK 開發陣列欄位的支援。
purchases.apply(Select.fieldNames("transactions[].bank"));將產生一個列,其中包含一個元素類型為字串的陣列欄位,其中包含每個交易的銀行清單。
雖然建議在選取器中使用 [] 方括號,以清楚表明正在選擇陣列元素,但為了簡潔起見,可以省略它們。未來將支援陣列切片,允許選擇陣列的部分。
映射
映射欄位 (其中值類型為列) 也可以定址值類型的子欄位。選取後,結果會是一個映射,其中索引鍵與原始映射中的索引鍵相同,但值是指定的類型。與陣列類似,建議在選取器中使用 {} 大括號,以清楚表明正在選擇映射值元素,但為了簡潔起見,可以省略它們。未來將支援映射索引鍵選取器,允許從映射中選取特定索引鍵。例如,給定以下 Schema:
PurchasesByType
| 欄位名稱 | 欄位類型 |
|---|---|
| purchases | MAP{STRING, ROW{PURCHASE} |
以下內容
purchasesByType.apply(Select.fieldNames("purchases{}.userId"));尚未為 Python SDK 開發映射欄位的支援。
尚未為 Go SDK 開發映射欄位的支援。
將產生一個列,其中包含一個索引鍵類型為字串且值類型為字串的映射欄位。選取的映射將包含原始映射中的所有索引鍵,並且值將是包含在購買記錄中的 userId。
雖然建議在選取器中使用 {} 大括號,以清楚表明正在選擇映射值元素,但為了簡潔起見,可以省略它們。未來將支援映射切片,允許從映射中選取特定索引鍵。
6.6.2. Schema 轉換
Beam 提供了一系列以 Schema 原生操作的轉換。這些轉換非常具有表達力,允許根據命名的 Schema 欄位進行選擇和彙總。以下是一些有用的 Schema 轉換的範例。
選取輸入
通常,計算僅對輸入 PCollection 中的欄位子集感興趣。Select 轉換允許輕鬆投影出僅感興趣的欄位。產生的 PCollection 具有一個 Schema,其中包含每個選取的欄位作為最上層欄位。可以選取最上層欄位和巢狀欄位。例如,在 Purchase Schema 中,可以按如下方式僅選取 userId 和 streetAddress 欄位:
purchases.apply(Select.fieldNames("userId", "shippingAddress.streetAddress"));尚未為 Python SDK 開發巢狀欄位的支援。
尚未為 Go SDK 開發巢狀欄位的支援。
產生的 PCollection 將具有以下 Schema:
| 欄位名稱 | 欄位類型 |
|---|---|
| userId | 字串 |
| streetAddress | 字串 |
萬用字元選取也是如此。以下內容:
purchases.apply(Select.fieldNames("userId", "shippingAddress.*"));尚未為 Python SDK 開發萬用字元的支援。
尚未為 Go SDK 開發萬用字元的支援。
將會產生以下綱要
| 欄位名稱 | 欄位類型 |
|---|---|
| userId | 字串 |
| streetAddress | 字串 |
| city | 字串 |
| state | 可為 null 字串 |
| country | 字串 |
| postCode | 字串 |
當選取巢狀於陣列內部的欄位時,相同的規則適用,即每個選取的欄位都會以個別的頂層欄位形式出現在產生的列中。這表示如果從同一個巢狀列中選取多個欄位,則每個選取的欄位都會以其自身的陣列欄位形式出現。例如
purchases.apply(Select.fieldNames( "transactions.bank", "transactions.purchaseAmount"));Python SDK 尚未開發巢狀欄位的支援。
Go SDK 尚未開發巢狀欄位的支援。
將會產生以下綱要
| 欄位名稱 | 欄位類型 |
|---|---|
| bank | ARRAY[STRING] |
| purchaseAmount | ARRAY[DOUBLE] |
萬用字元選取等同於個別選取每個欄位。
選取巢狀於對應表內部的欄位具有與陣列相同的語意。如果您從對應表中選取多個欄位,則每個選取的欄位都會展開到頂層自己的對應表。這表示會複製一組對應表鍵,每個選取的欄位複製一次。
有時不同的巢狀列會具有名稱相同的欄位。選取多個這些欄位會導致名稱衝突,因為所有選取的欄位都會放在相同的列綱要中。當發生這種情況時,可以使用 Select.withFieldNameAs 建構器方法來提供選取欄位的替代名稱。
Select 轉換的另一個用途是將巢狀綱要展平為單一平面綱要。例如
purchases.apply(Select.flattenedSchema());Python SDK 尚未開發巢狀欄位的支援。
Go SDK 尚未開發巢狀欄位的支援。
將會產生以下綱要
| 欄位名稱 | 欄位類型 |
|---|---|
| userId | 字串 |
| itemId | 字串 |
| shippingAddress_streetAddress | 字串 |
| shippingAddress_city | 可為 null 字串 |
| shippingAddress_state | 字串 |
| shippingAddress_country | 字串 |
| shippingAddress_postCode | 字串 |
| costCents | INT64 |
| transactions_bank | ARRAY[STRING] |
| transactions_purchaseAmount | ARRAY[DOUBLE] |
群組彙總
Group 轉換允許簡單地依輸入綱要中的任何欄位數來分組資料,將彙總套用至這些群組,並將彙總結果儲存在新的綱要欄位中。Group 轉換的輸出具有一個綱要,每個執行的彙總對應一個欄位。
GroupBy 轉換允許簡單地依輸入綱要中的任何欄位數來分組資料,將彙總套用至這些群組,並將彙總結果儲存在新的綱要欄位中。GroupBy 轉換的輸出具有一個綱要,每個執行的彙總對應一個欄位。
Group 最簡單的用法是未指定任何彙總,在這種情況下,所有符合提供的欄位集的輸入都會一起分組到 ITERABLE 欄位中。例如
GroupBy 最簡單的用法是未指定任何彙總,在這種情況下,所有符合提供的欄位集的輸入都會一起分組到 ITERABLE 欄位中。例如
purchases.apply(Group.byFieldNames("userId", "bank"));input_pc = ... # {"user_id": ...,"bank": ..., "purchase_amount": ...}
output_pc = input_pc | beam.GroupBy('user_id','bank')Go SDK 尚未開發支援綱要感知的群組。
此輸出的綱要是
| 欄位名稱 | 欄位類型 |
|---|---|
| key | ROW{userId:STRING, bank:STRING} |
| values | ITERABLE[ROW[Purchase]] |
key 欄位包含分組鍵,而 values 欄位包含符合該鍵的所有值的清單。
可以使用 withKeyField 和 withValueField 建構器來控制輸出綱要中的 key 和 values 欄位名稱,如下所示
purchases.apply(Group.byFieldNames("userId", "shippingAddress.streetAddress")
    .withKeyField("userAndStreet")
    .withValueField("matchingPurchases"));
通常會將一個或多個彙總套用至分組的結果。每個彙總都可以指定一個或多個要彙總的欄位、一個彙總函式,以及輸出綱要中產生的欄位名稱。例如,下列應用程式會計算依 userId 分組的三個彙總,所有彙總都表示在單一輸出綱要中
purchases.apply(Group.byFieldNames("userId")
    .aggregateField("itemId", Count.combineFn(), "numPurchases")
    .aggregateField("costCents", Sum.ofLongs(), "totalSpendCents")
    .aggregateField("costCents", Top.<Long>largestLongsFn(10), "topPurchases"));
input_pc = ... # {"user_id": ..., "item_Id": ..., "cost_cents": ...}
output_pc = input_pc | beam.GroupBy("user_id")
.aggregate_field("item_id", CountCombineFn, "num_purchases")
.aggregate_field("cost_cents", sum, "total_spendcents")
.aggregate_field("cost_cents", TopCombineFn, "top_purchases")Go SDK 尚未開發支援綱要感知的群組。
此彙總的結果會具有下列綱要
| 欄位名稱 | 欄位類型 |
|---|---|
| key | ROW{userId:STRING} |
| value | ROW{numPurchases: INT64, totalSpendCents: INT64, topPurchases: ARRAY[INT64]} |
通常會使用 Selected.flattenedSchema 將結果展平為非巢狀的平面綱要。
聯結
Beam 支援綱要 PCollections 上的等值聯結 — 也就是說,聯結條件取決於欄位子集的相等性的聯結。例如,下列範例使用 Purchases 綱要將交易與可能與該交易相關聯的評論聯結 (使用者和產品都與交易中的符合)。這是一個「自然聯結」 — 也就是說,在聯結的左側和右側都使用相同的欄位名稱 — 並以 using 關鍵字指定
Python SDK 尚未開發聯結的支援。
Go SDK 尚未開發聯結的支援。
PCollection<Transaction> transactions = readTransactions();
PCollection<Review> reviews = readReviews();
PCollection<Row> joined = transactions.apply(
    Join.innerJoin(reviews).using("userId", "productId"));
產生的綱要如下
| 欄位名稱 | 欄位類型 |
|---|---|
| lhs | ROW{Transaction} |
| rhs | ROW{Review} |
每個產生的列都包含一個符合聯結條件的 Transaction 和一個 Review。
如果兩個綱要中要符合的欄位名稱不同,則可以使用 on 函式。例如,如果 Review 綱要對這些欄位的命名方式與 Transaction 綱要不同,則我們可以編寫下列程式碼
Python SDK 尚未開發聯結的支援。
Go SDK 尚未開發聯結的支援。
PCollection<Row> joined = transactions.apply(
    Join.innerJoin(reviews).on(
      FieldsEqual
         .left("userId", "productId")
         .right("reviewUserId", "reviewProductId")));
除了內部聯結之外,Join 轉換還支援完整外部聯結、左外部聯結和右外部聯結。
複雜聯結
雖然大多數聯結往往是二元聯結 — 將兩個輸入聯結在一起 — 但有時您會有兩個以上的輸入串流,這些串流都需要依通用鍵聯結。CoGroup 轉換允許依綱要欄位的相等性將多個 PCollections 聯結在一起。每個 PCollection 都可以在最終聯結記錄中標記為必要或選用,從而將外部聯結廣義化為具有大於兩個輸入 PCollection 的聯結。輸出可以選擇性地展開 — 提供個別的聯結記錄,如 Join 轉換中所示。也可以以未展開的格式處理輸出 — 提供聯結鍵,以及來自每個符合該鍵的輸入的所有記錄的 Iterables。
Python SDK 尚未開發聯結的支援。
Go SDK 尚未開發聯結的支援。
篩選事件
可以透過一組述詞來設定 Filter 轉換,每個述詞都基於指定的欄位。只有所有述詞都傳回 true 的記錄才會通過篩選。例如,以下
purchases.apply(Filter.create()
    .whereFieldName("costCents", c -> c > 100 * 20)
    .whereFieldName("shippingAddress.country", c -> c.equals("de"));
會產生所有來自德國且購買價格高於 20 分的購買項目。
將欄位新增至綱要
AddFields 轉換可用來使用新的欄位擴充綱要。輸入列將透過插入新欄位的 null 值來擴充到新的綱要,但可以指定替代的預設值;如果使用預設的 null 值,則新的欄位類型會標記為可為 null。可以使用欄位選取語法新增巢狀子欄位,包括陣列或對應表值內的巢狀欄位。
例如,下列應用程式
purchases.apply(AddFields.<PurchasePojo>create()
    .field("timeOfDaySeconds", FieldType.INT32)
    .field("shippingAddress.deliveryNotes", FieldType.STRING)
    .field("transactions.isFlagged", FieldType.BOOLEAN, false));
會產生具有已擴充綱要的 PCollection。輸入的所有列和欄位,以及新增至綱要的指定欄位。所有產生的列都將填入 timeOfDaySeconds 和 shippingAddress.deliveryNotes 欄位的 null 值,以及 transactions.isFlagged 欄位的 false 值。
從綱要中移除欄位
DropFields 允許從綱要中捨棄特定欄位。輸入列的綱要將會截斷,而任何已捨棄欄位的值都會從輸出中移除。也可以使用欄位選取語法來捨棄巢狀欄位。
例如,下列程式碼片段
purchases.apply(DropFields.fields("userId", "shippingAddress.streetAddress"));會產生輸入的副本,其中移除這兩個欄位及其對應的值。
重新命名綱要欄位
RenameFields 允許重新命名綱要中的特定欄位。輸入列中的欄位值保持不變,只會修改綱要。這個轉換通常用於準備記錄以輸出到綱要感知的接收器 (例如 RDBMS),以確保 PCollection 綱要欄位名稱與輸出的欄位名稱相符。它也可以用來重新命名其他轉換產生的欄位,使其更實用 (類似於 SQL 中的 SELECT AS)。也可以使用欄位選取語法來重新命名巢狀欄位。
例如,下列程式碼片段
purchases.apply(RenameFields.<PurchasePojo>create()
  .rename("userId", "userIdentifier")
  .rename("shippingAddress.streetAddress", "shippingAddress.street"));
會產生相同的一組未修改的輸入元素,但是 PCollection 的綱要已變更為將 userId 重新命名為 userIdentifier,並將 shippingAddress.streetAddress 重新命名為 shippingAddress.street。
在類型之間轉換
如前所述,只要這些類型具有對等的綱要,Beam 就可以自動在不同的 Java 類型之間轉換。其中一種方法是使用 Convert 轉換,如下所示。
PCollection<PurchaseBean> purchaseBeans = readPurchasesAsBeans();
PCollection<PurchasePojo> pojoPurchases =
    purchaseBeans.apply(Convert.to(PurchasePojo.class));
Beam 會驗證 PurchasePojo 的推斷綱要是否與輸入 PCollection 的綱要相符,然後轉換為 PCollection<PurchasePojo>。
由於 Row 類別可以支援任何綱要,因此任何具有綱要的 PCollection 都可以轉換為列的 PCollection,如下所示。
PCollection<Row> purchaseRows = purchaseBeans.apply(Convert.toRows());如果來源類型是單一欄位綱要,Convert 也會轉換為欄位的類型 (如果要求),實際上會取消裝箱列。例如,給定具有單一 INT64 欄位的綱要,以下程式碼會將其轉換為 PCollection<Long>
PCollection<Long> longs = rows.apply(Convert.to(TypeDescriptors.longs()));在所有情況下,類型檢查都會在管線圖建構時完成,如果類型與綱要不符,則管線會無法啟動。
6.6.3. ParDo 中的 Schema
具有綱要的 PCollection 可以套用 ParDo,就像任何其他 PCollection 一樣。但是 Beam 執行器在套用 ParDo 時會感知綱要,這會啟用其他功能。
輸入轉換
Beam 尚未支援 Go 中的輸入轉換。
由於 Beam 知道來源 PCollection 的綱要,因此它可以自動將元素轉換為任何已知相符綱要的 Java 類型。例如,使用上述 Transaction 綱要,假設我們有下列 PCollection
PCollection<PurchasePojo> purchases = readPurchases();如果沒有綱要,則套用的 DoFn 必須接受 TransactionPojo 類型的元素。但是,由於有綱要,您可以套用下列 DoFn
purchases.apply(ParDo.of(new DoFn<PurchasePojo, PurchasePojo>() {
  @ProcessElement public void process(@Element PurchaseBean purchase) {
      ...
  }
}));
即使 @Element 參數與 PCollection 的 Java 類型不符,由於它具有相符的綱要,因此 Beam 會自動轉換元素。如果綱要不符,則 Beam 會在圖形建構時偵測到此情況,並會因類型錯誤而導致作業失敗。
由於每個 schema 都可以用 Row 型別表示,因此這裡也可以使用 Row。
purchases.appy(ParDo.of(new DoFn<PurchasePojo, PurchasePojo>() {
  @ProcessElement public void process(@Element Row purchase) {
      ...
  }
}));
輸入選擇
由於輸入具有 schema,您也可以自動選擇特定的欄位在 DoFn 中處理。
假設有上述的 PCollection 購買資料,您只想處理 userId 和 itemId 欄位。您可以使用上述的選擇表達式來完成,如下所示
purchases.appy(ParDo.of(new DoFn<PurchasePojo, PurchasePojo>() {
@ProcessElement public void process(
@FieldAccess("userId") String userId, @FieldAccess("itemId") long itemId) {
...
}
}));您也可以選擇巢狀欄位,如下所示。
purchases.appy(ParDo.of(new DoFn<PurchasePojo, PurchasePojo>() {
@ProcessElement public void process(
@FieldAccess("shippingAddress.street") String street) {
...
}
}));有關更多資訊,請參閱欄位選擇表達式章節。當選擇子 schema 時,Beam 會自動轉換為任何符合的 schema 型別,就像讀取整個 row 一樣。
7. 資料編碼和型別安全
當 Beam runner 執行您的 pipeline 時,它們通常需要將 PCollection 中的中間資料實體化,這需要將元素轉換為位元組字串或從位元組字串轉換。Beam SDK 使用稱為 Coder 的物件來描述如何編碼和解碼給定 PCollection 的元素。
請注意,Coder 與和外部資料來源或接收器互動時的資料剖析或格式化無關。此類剖析或格式化通常應使用
ParDo或MapElements等轉換來明確完成。
在 Java 的 Beam SDK 中,Coder 型別提供了編碼和解碼資料所需的方法。Java 的 SDK 提供了許多 Coder 子類別,這些子類別可與各種標準 Java 型別(例如 Integer、Long、Double、StringUtf8 等)一起使用。您可以在 Coder 套件中找到所有可用的 Coder 子類別。
在 Python 的 Beam SDK 中,Coder 型別提供了編碼和解碼資料所需的方法。Python 的 SDK 提供了許多 Coder 子類別,這些子類別可與各種標準 Python 型別(例如基本型別、Tuple、Iterable、StringUtf8 等)一起使用。您可以在 apache_beam.coders 套件中找到所有可用的 Coder 子類別。
標準 Go 型別(如 int、int64、float64、[]byte 和 string 等)使用內建的 coder 進行編碼。結構體和結構體指標預設使用 Beam Schema Row 編碼。但是,使用者可以使用 beam.RegisterCoder 建構和註冊自訂 coder。您可以在 coder 套件中找到可用的 Coder 函數。
標準 Typescript 型別(如 number、UInt8Array 和 string 等)使用內建的 coder 進行編碼。Json 物件和陣列透過 BSON 編碼進行編碼。對於這些型別,除非與跨語言轉換互動,否則不需要指定 coder。使用者可以透過擴展 beam.coders.Coder 來建構自訂 coder,以用於 withCoderInternal,但一般來說,邏輯型別是這種情況的首選。
請注意,coder 不一定與型別具有 1:1 的關係。例如,Integer 型別可以有多個有效的 coder,輸入和輸出資料可以使用不同的 Integer coder。轉換可能具有使用 BigEndianIntegerCoder 的 Integer 型別輸入資料,以及使用 VarIntCoder 的 Integer 型別輸出資料。
7.1. 指定編碼器
Beam SDK 要求您的 pipeline 中的每個 PCollection 都有一個 coder。在大多數情況下,Beam SDK 能夠根據其元素型別或產生它的轉換自動推斷 PCollection 的 Coder,但是,在某些情況下,pipeline 作者將需要明確指定 Coder,或為其自訂型別開發 Coder。
您可以使用 PCollection.setCoder 方法來明確設定現有 PCollection 的 coder。請注意,您無法在已完成的 PCollection 上呼叫 setCoder(例如,透過在其上呼叫 .apply)。
您可以使用 getCoder 方法來取得現有 PCollection 的 coder。如果未設定 coder 且無法為給定的 PCollection 推斷出 coder,則此方法將失敗並出現 IllegalStateException。
Beam SDK 在嘗試自動推斷 PCollection 的 Coder 時會使用各種機制。
每個 pipeline 物件都有一個 CoderRegistry。CoderRegistry 表示 Java 型別與 pipeline 應為每個型別的 PCollection 使用的預設 coder 之間的對應關係。
Python 的 Beam SDK 有一個 CoderRegistry,表示 Python 型別與應為每個型別的 PCollection 使用的預設 coder 之間的對應關係。
Go 的 Beam SDK 允許使用者使用 beam.RegisterCoder 註冊預設 coder 實作。
預設情況下,Java 的 Beam SDK 會使用轉換的函數物件(例如 DoFn)中的型別參數,自動推斷 PTransform 產生的 PCollection 元素的 Coder。例如,在 ParDo 的情況下,DoFn<Integer, String> 函數物件接受 Integer 型別的輸入元素,並產生 String 型別的輸出元素。在這種情況下,Java 的 SDK 會自動推斷輸出 PCollection<String> 的預設 Coder(在預設 pipeline CoderRegistry 中,這是 StringUtf8Coder)。
預設情況下,Python 的 Beam SDK 會使用轉換函數物件(例如 DoFn)中的型別提示,自動推斷輸出 PCollection 元素的 Coder。例如,在 ParDo 的情況下,具有 @beam.typehints.with_input_types(int) 和 @beam.typehints.with_output_types(str) 型別提示的 DoFn 接受 int 型別的輸入元素,並產生 str 型別的輸出元素。在這種情況下,Python 的 Beam SDK 會自動推斷輸出 PCollection 的預設 Coder(在預設 pipeline CoderRegistry 中,這是 BytesCoder)。
預設情況下,Go 的 Beam SDK 會根據轉換的函數物件(例如 DoFn)的輸出,自動推斷輸出 PCollection 元素的 Coder。例如,在 ParDo 的情況下,具有 v int, emit func(string) 參數的 DoFn 接受 int 型別的輸入元素,並產生 string 型別的輸出元素。在這種情況下,Go 的 Beam SDK 會自動推斷輸出 PCollection 的預設 Coder 為 string_utf8 coder。
注意: 如果您使用
Create轉換從記憶體中資料建立PCollection,則無法依賴 coder 推斷和預設 coder。Create無法存取其引數的任何型別資訊,並且如果引數清單包含一個值,而該值的確切執行階段類別沒有註冊預設 coder,則可能無法推斷出 coder。
當使用 Create 時,確保您擁有正確 coder 的最簡單方法是在您套用 Create 轉換時呼叫 withCoder。
7.2. 預設編碼器和 CoderRegistry
每個 Pipeline 物件都有一個 CoderRegistry 物件,該物件將語言型別對應到 pipeline 應為這些型別使用的預設 coder。您可以使用 CoderRegistry 本身來查閱給定型別的預設 coder,或為給定型別註冊新的預設 coder。
對於您使用 JavaPython 的 Beam SDK 建立的任何 pipeline,CoderRegistry 都包含 coder 到標準 JavaPython 型別的預設對應。下表顯示了標準對應
| Java 型別 | 預設 Coder |
|---|---|
| Double | DoubleCoder |
| Instant | InstantCoder |
| Integer | VarIntCoder |
| Iterable | IterableCoder |
| KV | KvCoder |
| List | ListCoder |
| Map | MapCoder |
| Long | VarLongCoder |
| String | StringUtf8Coder |
| TableRow | TableRowJsonCoder |
| Void | VoidCoder |
| byte[ ] | ByteArrayCoder |
| TimestampedValue | TimestampedValueCoder |
| Python 型別 | 預設 Coder |
|---|---|
| int | VarIntCoder |
| float | FloatCoder |
| str | BytesCoder |
| bytes | StrUtf8Coder |
| Tuple | TupleCoder |
7.2.1. 查找預設編碼器
您可以使用 CoderRegistry.getCoder 方法來判斷 Java 型別的預設 Coder。您可以使用 Pipeline.getCoderRegistry 方法來存取給定 pipeline 的 CoderRegistry。這讓您可以根據每個 pipeline 來判斷(或設定)Java 型別的預設 Coder:例如,「對於此 pipeline,驗證 Integer 值是否使用 BigEndianIntegerCoder 進行編碼」。
您可以使用 CoderRegistry.get_coder 方法來判斷 Python 型別的預設 Coder。您可以使用 coders.registry 來存取 CoderRegistry。這讓您可以判斷(或設定)Python 型別的預設 Coder。
您可以使用 beam.NewCoder 函數來判斷 Go 型別的預設 Coder。
7.2.2. 設定類型的預設編碼器
要為特定 pipeline 設定 JavaPython 型別的預設 Coder,您需要取得並修改 pipeline 的 CoderRegistry。您可以使用 Pipeline.getCoderRegistry coders.registry 方法來取得 CoderRegistry 物件,然後使用 CoderRegistry.registerCoder CoderRegistry.register_coder 方法來為目標型別註冊新的 Coder。
若要設定 Go 型別的預設 Coder,您可以使用 beam.RegisterCoder 函數來為目標型別註冊編碼器和解碼器函數。但是,內建型別(例如 int、string、float64 等)無法覆寫其 coder。
以下範例程式碼示範如何為 pipeline 的 Integerint 值設定預設 Coder,在此情況下為 BigEndianIntegerCoder。
以下範例程式碼示範如何為 MyCustomType 元素設定自訂 Coder。
PipelineOptions options = PipelineOptionsFactory.create();
Pipeline p = Pipeline.create(options);
CoderRegistry cr = p.getCoderRegistry();
cr.registerCoder(Integer.class, BigEndianIntegerCoder.class);apache_beam.coders.registry.register_coder(int, BigEndianIntegerCoder)type MyCustomType struct{
...
}
// See documentation on beam.RegisterCoder for other supported coder forms.
func encode(MyCustomType) []byte { ... }
func decode(b []byte) MyCustomType { ... }
func init() {
beam.RegisterCoder(reflect.TypeOf((*MyCustomType)(nil)).Elem(), encode, decode)
}7.2.3. 使用預設編碼器註解自訂資料類型
如果您的 pipeline 程式定義了自訂資料型別,您可以使用 @DefaultCoder 註解來指定要與該型別搭配使用的 coder。預設情況下,Beam 將使用使用 Java 序列化的 SerializableCoder,但它有缺點
它在編碼大小和速度方面效率低下。請參閱此Java 序列化方法比較。
它是不確定的:它可能會為兩個等效的物件產生不同的二進位編碼。
對於鍵/值對,基於鍵的操作(GroupByKey、Combine)和每個鍵的狀態的正確性取決於鍵是否具有確定性的 coder。
您可以使用 @DefaultCoder 註解來設定新的預設值,如下所示
@DefaultCoder(AvroCoder.class)
public class MyCustomDataType {
...
}如果您已建立自訂 coder 以符合您的資料型別,並且想要使用 @DefaultCoder 註解,則您的 coder 類別必須實作靜態 Coder.of(Class<T>) 工廠方法。
public class MyCustomCoder implements Coder {
public static Coder<T> of(Class<T> clazz) {...}
...
}
@DefaultCoder(MyCustomCoder.class)
public class MyCustomDataType {
...
}PythonGo 的 Beam SDK 不支援使用預設 coder 註解資料型別。如果您想要設定預設 coder,請使用上一節為型別設定預設 coder 中描述的方法。
8. 視窗化
Windowing 會根據 PCollection 中各元素的 timestamp 來細分 PCollection。聚合多個元素的轉換(例如 GroupByKey 和 Combine)會隱式地在每個視窗的基礎上運作 — 它們會將每個 PCollection 作為一系列多個有限視窗進行處理,儘管整個集合本身可能是無界大小。
一個相關的概念,稱為觸發器(triggers),決定了當無邊界資料到達時,何時發出聚合結果。您可以使用觸發器來改進 PCollection 的視窗策略。觸發器允許您處理延遲到達的資料或提供早期結果。詳情請參閱觸發器章節。
8.1. 視窗化基礎
某些 Beam 轉換,例如 GroupByKey 和 Combine,會根據共同的鍵值將多個元素分組。通常,該分組操作會將整個資料集中具有相同鍵值的所有元素分組。對於無邊界的資料集,不可能收集所有元素,因為新的元素會不斷加入,而且數量可能是無限的(例如,串流資料)。如果您正在處理無邊界的 PCollection,視窗化(windowing)尤其有用。
在 Beam 模型中,任何 PCollection(包括無邊界的 PCollection)都可以細分為邏輯視窗。PCollection 中的每個元素都會根據 PCollection 的視窗化函式,被分配到一個或多個視窗中,而每個單獨的視窗都包含有限數量的元素。然後,分組轉換會以每個視窗為基礎考慮每個 PCollection 的元素。例如,GroupByKey 會隱式地按鍵值和視窗分組 PCollection 的元素。
注意: Beam 的預設視窗化行為是將 PCollection 的所有元素分配到一個單一的全局視窗,並丟棄延遲的資料,即使是針對無邊界的 PCollection 也是如此。在無邊界的 PCollection 上使用 GroupByKey 等分組轉換之前,您必須至少執行以下其中一項:
- 設定一個非全局的視窗化函式。請參閱設定 PCollection 的視窗化函式。
- 設定一個非預設的觸發器。由於預設的視窗化行為(等待所有資料到達)永遠不會發生,這允許全局視窗在其他條件下發出結果。
如果您沒有為無邊界的 PCollection 設定非全局的視窗化函式或非預設的觸發器,然後使用 GroupByKey 或 Combine 等分組轉換,您的管線在建構時會產生錯誤,並且您的作業將會失敗。
8.1.1. 視窗化限制
在您為 PCollection 設定視窗化函式後,元素的視窗會在您下次將分組轉換應用到該 PCollection 時使用。視窗分組會根據需要發生。如果您使用 Window 轉換設定視窗化函式,則每個元素都會被分配到一個視窗,但在 GroupByKey 或 Combine 跨視窗和鍵值進行聚合之前,不會考慮這些視窗。這可能會對您的管線產生不同的影響。請考慮下圖中的範例管線

圖 3:應用視窗化的管線
在上面的管線中,我們使用 KafkaIO 讀取一組鍵/值對來建立無邊界的 PCollection,然後使用 Window 轉換將視窗化函式應用到該集合。然後,我們將 ParDo 應用到該集合,然後稍後使用 GroupByKey 對 ParDo 的結果進行分組。視窗化函式對 ParDo 轉換沒有影響,因為在需要 GroupByKey 之前,視窗實際上並未使用。但是,後續的轉換會應用於 GroupByKey 的結果 - 資料會依鍵值和視窗分組。
8.1.2. 使用有界 PCollection 進行視窗化
您可以在有邊界的 PCollection 中使用視窗化來處理固定大小的資料集。但是,請注意,視窗化僅考慮附加到 PCollection 每個元素的隱式時間戳記,而建立固定資料集(例如 TextIO)的資料來源會為每個元素分配相同的時間戳記。這表示所有元素預設都是單一全局視窗的一部分。
若要將視窗化與固定資料集一起使用,您可以為每個元素分配自己的時間戳記。若要將時間戳記分配給元素,請使用具有 DoFn 的 ParDo 轉換,該 DoFn 會輸出具有新時間戳記的每個元素(例如,Beam SDK for Java 中的 WithTimestamps 轉換)。
為了說明使用有邊界的 PCollection 的視窗化如何影響您的管線處理資料的方式,請考慮以下管線

圖 4:在有邊界集合上,不使用視窗化的 GroupByKey 和 ParDo。
在上面的管線中,我們透過使用 TextIO 從檔案讀取行來建立有邊界的 PCollection。然後,我們使用 GroupByKey 對集合進行分組,並將 ParDo 轉換應用於分組的 PCollection。在此範例中,GroupByKey 會建立唯一鍵值的集合,然後 ParDo 會針對每個鍵值準確執行一次。
請注意,即使您未設定視窗化函式,仍然存在一個視窗 – 您 PCollection 中的所有元素都會被分配到一個單一的全局視窗。
現在,請考慮相同的管線,但使用視窗化函式

圖 5:在有邊界集合上,使用視窗化的 GroupByKey 和 ParDo。
和之前一樣,管線透過從檔案讀取行來建立有邊界的 PCollection。然後,我們為該 PCollection 設定一個視窗化函式。GroupByKey 轉換會根據視窗化函式,按鍵值和視窗分組 PCollection 的元素。後續的 ParDo 轉換會針對每個鍵值多次執行,每個視窗執行一次。
8.2. 提供的視窗化函式
您可以定義不同種類的視窗,以分割 PCollection 的元素。Beam 提供多種視窗化函式,包括
- 固定時間視窗
- 滑動時間視窗
- 每個工作階段視窗
- 單一全局視窗
- 基於日曆的視窗(Beam SDK for Python 或 Go 不支援)
如果您有更複雜的需求,您也可以定義自己的 WindowFn。
請注意,根據您使用的視窗化函式,每個元素在邏輯上可以屬於多個視窗。例如,滑動時間視窗化可能會建立重疊的視窗,其中單一元素可以被分配到多個視窗。但是,PCollection 中的每個元素只能在一個視窗中,因此如果一個元素被分配到多個視窗,則該元素在概念上會被複製到每個視窗中,而且每個元素都是相同的,只是視窗不同。
8.2.1. 固定時間視窗
最簡單的視窗化形式是使用固定時間視窗:給定一個可能不斷更新的時間戳記 PCollection,每個視窗可能會捕獲(例如)時間戳記落在 30 秒間隔內的所有元素。
固定時間視窗代表資料串流中一致的持續時間,非重疊的時間間隔。考慮持續時間為 30 秒的視窗:無邊界 PCollection 中時間戳記值從 0:00:00 到 0:00:30(但不包括 0:00:30)的所有元素都屬於第一個視窗,時間戳記值從 0:00:30 到 0:01:00(但不包括 0:01:00)的元素屬於第二個視窗,依此類推。
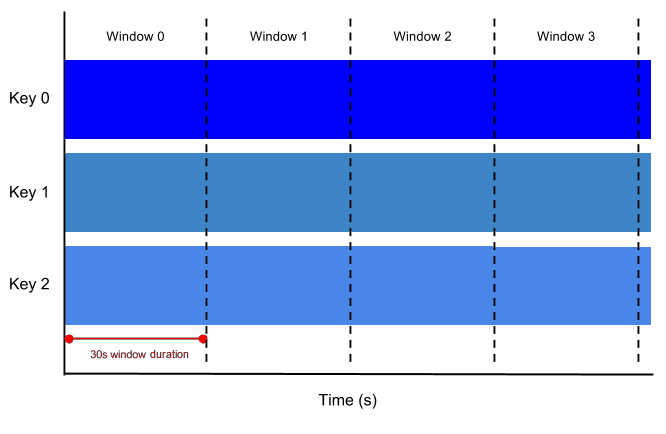
圖 6:固定時間視窗,持續時間為 30 秒。
8.2.2. 滑動時間視窗
滑動時間視窗也代表資料串流中的時間間隔;但是,滑動時間視窗可以重疊。例如,每個視窗可能會捕獲 60 秒的資料,但每 30 秒會啟動一個新視窗。滑動視窗開始的頻率稱為週期。因此,我們的範例會有 60 秒的視窗持續時間和 30 秒的週期。
由於多個視窗重疊,資料集中的大多數元素會屬於多個視窗。這種視窗化方式對於計算資料的滾動平均值非常有用;使用滑動時間視窗,您可以在我們的範例中計算過去 60 秒資料的滾動平均值,並每 30 秒更新一次。
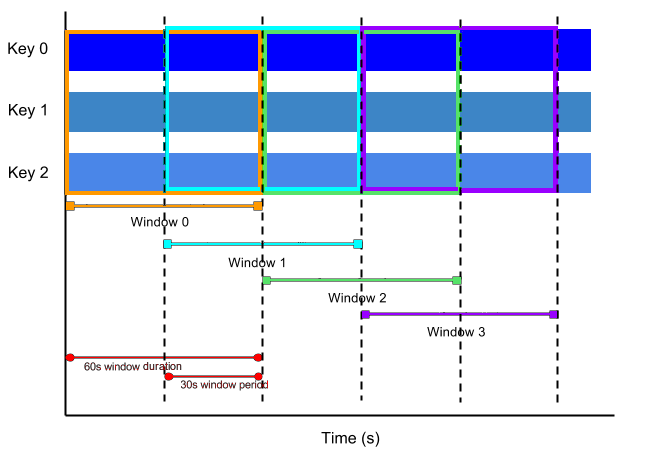
圖 7:滑動時間視窗,視窗持續時間為 1 分鐘,視窗週期為 30 秒。
8.2.3. 工作階段視窗
工作階段視窗函式會定義包含在另一個元素的特定間隔持續時間內的元素的視窗。工作階段視窗化會按鍵值套用,對於時間分佈不規律的資料非常有用。例如,代表使用者滑鼠活動的資料串流可能會有長時間的閒置時間,並散佈著高密度的點擊。如果資料在指定的最小間隔持續時間之後到達,這會啟動新視窗的開始。
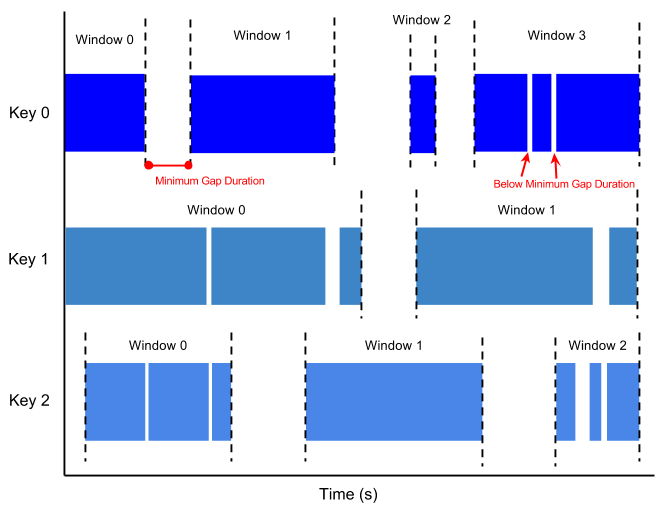
圖 8:工作階段視窗,具有最小間隔持續時間。請注意每個資料鍵值如何根據其資料分佈具有不同的視窗。
8.2.4. 單一全域視窗
預設情況下,PCollection 中的所有資料都會被分配到單一的全局視窗,並且會丟棄延遲的資料。如果您的資料集大小是固定的,您可以為您的 PCollection 使用全局視窗預設值。
如果您正在處理無邊界的資料集(例如,來自串流資料來源),您可以使用單一全局視窗,但在應用 GroupByKey 和 Combine 等聚合轉換時請務必小心。具有預設觸發器的單一全局視窗通常需要整個資料集都可用才能進行處理,這對於不斷更新的資料是不可能的。若要對使用全局視窗化的無邊界 PCollection 執行聚合,您應該為該 PCollection 指定一個非預設的觸發器。
8.3. 設定 PCollection 的視窗化函式
您可以透過套用 Window 轉換來設定 PCollection 的視窗化函式。當您套用 Window 轉換時,您必須提供 WindowFn。WindowFn 決定您的 PCollection 將用於後續分組轉換的視窗化函式,例如固定或滑動時間視窗。
當您設定視窗化函式時,您可能還想要為您的 PCollection 設定觸發器。觸發器決定何時聚合和發出每個單獨的視窗,並有助於改進視窗化函式在延遲資料和計算早期結果方面的執行方式。請參閱觸發器章節以取得更多資訊。
在 Beam YAML 中,視窗化規格也可以直接放置在任何轉換上,而不需要明確的 WindowInto 轉換。
8.3.1. 固定時間視窗
以下範例程式碼顯示如何套用 Window 將 PCollection 分割為固定視窗,每個視窗長度為 60 秒
PCollection<String> items = ...;
PCollection<String> fixedWindowedItems = items.apply(
Window.<String>into(FixedWindows.of(Duration.standardSeconds(60))));from apache_beam import window
fixed_windowed_items = (
items | 'window' >> beam.WindowInto(window.FixedWindows(60)))fixedWindowedItems := beam.WindowInto(s,
window.NewFixedWindows(60*time.Second),
items)pcoll
.apply(beam.windowInto(windowings.fixedWindows(60)))type: WindowInto
windowing:
type: fixed
size: 60s8.3.2. 滑動時間視窗
以下範例程式碼顯示如何套用 Window 將 PCollection 分割為滑動時間視窗。每個視窗長度為 30 秒,且每五秒開始一個新視窗
PCollection<String> items = ...;
PCollection<String> slidingWindowedItems = items.apply(
Window.<String>into(SlidingWindows.of(Duration.standardSeconds(30)).every(Duration.standardSeconds(5))));from apache_beam import window
sliding_windowed_items = (
items | 'window' >> beam.WindowInto(window.SlidingWindows(30, 5)))slidingWindowedItems := beam.WindowInto(s,
window.NewSlidingWindows(5*time.Second, 30*time.Second),
items)pcoll
.apply(beam.windowInto(windowings.slidingWindows(30, 5)))type: WindowInto
windowing:
type: sliding
size: 5m
period: 30s8.3.3. 工作階段視窗
以下範例程式碼顯示如何套用 Window 將 PCollection 分割為工作階段視窗,其中每個工作階段必須以至少 10 分鐘(600 秒)的時間間隔分隔
PCollection<String> items = ...;
PCollection<String> sessionWindowedItems = items.apply(
Window.<String>into(Sessions.withGapDuration(Duration.standardSeconds(600))));from apache_beam import window
session_windowed_items = (
items | 'window' >> beam.WindowInto(window.Sessions(10 * 60)))sessionWindowedItems := beam.WindowInto(s,
window.NewSessions(600*time.Second),
items)pcoll
.apply(beam.windowInto(windowings.sessions(10 * 60)))type: WindowInto
windowing:
type: sessions
gap: 60s請注意,工作階段是按鍵值區分的 — 集合中的每個鍵值都會根據資料分佈具有自己的工作階段分組。
8.3.4. 單一全域視窗
如果您的 PCollection 是有邊界的(大小是固定的),您可以將所有元素分配到單一的全局視窗。以下範例程式碼顯示如何為 PCollection 設定單一全局視窗
PCollection<String> items = ...;
PCollection<String> batchItems = items.apply(
Window.<String>into(new GlobalWindows()));from apache_beam import window
global_windowed_items = (
items | 'window' >> beam.WindowInto(window.GlobalWindows()))globalWindowedItems := beam.WindowInto(s,
window.NewGlobalWindows(),
items)pcoll
.apply(beam.windowInto(windowings.globalWindows()))type: WindowInto
windowing:
type: global8.4. 浮水印和延遲資料
在任何資料處理系統中,資料事件發生的時間(「事件時間」,由資料元素本身的時間戳記決定)與您的管線中任何階段處理實際資料元素的時間(「處理時間」,由處理元素的系統上的時鐘決定)之間存在一定的延遲。此外,無法保證資料事件會以產生它們的相同順序出現在您的管線中。
舉例來說,假設我們有一個使用固定時間視窗的 PCollection,其視窗長度為五分鐘。對於每個視窗,Beam 必須收集所有在給定視窗範圍內(例如,第一個視窗的 0:00 到 4:59 之間)具有事件時間時間戳記的所有資料。時間戳記超出該範圍的資料(來自 5:00 或更晚的資料)屬於不同的視窗。
然而,資料並不總是保證會依時間順序到達管道中,也不保證總是以可預測的間隔到達。Beam 會追蹤一個水位線,這是系統對特定視窗中所有資料預期到達管道的時間的概念。一旦水位線超過視窗的結束時間,任何後續到達且時間戳記屬於該視窗的元素都會被視為延遲資料。
以我們的範例來說,假設我們有一個簡單的水位線,假設資料時間戳記(事件時間)與資料出現在管道中的時間(處理時間)之間約有 30 秒的延遲時間,那麼 Beam 會在 5:30 關閉第一個視窗。如果一筆資料記錄在 5:34 到達,但其時間戳記屬於 0:00-4:59 視窗(例如,3:38),則該記錄為延遲資料。
注意:為了簡單起見,我們假設我們正在使用一個非常簡單的水位線來估計延遲時間。實際上,您的 PCollection 的資料來源會決定水位線,而水位線可以更精確或更複雜。
Beam 的預設視窗設定會嘗試判斷所有資料何時到達(根據資料來源的類型),然後將水位線推進到視窗結束時間之後。此預設設定不允許延遲資料。觸發器可讓您修改和改進 PCollection 的視窗策略。您可以使用觸發器來決定每個個別視窗何時彙總並報告其結果,包括視窗如何發出延遲元素。
8.4.1. 管理延遲資料
您可以在設定 PCollection 的視窗策略時,呼叫 .withAllowedLateness 操作來允許延遲資料。以下程式碼範例示範了一個視窗策略,該策略將允許在視窗結束後最多兩天的延遲資料。
PCollection<String> items = ...;
PCollection<String> fixedWindowedItems = items.apply(
Window.<String>into(FixedWindows.of(Duration.standardMinutes(1)))
.withAllowedLateness(Duration.standardDays(2))); pc = [Initial PCollection]
pc | beam.WindowInto(
FixedWindows(60),
trigger=trigger_fn,
accumulation_mode=accumulation_mode,
timestamp_combiner=timestamp_combiner,
allowed_lateness=Duration(seconds=2*24*60*60)) # 2 dayswindowedItems := beam.WindowInto(s,
window.NewFixedWindows(1*time.Minute), items,
beam.AllowedLateness(2*24*time.Hour), // 2 days
)當您在 PCollection 上設定 .withAllowedLateness 時,允許的延遲會傳播到從您套用允許延遲的第一個 PCollection 中衍生的任何後續 PCollection。如果您想在管道中稍後更改允許的延遲,您必須明確地套用 Window.configure().withAllowedLateness() 來進行更改。
8.5. 將時間戳記新增至 PCollection 的元素
無邊界來源會為每個元素提供時間戳記。根據您的無邊界來源,您可能需要設定如何從原始資料串流中擷取時間戳記。
但是,有邊界來源(例如來自 TextIO 的檔案)不會提供時間戳記。如果您需要時間戳記,則必須將它們新增至 PCollection 的元素。
您可以透過套用 ParDo 轉換來為 PCollection 的元素指派新的時間戳記,該轉換會輸出您設定時間戳記的新元素。
一個例子可能是,如果您的管道從輸入檔案中讀取記錄日誌,並且每個記錄日誌都包含一個時間戳記欄位;由於您的管道是從檔案中讀取記錄,因此檔案來源不會自動指派時間戳記。您可以從每個記錄中解析時間戳記欄位,並使用具有 DoFn 的 ParDo 轉換,將時間戳記附加到 PCollection 中的每個元素。
PCollection<LogEntry> unstampedLogs = ...;
PCollection<LogEntry> stampedLogs =
unstampedLogs.apply(ParDo.of(new DoFn<LogEntry, LogEntry>() {
public void processElement(@Element LogEntry element, OutputReceiver<LogEntry> out) {
// Extract the timestamp from log entry we're currently processing.
Instant logTimeStamp = extractTimeStampFromLogEntry(element);
// Use OutputReceiver.outputWithTimestamp (rather than
// OutputReceiver.output) to emit the entry with timestamp attached.
out.outputWithTimestamp(element, logTimeStamp);
}
}));class AddTimestampDoFn(beam.DoFn):
def process(self, element):
# Extract the numeric Unix seconds-since-epoch timestamp to be
# associated with the current log entry.
unix_timestamp = extract_timestamp_from_log_entry(element)
# Wrap and emit the current entry and new timestamp in a
# TimestampedValue.
yield beam.window.TimestampedValue(element, unix_timestamp)
timestamped_items = items | 'timestamp' >> beam.ParDo(AddTimestampDoFn())// AddTimestampDoFn extracts an event time from a LogEntry.
func AddTimestampDoFn(element LogEntry, emit func(beam.EventTime, LogEntry)) {
et := extractEventTime(element)
// Defining an emitter with beam.EventTime as the first parameter
// allows the DoFn to set the event time for the emitted element.
emit(mtime.FromTime(et), element)
}
// Use the DoFn with ParDo as normal.
stampedLogs := beam.ParDo(s, AddTimestampDoFn, unstampedLogs)type: AssignTimestamps
config:
language: python
timestamp:
callable: |
import datetime
def extract_timestamp(x):
raw = datetime.datetime.strptime(
x.external_timestamp_field, "%Y-%m-%d")
return raw.astimezone(datetime.timezone.utc) 9. 觸發器
注意: Beam SDK for Go 中的觸發器 API 目前處於實驗階段,可能會變更。
在收集資料並將其分組到視窗中時,Beam 會使用觸發器來決定何時發出每個視窗的彙總結果(稱為窗格)。如果您使用 Beam 的預設視窗設定和預設觸發器,則 Beam 會在估計所有資料都已到達時輸出彙總結果,並捨棄該視窗的所有後續資料。
您可以為您的 PCollection 設定觸發器來變更此預設行為。Beam 提供許多您可以設定的預先建置的觸發器。
- 事件時間觸發器。這些觸發器會根據每個資料元素上的時間戳記所指示的事件時間來運作。Beam 的預設觸發器是以事件時間為基礎的。
- 處理時間觸發器。這些觸發器會根據處理時間來運作 – 即資料元素在管道中的任何給定階段被處理的時間。
- 資料驅動觸發器。這些觸發器會透過檢查每個視窗中到達的資料來運作,並在資料滿足特定屬性時觸發。目前,資料驅動觸發器僅支援在特定數量的資料元素之後觸發。
- 複合觸發器。這些觸發器會以各種方式組合多個觸發器。
從較高的層次來看,與僅在視窗結束時輸出相比,觸發器提供了兩個額外的功能。
- 觸發器允許 Beam 在給定視窗中的所有資料到達之前發出早期結果。例如,在經過一定的時間量之後,或在一定數量的元素到達之後發出。
- 觸發器允許在事件時間水位線超過視窗結束時間後觸發,從而處理延遲資料。
這些功能可讓您控制資料流,並根據您的使用案例在不同因素之間取得平衡。
- 完整性:在您計算結果之前,擁有所有資料有多重要?
- 延遲:您希望等待資料多久?例如,您是否等到您認為您擁有所有資料?您是否在資料到達時處理資料?
- 成本:您願意花費多少運算能力/金錢來降低延遲?
例如,一個需要時間敏感更新的系統可能會使用嚴格的基於時間的觸發器,該觸發器每 N 秒發出一個視窗,重視及時性而非資料完整性。一個重視資料完整性勝於結果的確切時間的系統可能會選擇使用 Beam 的預設觸發器,該觸發器會在視窗結束時觸發。
您也可以為使用單一全域視窗作為其視窗函式的無邊界 PCollection 設定觸發器。當您希望您的管道定期更新無邊界資料集時,這會很有用 — 例如,更新到目前為止提供的所有資料的執行平均值,每 N 秒或每 N 個元素更新一次。
9.1. 事件時間觸發器
AfterWatermark 觸發器會根據事件時間運作。AfterWatermark 觸發器會在水位線根據附加到資料元素的時間戳記超過視窗結束時間之後,發出視窗的內容。水位線是一個全域進度指標,是 Beam 在任何給定點上對管道內輸入完整性的概念。AfterWatermark.pastEndOfWindow() AfterWatermark trigger.AfterEndOfWindow 僅在水位線超過視窗結束時間時觸發。
此外,您可以設定觸發器,以便在您的管道在視窗結束之前或之後接收到資料時觸發。
以下範例顯示一個帳單情境,並使用早期和延遲觸發。
// Create a bill at the end of the month.
AfterWatermark.pastEndOfWindow()
// During the month, get near real-time estimates.
.withEarlyFirings(
AfterProcessingTime
.pastFirstElementInPane()
.plusDuration(Duration.standardMinutes(1))
// Fire on any late data so the bill can be corrected.
.withLateFirings(AfterPane.elementCountAtLeast(1))AfterWatermark(
early=AfterProcessingTime(delay=1 * 60), late=AfterCount(1))trigger := trigger.AfterEndOfWindow().
EarlyFiring(trigger.AfterProcessingTime().
PlusDelay(60 * time.Second)).
LateFiring(trigger.Repeat(trigger.AfterCount(1)))9.1.1. 預設觸發器
PCollection 的預設觸發器是以事件時間為基礎,並且會在 Beam 的水位線超過視窗結束時間時發出視窗的結果,然後在每次延遲資料到達時觸發。
但是,如果您同時使用預設視窗設定和預設觸發器,則預設觸發器只會發出一次,並且會捨棄延遲資料。這是因為預設視窗設定的允許延遲值為 0。如需修改此行為的資訊,請參閱處理延遲資料章節。
9.2. 處理時間觸發器
AfterProcessingTime 觸發器會根據處理時間運作。例如,AfterProcessingTime.pastFirstElementInPane() AfterProcessingTime trigger.AfterProcessingTime() 觸發器會在自收到資料起經過一定的處理時間後發出一個視窗。處理時間由系統時鐘決定,而不是由資料元素的時間戳記決定。
AfterProcessingTime 觸發器適用於從視窗觸發早期結果,特別是具有較長時間範圍的視窗,例如單一全域視窗。
9.3. 資料驅動觸發器
Beam 提供一個資料驅動的觸發器,AfterPane.elementCountAtLeast() AfterCount trigger.AfterCount()。此觸發器會根據元素計數運作;它會在目前的窗格收集至少 N 個元素後觸發。這允許視窗發出早期結果(在累積所有資料之前),如果您使用單一全域視窗,這會特別有用。
請務必注意,例如,如果您指定 .elementCountAtLeast(50) AfterCount(50) trigger.AfterCount(50) 並且只到達 32 個元素,則這 32 個元素會永遠閒置。如果這 32 個元素對您很重要,請考慮使用複合觸發器來組合多個條件。這可讓您指定多個觸發條件,例如「當我收到 50 個元素時,或每 1 秒觸發一次」。
9.4. 設定觸發器
當您使用 WindowWindowIntobeam.WindowInto 轉換來為 PCollection 設定視窗函式時,您也可以指定觸發器。
您可以透過在 Window.into() 轉換的結果上呼叫 .triggering() 方法來設定 PCollection 的觸發器。此程式碼範例為 PCollection 設定了一個基於時間的觸發器,該觸發器會在該視窗中的第一個元素被處理後一分鐘發出結果。程式碼範例中的最後一行 .discardingFiredPanes() 會設定視窗的累積模式。
當您使用 WindowInto 轉換時,可以透過設定 trigger 參數來設定 PCollection 的觸發器。此程式碼範例為 PCollection 設定了一個基於時間的觸發器,該觸發器會在該視窗中的第一個元素被處理後一分鐘發出結果。accumulation_mode 參數設定視窗的累積模式。
您可以使用 beam.WindowInto 轉換時,傳入 beam.Trigger 參數,為 PCollection 設定觸發器。以下程式碼範例為 PCollection 設定了基於時間的觸發器,該觸發器會在該視窗中第一個元素被處理後一分鐘發出結果。beam.AccumulationMode 參數設定視窗的累積模式。
PCollection<String> pc = ...;
pc.apply(Window.<String>into(FixedWindows.of(1, TimeUnit.MINUTES))
.triggering(AfterProcessingTime.pastFirstElementInPane()
.plusDelayOf(Duration.standardMinutes(1)))
.discardingFiredPanes()); pcollection | WindowInto(
FixedWindows(1 * 60),
trigger=AfterProcessingTime(1 * 60),
accumulation_mode=AccumulationMode.DISCARDING)windowedItems := beam.WindowInto(s,
window.NewFixedWindows(1*time.Minute), pcollection,
beam.Trigger(trigger.AfterProcessingTime().
PlusDelay(1*time.Minute)),
beam.AllowedLateness(30*time.Minute),
beam.PanesDiscard(),
)9.4.1. 視窗累積模式
當您指定觸發器時,還必須設定視窗的累積模式。當觸發器觸發時,它會將視窗的當前內容作為一個窗格發出。由於觸發器可以多次觸發,因此累積模式決定了系統是否在觸發器觸發時累積視窗窗格,或捨棄它們。
若要將視窗設定為累積觸發器觸發時產生的窗格,請在設定觸發器時呼叫 .accumulatingFiredPanes()。若要將視窗設定為捨棄已觸發的窗格,請呼叫 .discardingFiredPanes()。
若要將視窗設定為累積觸發器觸發時產生的窗格,請在設定觸發器時將 accumulation_mode 參數設定為 ACCUMULATING。若要將視窗設定為捨棄已觸發的窗格,請將 accumulation_mode 設定為 DISCARDING。
若要將視窗設定為累積觸發器觸發時產生的窗格,請在設定觸發器時將 beam.AccumulationMode 參數設定為 beam.PanesAccumulate()。若要將視窗設定為捨棄已觸發的窗格,請將 beam.AccumulationMode 設定為 beam.PanesDiscard()。
讓我們來看一個範例,該範例使用具有固定時間視窗和基於資料的觸發器的 PCollection。舉例來說,如果您希望每個視窗代表十分鐘的滾動平均值,但您希望在使用者介面中更頻繁地顯示平均值的當前值,而不是每十分鐘一次,您可能會這樣做。我們假設以下條件
PCollection使用 10 分鐘的固定時間視窗。PCollection具有重複觸發器,每次有 3 個元素到達時都會觸發。
下圖顯示了鍵 X 的資料事件,這些事件在 PCollection 中到達並被分配到視窗。為了使圖表更簡單一些,我們假設事件都按順序到達管道中。
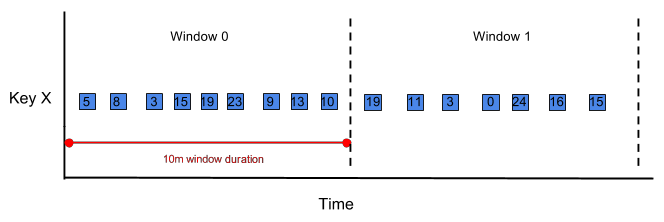
9.4.1.1. 累積模式
如果我們的觸發器設定為累積模式,則觸發器每次觸發時都會發出以下值。請記住,觸發器會在每當三個元素到達時觸發
First trigger firing: [5, 8, 3]
Second trigger firing: [5, 8, 3, 15, 19, 23]
Third trigger firing: [5, 8, 3, 15, 19, 23, 9, 13, 10]
9.4.1.2. 捨棄模式
如果我們的觸發器設定為捨棄模式,則觸發器每次觸發時都會發出以下值
First trigger firing: [5, 8, 3]
Second trigger firing: [15, 19, 23]
Third trigger firing: [9, 13, 10]
9.4.2. 處理延遲資料
如果您希望管道處理在浮水印通過視窗末尾之後到達的資料,則可以在設定視窗組態時套用允許的延遲時間。這使您的觸發器有機會對延遲資料做出反應。如果設定了允許的延遲時間,則每當有延遲資料到達時,預設觸發器都會立即發出新結果。
您可以在設定視窗函式時使用 .withAllowedLateness() allowed_lateness beam.AllowedLateness() 來設定允許的延遲時間
PCollection<String> pc = ...;
pc.apply(Window.<String>into(FixedWindows.of(1, TimeUnit.MINUTES))
.triggering(AfterProcessingTime.pastFirstElementInPane()
.plusDelayOf(Duration.standardMinutes(1)))
.withAllowedLateness(Duration.standardMinutes(30)); pc = [Initial PCollection]
pc | beam.WindowInto(
FixedWindows(60),
trigger=AfterProcessingTime(60),
allowed_lateness=1800) # 30 minutes
| ...allowedToBeLateItems := beam.WindowInto(s,
window.NewFixedWindows(1*time.Minute), pcollection,
beam.Trigger(trigger.AfterProcessingTime().
PlusDelay(1*time.Minute)),
beam.AllowedLateness(30*time.Minute),
)此允許的延遲時間會傳播到所有從對原始 PCollection 套用轉換而衍生的 PCollection。如果您想要稍後在管道中變更允許的延遲時間,您可以再次明確套用 Window.configure().withAllowedLateness() allowed_lateness beam.AllowedLateness()。
9.5. 複合觸發器
您可以結合多個觸發器來形成複合觸發器,並且可以指定觸發器重複發出結果、最多一次或在其他自訂條件下發出結果。
9.5.1. 複合觸發器類型
Beam 包含以下複合觸發器
- 您可以透過
.withEarlyFirings和.withLateFirings將其他早期觸發或延遲觸發新增到AfterWatermark.pastEndOfWindow。 Repeatedly.forever指定一個永遠執行的觸發器。每當滿足觸發器的條件時,它就會導致視窗發出結果,然後重置並重新開始。將Repeatedly.forever與.orFinally結合使用來指定導致重複觸發器停止的條件會很有用。AfterEach.inOrder結合多個觸發器以按照特定順序觸發。每次順序中的觸發器發出視窗時,順序都會前進到下一個觸發器。AfterFirst採用多個觸發器,並在任何一個引數觸發器滿足時第一次發出。這相當於多個觸發器的邏輯 OR 運算。AfterAll採用多個觸發器,並在所有引數觸發器都滿足時發出。這相當於多個觸發器的邏輯 AND 運算。orFinally可以作為最終條件,導致任何觸發器最終觸發一次,並且永不再觸發。
9.5.2. 與 AfterWatermark 的組合
當 Beam 估計所有資料都已到達時(即浮水印通過視窗末尾時),一些最有用的複合觸發器會觸發一次,並與以下其中一個或兩個結合使用
在浮水印通過視窗末尾之前進行推測性觸發,以允許更快地處理部分結果。
在浮水印通過視窗末尾之後發生延遲觸發,以允許處理延遲到達的資料
您可以使用 AfterWatermark 來表示此模式。例如,以下範例觸發程式碼在以下條件下觸發
當 Beam 估計所有資料都已到達時(浮水印通過視窗末尾)
在延遲十分鐘後,每當有延遲資料到達時
- 兩天後,我們假設不會再有任何感興趣的資料到達,並且觸發器停止執行
.apply(Window
.configure()
.triggering(AfterWatermark
.pastEndOfWindow()
.withLateFirings(AfterProcessingTime
.pastFirstElementInPane()
.plusDelayOf(Duration.standardMinutes(10))))
.withAllowedLateness(Duration.standardDays(2)));pcollection | WindowInto(
FixedWindows(1 * 60),
trigger=AfterWatermark(late=AfterProcessingTime(10 * 60)),
allowed_lateness=10,
accumulation_mode=AccumulationMode.DISCARDING)compositeTriggerItems := beam.WindowInto(s,
window.NewFixedWindows(1*time.Minute), pcollection,
beam.Trigger(trigger.AfterEndOfWindow().
LateFiring(trigger.AfterProcessingTime().
PlusDelay(10*time.Minute))),
beam.AllowedLateness(2*24*time.Hour),
)9.5.3. 其他複合觸發器
您也可以建構其他類型的複合觸發器。以下範例程式碼顯示了一個簡單的複合觸發器,該觸發器會在窗格至少有 100 個元素時或一分鐘後觸發。
Repeatedly.forever(AfterFirst.of(
AfterPane.elementCountAtLeast(100),
AfterProcessingTime.pastFirstElementInPane().plusDelayOf(Duration.standardMinutes(1))))pcollection | WindowInto(
FixedWindows(1 * 60),
trigger=Repeatedly(
AfterAny(AfterCount(100), AfterProcessingTime(1 * 60))),
accumulation_mode=AccumulationMode.DISCARDING)10. 指標
在 Beam 模型中,指標提供對使用者管道目前狀態的一些深入分析,可能會在管道執行時提供。可能有不同的原因,例如
- 檢查在管道的特定步驟執行時遇到的錯誤數量;
- 監控對後端服務進行的 RPC 數量;
- 擷取已處理的元素數量的準確計數;
- …等等。
10.1. Beam 指標的主要概念
- 已命名。每個指標都有一個名稱,該名稱由命名空間和實際名稱組成。命名空間可用於區分具有相同名稱的多個指標,並且還允許查詢特定命名空間中的所有指標。
- 已限定範圍。每個指標都會針對管道中的特定步驟報告,指示在遞增指標時正在執行的程式碼。
- 動態建立。指標可能會在執行階段建立,而無需預先宣告它們,這與可以建立記錄器的方式非常相似。這使得在公用程式碼中產生指標並讓它們有用地報告更容易。
- 正常降級。如果執行器不支援報告指標的某些部分,則回退行為是捨棄指標更新,而不是讓管道失敗。如果執行器不支援查詢指標的某些部分,則執行器將不會傳回相關資料。
報告的指標會隱式地限定在報告它們的管道中的轉換範圍內。這允許在多個位置報告相同的指標名稱,並識別每個轉換報告的值,以及彙總整個管道的指標。
注意:指標是否可在管道執行期間存取或僅在作業完成後存取取決於執行器。
10.2. 指標類型
目前支援三種類型的指標:Counter、Distribution 和 Gauge。
在 Go 的 Beam SDK 中,框架提供的 context.Context 必須傳遞給指標,否則將不會記錄指標值。當 ProcessElement 和類似方法是第一個參數時,框架會自動提供有效的 context.Context。
Counter:報告單個長值且可以遞增或遞減的指標。
Counter counter = Metrics.counter( "namespace", "counter1");
@ProcessElement
public void processElement(ProcessContext context) {
// count the elements
counter.inc();
...
}var counter = beam.NewCounter("namespace", "counter1")
func (fn *MyDoFn) ProcessElement(ctx context.Context, ...) {
// count the elements
counter.Inc(ctx, 1)
...
}from apache_beam import metrics
class MyDoFn(beam.DoFn):
def __init__(self):
self.counter = metrics.Metrics.counter("namespace", "counter1")
def process(self, element):
self.counter.inc()
yield elementDistribution:報告有關已報告值分佈資訊的指標。
Distribution distribution = Metrics.distribution( "namespace", "distribution1");
@ProcessElement
public void processElement(ProcessContext context) {
Integer element = context.element();
// create a distribution (histogram) of the values
distribution.update(element);
...
}var distribution = beam.NewDistribution("namespace", "distribution1")
func (fn *MyDoFn) ProcessElement(ctx context.Context, v int64, ...) {
// create a distribution (histogram) of the values
distribution.Update(ctx, v)
...
}class MyDoFn(beam.DoFn):
def __init__(self):
self.distribution = metrics.Metrics.distribution("namespace", "distribution1")
def process(self, element):
self.distribution.update(element)
yield elementGauge:報告已報告值中的最新值的指標。由於指標是從許多工作程式收集的,因此該值可能不是絕對最後一個,而是最新的值之一。
Gauge gauge = Metrics.gauge( "namespace", "gauge1");
@ProcessElement
public void processElement(ProcessContext context) {
Integer element = context.element();
// create a gauge (latest value received) of the values
gauge.set(element);
...
}var gauge = beam.NewGauge("namespace", "gauge1")
func (fn *MyDoFn) ProcessElement(ctx context.Context, v int64, ...) {
// create a gauge (latest value received) of the values
gauge.Set(ctx, v)
...
}class MyDoFn(beam.DoFn):
def __init__(self):
self.gauge = metrics.Metrics.gauge("namespace", "gauge1")
def process(self, element):
self.gauge.set(element)
yield element10.3. 查詢指標
PipelineResult 有一個方法 metrics(),它會傳回一個 MetricResults 物件,該物件允許存取指標。MetricResults 中可用的主要方法允許查詢與給定篩選器相符的所有指標。
beam.PipelineResult 有一個方法 Metrics(),它會傳回一個 metrics.Results 物件,該物件允許存取指標。metrics.Results 中可用的主要方法允許查詢與給定篩選器相符的所有指標。它會採用一個帶有 SingleResult 參數類型的謂詞,該謂詞可以用於自訂篩選器。
PipelineResult 有一個 metrics 方法,它會傳回一個 MetricResults 物件。MetricResults 物件可讓您存取指標。MetricResults 物件中可用的主要方法 query 可讓您查詢與給定篩選器相符的所有指標。query 方法會採用一個 MetricsFilter 物件,您可以使用該物件依多個不同的條件進行篩選。查詢 MetricResults 物件會傳回 MetricResult 物件的清單字典,該字典會依類型組織它們,例如 Counter、Distribution 和 Gauge。MetricResult 物件包含一個 result 函式,該函式會取得指標的值,並包含一個 key 屬性。key 屬性包含有關命名空間和指標名稱的資訊。
public interface PipelineResult {
MetricResults metrics();
}
public abstract class MetricResults {
public abstract MetricQueryResults queryMetrics(@Nullable MetricsFilter filter);
}
public interface MetricQueryResults {
Iterable<MetricResult<Long>> getCounters();
Iterable<MetricResult<DistributionResult>> getDistributions();
Iterable<MetricResult<GaugeResult>> getGauges();
}
public interface MetricResult<T> {
MetricName getName();
String getStep();
T getCommitted();
T getAttempted();
}func queryMetrics(pr beam.PipelineResult, ns, n string) metrics.QueryResults {
return pr.Metrics().Query(func(r beam.MetricResult) bool {
return r.Namespace() == ns && r.Name() == n
})
}class PipelineResult:
def metrics(self) -> MetricResults:
"""Returns a the metric results from the pipeline."""
class MetricResults:
def query(self, filter: MetricsFilter) -> Dict[str, List[MetricResult]]:
"""Filters the results against the specified filter."""
class MetricResult:
def result(self):
"""Returns the value of the metric."""10.4. 在管線中使用指標
下面是一個簡單範例,說明如何在使用者管道中使用 Counter 指標。
// creating a pipeline with custom metrics DoFn
pipeline
.apply(...)
.apply(ParDo.of(new MyMetricsDoFn()));
pipelineResult = pipeline.run().waitUntilFinish(...);
// request the metric called "counter1" in namespace called "namespace"
MetricQueryResults metrics =
pipelineResult
.metrics()
.queryMetrics(
MetricsFilter.builder()
.addNameFilter(MetricNameFilter.named("namespace", "counter1"))
.build());
// print the metric value - there should be only one line because there is only one metric
// called "counter1" in the namespace called "namespace"
for (MetricResult<Long> counter: metrics.getCounters()) {
System.out.println(counter.getName() + ":" + counter.getAttempted());
}
public class MyMetricsDoFn extends DoFn<Integer, Integer> {
private final Counter counter = Metrics.counter( "namespace", "counter1");
@ProcessElement
public void processElement(ProcessContext context) {
// count the elements
counter.inc();
context.output(context.element());
}
}func addMetricDoFnToPipeline(s beam.Scope, input beam.PCollection) beam.PCollection {
return beam.ParDo(s, &MyMetricsDoFn{}, input)
}
func executePipelineAndGetMetrics(ctx context.Context, p *beam.Pipeline) (metrics.QueryResults, error) {
pr, err := beam.Run(ctx, runner, p)
if err != nil {
return metrics.QueryResults{}, err
}
// Request the metric called "counter1" in namespace called "namespace"
ms := pr.Metrics().Query(func(r beam.MetricResult) bool {
return r.Namespace() == "namespace" && r.Name() == "counter1"
})
// Print the metric value - there should be only one line because there is
// only one metric called "counter1" in the namespace called "namespace"
for _, c := range ms.Counters() {
fmt.Println(c.Namespace(), "-", c.Name(), ":", c.Committed)
}
return ms, nil
}
type MyMetricsDoFn struct {
counter beam.Counter
}
func init() {
beam.RegisterType(reflect.TypeOf((*MyMetricsDoFn)(nil)))
}
func (fn *MyMetricsDoFn) Setup() {
// While metrics can be defined in package scope or dynamically
// it's most efficient to include them in the DoFn.
fn.counter = beam.NewCounter("namespace", "counter1")
}
func (fn *MyMetricsDoFn) ProcessElement(ctx context.Context, v beam.V, emit func(beam.V)) {
// count the elements
fn.counter.Inc(ctx, 1)
emit(v)
}class MyMetricsDoFn(beam.DoFn):
def __init__(self):
self.counter = metrics.Metrics.counter("namespace", "counter1")
def process(self, element):
counter.inc()
yield element
pipeline = beam.Pipeline()
pipeline | beam.ParDo(MyMetricsDoFn())
result = pipeline.run().wait_until_finish()
metrics = result.metrics().query(
metrics.MetricsFilter.with_namespace("namespace").with_name("counter1"))
for metric in metrics["counters"]:
print(metric)10.5. 匯出指標
Beam 指標可以匯出到外部接收器。如果在組態中設定了指標接收器,則執行器將會以預設的 5 秒週期將指標推送給它。組態保留在 MetricsOptions 類別中。它包含推送週期組態和特定於接收器的選項,例如類型和 URL。就目前而言,僅支援 REST HTTP 和 Graphite 接收器,並且僅 Flink 和 Spark 執行器支援指標匯出。
此外,Beam 指標也會匯出到內部 Spark 和 Flink 儀表板,以便在其各自的 UI 中進行查詢。
11. 狀態和計時器
Beam 的視窗化和觸發機制提供了一個強大的抽象概念,可以根據時間戳對無邊界輸入數據進行分組和聚合。然而,對於某些聚合用例,開發人員可能需要比視窗和觸發器提供的更高程度的控制。Beam 提供了一個 API 來手動管理每個鍵的狀態,允許對聚合進行精細控制。
Beam 的狀態 API 為每個鍵建模狀態。要使用狀態 API,您需要從一個鍵控的 PCollection 開始,在 Java 中,它被建模為 PCollection<KV<K, V>>。處理這個 PCollection 的 ParDo 現在可以宣告狀態變數。在 ParDo 內部,這些狀態變數可以用於寫入或更新目前鍵的狀態,或讀取為該鍵先前寫入的狀態。狀態始終完全限定於當前處理的鍵。
視窗化仍然可以與有狀態的處理一起使用。一個鍵的所有狀態都限定在目前的視窗內。這意味著,第一次看到給定視窗的鍵時,任何狀態讀取都將返回空值,並且當視窗完成時,執行器可以垃圾收集狀態。在有狀態運算子之前使用 Beam 的視窗化聚合也通常很有用。例如,使用組合器預先聚合數據,然後將聚合數據儲存在狀態中。使用狀態和計時器時,目前不支援合併視窗。
有時,有狀態的處理用於在 DoFn 內部實現狀態機風格的處理。在執行此操作時,必須注意記住輸入 PCollection 中的元素沒有保證的順序,並確保程式邏輯對此具有彈性。使用 DirectRunner 編寫的單元測試會隨機調整元素處理的順序,建議用於測試正確性。
在 Java 中,DoFn 通過建立代表每個狀態的最終 StateSpec 成員變數來宣告要存取的狀態。每個狀態都必須使用 StateId 注釋命名;此名稱在圖形中的 ParDo 中是唯一的,並且與圖形中的其他節點無關。一個 DoFn 可以宣告多個狀態變數。
在 Python 中,DoFn 通過建立代表每個狀態的 StateSpec 類別成員變數來宣告要存取的狀態。每個 StateSpec 都使用一個名稱初始化,此名稱在圖形中的 ParDo 中是唯一的,並且與圖形中的其他節點無關。一個 DoFn 可以宣告多個狀態變數。
在 Go 中,DoFn 通過建立代表每個狀態的狀態結構成員變數來宣告要存取的狀態。每個狀態變數都使用一個鍵初始化,此鍵在圖形中的 ParDo 中是唯一的,並且與圖形中的其他節點無關。如果沒有提供名稱,則該鍵預設為成員變數的名稱。一個 DoFn 可以宣告多個狀態變數。
注意:Typescript 的 Beam SDK 尚不支援狀態和計時器 API,但是可以從跨語言管道中使用這些功能(請參閱下文)。
11.1. 狀態類型
Beam 提供幾種類型的狀態
ValueState
ValueState 是一個標量狀態值。對於輸入中的每個鍵,ValueState 將儲存一個類型化的值,該值可以在 DoFn 的 @ProcessElement 或 @OnTimer 方法中讀取和修改。如果 ValueState 的類型已註冊編碼器,則 Beam 將自動推斷狀態值的編碼器。否則,可以在建立 ValueState 時明確指定編碼器。例如,以下 ParDo 建立一個單一狀態變數,該變數會累加看到的元素數量。
注意:ValueState 在 Python SDK 中稱為 ReadModifyWriteState。
PCollection<KV<String, ValueT>> perUser = readPerUser();
perUser.apply(ParDo.of(new DoFn<KV<String, ValueT>, OutputT>() {
@StateId("state") private final StateSpec<ValueState<Integer>> numElements = StateSpecs.value();
@ProcessElement public void process(@StateId("state") ValueState<Integer> state) {
// Read the number element seen so far for this user key.
// state.read() returns null if it was never set. The below code allows us to have a default value of 0.
int currentValue = MoreObjects.firstNonNull(state.read(), 0);
// Update the state.
state.write(currentValue + 1);
}
}));// valueStateFn keeps track of the number of elements seen.
type valueStateFn struct {
Val state.Value[int]
}
func (s *valueStateFn) ProcessElement(p state.Provider, book string, word string, emitWords func(string)) error {
// Get the value stored in our state
val, ok, err := s.Val.Read(p)
if err != nil {
return err
}
if !ok {
s.Val.Write(p, 1)
} else {
s.Val.Write(p, val+1)
}
if val > 10000 {
// Example of clearing and starting again with an empty bag
s.Val.Clear(p)
}
return nil
}Beam 還允許明確為 ValueState 值指定編碼器。例如
PCollection<KV<String, ValueT>> perUser = readPerUser();
perUser.apply(ParDo.of(new DoFn<KV<String, ValueT>, OutputT>() {
@StateId("state") private final StateSpec<ValueState<MyType>> numElements = StateSpecs.value(new MyTypeCoder());
...
}));class ReadModifyWriteStateDoFn(DoFn):
STATE_SPEC = ReadModifyWriteStateSpec('num_elements', VarIntCoder())
def process(self, element, state=DoFn.StateParam(STATE_SPEC)):
# Read the number element seen so far for this user key.
current_value = state.read() or 0
state.write(current_value+1)
_ = (p | 'Read per user' >> ReadPerUser()
| 'state pardo' >> beam.ParDo(ReadModifyWriteStateDoFn()))type valueStateDoFn struct {
Val state.Value[MyCustomType]
}
func encode(m MyCustomType) []byte {
return m.Bytes()
}
func decode(b []byte) MyCustomType {
return MyCustomType{}.FromBytes(b)
}
func init() {
beam.RegisterCoder(reflect.TypeOf((*MyCustomType)(nil)).Elem(), encode, decode)
}const pcoll = root.apply(
beam.create([
{ key: "a", value: 1 },
{ key: "b", value: 10 },
{ key: "a", value: 100 },
])
);
const result: PCollection<number> = await pcoll
.apply(
withCoderInternal(
new KVCoder(new StrUtf8Coder(), new VarIntCoder())
)
)
.applyAsync(
pythonTransform(
// Construct a new Transform from source.
"__constructor__",
[
pythonCallable(`
# Define a DoFn to be used below.
class ReadModifyWriteStateDoFn(beam.DoFn):
STATE_SPEC = beam.transforms.userstate.ReadModifyWriteStateSpec(
'num_elements', beam.coders.VarIntCoder())
def process(self, element, state=beam.DoFn.StateParam(STATE_SPEC)):
current_value = state.read() or 0
state.write(current_value + 1)
yield current_value + 1
class MyPythonTransform(beam.PTransform):
def expand(self, pcoll):
return pcoll | beam.ParDo(ReadModifyWriteStateDoFn())
`),
],
// Keyword arguments to pass to the transform, if any.
{},
// Output type if it cannot be inferred
{ requestedOutputCoders: { output: new VarIntCoder() } }
)
);CombiningState
CombiningState 允許您建立一個狀態對象,該對象使用 Beam 組合器進行更新。例如,先前的 ValueState 範例可以重寫為使用 CombiningState
PCollection<KV<String, ValueT>> perUser = readPerUser();
perUser.apply(ParDo.of(new DoFn<KV<String, ValueT>, OutputT>() {
@StateId("state") private final StateSpec<CombiningState<Integer, int[], Integer>> numElements =
StateSpecs.combining(Sum.ofIntegers());
@ProcessElement public void process(@StateId("state") ValueState<Integer> state) {
state.add(1);
}
}));class CombiningStateDoFn(DoFn):
SUM_TOTAL = CombiningValueStateSpec('total', sum)
def process(self, element, state=DoFn.StateParam(SUM_TOTAL)):
state.add(1)
_ = (p | 'Read per user' >> ReadPerUser()
| 'Combine state pardo' >> beam.ParDo(CombiningStateDofn()))// combiningStateFn keeps track of the number of elements seen.
type combiningStateFn struct {
// types are the types of the accumulator, input, and output respectively
Val state.Combining[int, int, int]
}
func (s *combiningStateFn) ProcessElement(p state.Provider, book string, word string, emitWords func(string)) error {
// Get the value stored in our state
val, _, err := s.Val.Read(p)
if err != nil {
return err
}
s.Val.Add(p, 1)
if val > 10000 {
// Example of clearing and starting again with an empty bag
s.Val.Clear(p)
}
return nil
}
func combineState(s beam.Scope, input beam.PCollection) beam.PCollection {
// ...
// CombineFn param can be a simple fn like this or a structural CombineFn
cFn := state.MakeCombiningState[int, int, int]("stateKey", func(a, b int) int {
return a + b
})
combined := beam.ParDo(s, combiningStateFn{Val: cFn}, input)
// ...
BagState
狀態的常見用例是累加多個元素。BagState 允許累加無序的元素集合。這樣可以將元素新增到集合中,而無需先讀取整個集合,這是一種效率提升。此外,支援分頁讀取的執行器可以允許個別資料袋大於可用記憶體。
PCollection<KV<String, ValueT>> perUser = readPerUser();
perUser.apply(ParDo.of(new DoFn<KV<String, ValueT>, OutputT>() {
@StateId("state") private final StateSpec<BagState<ValueT>> numElements = StateSpecs.bag();
@ProcessElement public void process(
@Element KV<String, ValueT> element,
@StateId("state") BagState<ValueT> state) {
// Add the current element to the bag for this key.
state.add(element.getValue());
if (shouldFetch()) {
// Occasionally we fetch and process the values.
Iterable<ValueT> values = state.read();
processValues(values);
state.clear(); // Clear the state for this key.
}
}
}));class BagStateDoFn(DoFn):
ALL_ELEMENTS = BagStateSpec('buffer', coders.VarIntCoder())
def process(self, element_pair, state=DoFn.StateParam(ALL_ELEMENTS)):
state.add(element_pair[1])
if should_fetch():
all_elements = list(state.read())
process_values(all_elements)
state.clear()
_ = (p | 'Read per user' >> ReadPerUser()
| 'Bag state pardo' >> beam.ParDo(BagStateDoFn()))// bagStateFn only emits words that haven't been seen
type bagStateFn struct {
Bag state.Bag[string]
}
func (s *bagStateFn) ProcessElement(p state.Provider, book, word string, emitWords func(string)) error {
// Get all values we've written to this bag state in this window.
vals, ok, err := s.Bag.Read(p)
if err != nil {
return err
}
if !ok || !contains(vals, word) {
emitWords(word)
s.Bag.Add(p, word)
}
if len(vals) > 10000 {
// Example of clearing and starting again with an empty bag
s.Bag.Clear(p)
}
return nil
}11.2. 延遲狀態讀取
當 DoFn 包含多個狀態規格時,按順序讀取每個規格可能會很慢。在狀態上呼叫 read() 函數可能會導致執行器執行阻塞讀取。依序執行多個阻塞讀取會增加元素處理的延遲。如果您知道始終會讀取狀態,則可以將其註釋為 @AlwaysFetched,然後執行器可以預取所有必要的狀態。例如
PCollection<KV<String, ValueT>> perUser = readPerUser();
perUser.apply(ParDo.of(new DoFn<KV<String, ValueT>, OutputT>() {
@StateId("state1") private final StateSpec<ValueState<Integer>> state1 = StateSpecs.value();
@StateId("state2") private final StateSpec<ValueState<String>> state2 = StateSpecs.value();
@StateId("state3") private final StateSpec<BagState<ValueT>> state3 = StateSpecs.bag();
@ProcessElement public void process(
@AlwaysFetched @StateId("state1") ValueState<Integer> state1,
@AlwaysFetched @StateId("state2") ValueState<String> state2,
@AlwaysFetched @StateId("state3") BagState<ValueT> state3) {
state1.read();
state2.read();
state3.read();
}
}));This is not supported yet, see https://github.com/apache/beam/issues/20739.This is not supported yet, see https://github.com/apache/beam/issues/22964.
但是,如果有未提取狀態的程式碼路徑,則使用 @AlwaysFetched 進行註釋會為這些路徑增加不必要的提取。在這種情況下,readLater 方法允許執行器知道該狀態將在未來被讀取,從而允許多個狀態讀取批量處理在一起。
PCollection<KV<String, ValueT>> perUser = readPerUser();
perUser.apply(ParDo.of(new DoFn<KV<String, ValueT>, OutputT>() {
@StateId("state1") private final StateSpec<ValueState<Integer>> state1 = StateSpecs.value();
@StateId("state2") private final StateSpec<ValueState<String>> state2 = StateSpecs.value();
@StateId("state3") private final StateSpec<BagState<ValueT>> state3 = StateSpecs.bag();
@ProcessElement public void process(
@StateId("state1") ValueState<Integer> state1,
@StateId("state2") ValueState<String> state2,
@StateId("state3") BagState<ValueT> state3) {
if (/* should read state */) {
state1.readLater();
state2.readLater();
state3.readLater();
}
// The runner can now batch all three states into a single read, reducing latency.
processState1(state1.read());
processState2(state2.read());
processState3(state3.read());
}
}));11.3. 計時器
Beam 提供每個鍵的計時器回呼 API。這允許延遲處理使用狀態 API 儲存的數據。計時器可以設定為在事件時間或處理時間時間戳記時回呼。每個計時器都使用 TimerId 識別。鍵的給定計時器只能設定為單一時間戳記。在計時器上呼叫 set 會覆寫該鍵計時器的先前觸發時間。
11.3.1. 事件時間計時器
當 DoFn 的輸入浮水印通過設定計時器的時間時,事件時間計時器會觸發,這意味著執行器認為沒有更多元素要以計時器時間戳記之前的時間戳記進行處理。這允許事件時間聚合。
PCollection<KV<String, ValueT>> perUser = readPerUser();
perUser.apply(ParDo.of(new DoFn<KV<String, ValueT>, OutputT>() {
@StateId("state") private final StateSpec<ValueState<Integer>> state = StateSpecs.value();
@TimerId("timer") private final TimerSpec timer = TimerSpecs.timer(TimeDomain.EVENT_TIME);
@ProcessElement public void process(
@Element KV<String, ValueT> element,
@Timestamp Instant elementTs,
@StateId("state") ValueState<Integer> state,
@TimerId("timer") Timer timer) {
...
// Set an event-time timer to the element timestamp.
timer.set(elementTs);
}
@OnTimer("timer") public void onTimer() {
//Process timer.
}
}));class EventTimerDoFn(DoFn):
ALL_ELEMENTS = BagStateSpec('buffer', coders.VarIntCoder())
TIMER = TimerSpec('timer', TimeDomain.WATERMARK)
def process(self,
element_pair,
t = DoFn.TimestampParam,
buffer = DoFn.StateParam(ALL_ELEMENTS),
timer = DoFn.TimerParam(TIMER)):
buffer.add(element_pair[1])
# Set an event-time timer to the element timestamp.
timer.set(t)
@on_timer(TIMER)
def expiry_callback(self, buffer = DoFn.StateParam(ALL_ELEMENTS)):
state.clear()
_ = (p | 'Read per user' >> ReadPerUser()
| 'EventTime timer pardo' >> beam.ParDo(EventTimerDoFn()))type eventTimerDoFn struct {
State state.Value[int64]
Timer timers.EventTime
}
func (fn *eventTimerDoFn) ProcessElement(ts beam.EventTime, sp state.Provider, tp timers.Provider, book, word string, emitWords func(string)) {
// ...
// Set an event-time timer to the element timestamp.
fn.Timer.Set(tp, ts.ToTime())
// ...
}
func (fn *eventTimerDoFn) OnTimer(sp state.Provider, tp timers.Provider, w beam.Window, key string, timer timers.Context, emitWords func(string)) {
switch timer.Family {
case fn.Timer.Family:
// process callback for this timer
}
}
func AddEventTimeDoFn(s beam.Scope, in beam.PCollection) beam.PCollection {
return beam.ParDo(s, &eventTimerDoFn{
// Timers are given family names so their callbacks can be handled independantly.
Timer: timers.InEventTime("processWatermark"),
State: state.MakeValueState[int64]("latest"),
}, in)
}11.3.2. 處理時間計時器
當實際掛鐘時間過去時,處理時間計時器會觸發。這通常用於在處理之前建立更大的數據批次。它還可以用於排程應在特定時間發生的事件。與事件時間計時器一樣,處理時間計時器是按鍵設置的 - 每個鍵都有一個單獨的計時器副本。
雖然處理時間計時器可以設定為絕對時間戳記,但通常會將其設定為相對於目前時間的偏移量。在 Java 中,可以使用 Timer.offset 和 Timer.setRelative 方法來完成此操作。
PCollection<KV<String, ValueT>> perUser = readPerUser();
perUser.apply(ParDo.of(new DoFn<KV<String, ValueT>, OutputT>() {
@TimerId("timer") private final TimerSpec timer = TimerSpecs.timer(TimeDomain.PROCESSING_TIME);
@ProcessElement public void process(@TimerId("timer") Timer timer) {
...
// Set a timer to go off 30 seconds in the future.
timer.offset(Duration.standardSeconds(30)).setRelative();
}
@OnTimer("timer") public void onTimer() {
//Process timer.
}
}));class ProcessingTimerDoFn(DoFn):
ALL_ELEMENTS = BagStateSpec('buffer', coders.VarIntCoder())
TIMER = TimerSpec('timer', TimeDomain.REAL_TIME)
def process(self,
element_pair,
buffer = DoFn.StateParam(ALL_ELEMENTS),
timer = DoFn.TimerParam(TIMER)):
buffer.add(element_pair[1])
# Set a timer to go off 30 seconds in the future.
timer.set(Timestamp.now() + Duration(seconds=30))
@on_timer(TIMER)
def expiry_callback(self, buffer = DoFn.StateParam(ALL_ELEMENTS)):
# Process timer.
state.clear()
_ = (p | 'Read per user' >> ReadPerUser()
| 'ProcessingTime timer pardo' >> beam.ParDo(ProcessingTimerDoFn()))type processingTimerDoFn struct {
Timer timers.ProcessingTime
}
func (fn *processingTimerDoFn) ProcessElement(sp state.Provider, tp timers.Provider, book, word string, emitWords func(string)) {
// ...
// Set a timer to go off 30 seconds in the future.
fn.Timer.Set(tp, time.Now().Add(30*time.Second))
// ...
}
func (fn *processingTimerDoFn) OnTimer(sp state.Provider, tp timers.Provider, w beam.Window, key string, timer timers.Context, emitWords func(string)) {
switch timer.Family {
case fn.Timer.Family:
// process callback for this timer
}
}
func AddProcessingTimeDoFn(s beam.Scope, in beam.PCollection) beam.PCollection {
return beam.ParDo(s, &processingTimerDoFn{
// Timers are given family names so their callbacks can be handled independantly.
Timer: timers.InProcessingTime("timer"),
}, in)
}11.3.3. 動態計時器標籤
Beam 還支援在 Java SDK 中使用 TimerMap 動態設定計時器標籤。這允許在 DoFn 中設定多個不同的計時器,並允許動態選擇計時器標籤 - 例如,根據輸入元素中的數據。具有特定標籤的計時器只能設定為單一時間戳記,因此再次設定計時器會覆寫該標籤計時器的先前到期時間。每個 TimerMap 都使用計時器系列 ID 識別,並且不同計時器系列中的計時器是獨立的。
在 Python SDK 中,可以在呼叫 set() 或 clear() 時指定動態計時器標籤。預設情況下,如果未指定計時器標籤,則計時器標籤為空字串。
PCollection<KV<String, ValueT>> perUser = readPerUser();
perUser.apply(ParDo.of(new DoFn<KV<String, ValueT>, OutputT>() {
@TimerFamily("actionTimers") private final TimerSpec timer =
TimerSpecs.timerMap(TimeDomain.EVENT_TIME);
@ProcessElement public void process(
@Element KV<String, ValueT> element,
@Timestamp Instant elementTs,
@TimerFamily("actionTimers") TimerMap timers) {
timers.set(element.getValue().getActionType(), elementTs);
}
@OnTimerFamily("actionTimers") public void onTimer(@TimerId String timerId) {
LOG.info("Timer fired with id " + timerId);
}
}));class TimerDoFn(DoFn):
ALL_ELEMENTS = BagStateSpec('buffer', coders.VarIntCoder())
TIMER = TimerSpec('timer', TimeDomain.REAL_TIME)
def process(self,
element_pair,
buffer = DoFn.StateParam(ALL_ELEMENTS),
timer = DoFn.TimerParam(TIMER)):
buffer.add(element_pair[1])
# Set a timer to go off 30 seconds in the future with dynamic timer tag 'first_timer'.
# And set a timer to go off 60 seconds in the future with dynamic timer tag 'second_timer'.
timer.set(Timestamp.now() + Duration(seconds=30), dynamic_timer_tag='first_timer')
timer.set(Timestamp.now() + Duration(seconds=60), dynamic_timer_tag='second_timer')
# Note that a timer can also be explicitly cleared if previously set with a dynamic timer tag:
# timer.clear(dynamic_timer_tag=...)
@on_timer(TIMER)
def expiry_callback(self, buffer = DoFn.StateParam(ALL_ELEMENTS), timer_tag=DoFn.DynamicTimerTagParam):
# Process timer, the dynamic timer tag associated with expiring timer can be read back with DoFn.DynamicTimerTagParam.
buffer.clear()
yield (timer_tag, 'fired')
_ = (p | 'Read per user' >> ReadPerUser()
| 'ProcessingTime timer pardo' >> beam.ParDo(TimerDoFn()))type hasAction interface {
Action() string
}
type dynamicTagsDoFn[V hasAction] struct {
Timer timers.EventTime
}
func (fn *dynamicTagsDoFn[V]) ProcessElement(ts beam.EventTime, tp timers.Provider, key string, value V, emitWords func(string)) {
// ...
// Set a timer to go off 30 seconds in the future.
fn.Timer.Set(tp, ts.ToTime(), timers.WithTag(value.Action()))
// ...
}
func (fn *dynamicTagsDoFn[V]) OnTimer(tp timers.Provider, w beam.Window, key string, timer timers.Context, emitWords func(string)) {
switch timer.Family {
case fn.Timer.Family:
tag := timer.Tag // Do something with fired tag
_ = tag
}
}
func AddDynamicTimerTagsDoFn[V hasAction](s beam.Scope, in beam.PCollection) beam.PCollection {
return beam.ParDo(s, &dynamicTagsDoFn[V]{
Timer: timers.InEventTime("actionTimers"),
}, in)
}11.3.4. 計時器輸出時間戳記
預設情況下,事件時間計時器會將 ParDo 的輸出浮水印保持在計時器的時間戳記。這意味著,如果計時器設定為下午 12 點,則管線圖中稍後在下午 12 點之後完成的任何視窗化聚合或事件時間計時器都不會過期。計時器的時間戳記也是計時器回呼的預設輸出時間戳記。這意味著,從 onTimer 方法輸出的任何元素的時間戳記都等於計時器觸發的時間戳記。對於處理時間計時器,預設輸出時間戳記和浮水印保持是在設定計時器時的輸入浮水印值。
在某些情況下,DoFn 需要輸出早於計時器到期時間的時間戳記,因此也需要將其輸出浮水印保持在這些時間戳記。例如,考慮以下管線,該管線會暫時將記錄批次處理到狀態中,並設定計時器以清空狀態。此程式碼看起來可能正確,但不會正常運作。
PCollection<KV<String, ValueT>> perUser = readPerUser();
perUser.apply(ParDo.of(new DoFn<KV<String, ValueT>, OutputT>() {
@StateId("elementBag") private final StateSpec<BagState<ValueT>> elementBag = StateSpecs.bag();
@StateId("timerSet") private final StateSpec<ValueState<Boolean>> timerSet = StateSpecs.value();
@TimerId("outputState") private final TimerSpec timer = TimerSpecs.timer(TimeDomain.PROCESSING_TIME);
@ProcessElement public void process(
@Element KV<String, ValueT> element,
@StateId("elementBag") BagState<ValueT> elementBag,
@StateId("timerSet") ValueState<Boolean> timerSet,
@TimerId("outputState") Timer timer) {
// Add the current element to the bag for this key.
elementBag.add(element.getValue());
if (!MoreObjects.firstNonNull(timerSet.read(), false)) {
// If the timer is not current set, then set it to go off in a minute.
timer.offset(Duration.standardMinutes(1)).setRelative();
timerSet.write(true);
}
}
@OnTimer("outputState") public void onTimer(
@StateId("elementBag") BagState<ValueT> elementBag,
@StateId("timerSet") ValueState<Boolean> timerSet,
OutputReceiver<ValueT> output) {
for (ValueT bufferedElement : elementBag.read()) {
// Output each element.
output.outputWithTimestamp(bufferedElement, bufferedElement.timestamp());
}
elementBag.clear();
// Note that the timer has now fired.
timerSet.clear();
}
}));type badTimerOutputTimestampsFn[V any] struct {
ElementBag state.Bag[V]
TimerSet state.Value[bool]
OutputState timers.ProcessingTime
}
func (fn *badTimerOutputTimestampsFn[V]) ProcessElement(sp state.Provider, tp timers.Provider, key string, value V, emit func(string)) error {
// Add the current element to the bag for this key.
if err := fn.ElementBag.Add(sp, value); err != nil {
return err
}
set, _, err := fn.TimerSet.Read(sp)
if err != nil {
return err
}
if !set {
fn.OutputState.Set(tp, time.Now().Add(1*time.Minute))
fn.TimerSet.Write(sp, true)
}
return nil
}
func (fn *badTimerOutputTimestampsFn[V]) OnTimer(sp state.Provider, tp timers.Provider, w beam.Window, key string, timer timers.Context, emit func(string)) error {
switch timer.Family {
case fn.OutputState.Family:
vs, _, err := fn.ElementBag.Read(sp)
if err != nil {
return err
}
for _, v := range vs {
// Output each element
emit(fmt.Sprintf("%v", v))
}
fn.ElementBag.Clear(sp)
// Note that the timer has now fired.
fn.TimerSet.Clear(sp)
}
return nil
}此程式碼的問題在於 ParDo 正在緩衝元素,但是沒有任何機制阻止浮水印超出這些元素的時間戳記,因此所有這些元素都可能作為延遲數據丟棄。為了防止這種情況發生,需要在計時器上設定輸出時間戳記,以防止浮水印超出最小元素的時間戳記。以下程式碼示範了這一點。
PCollection<KV<String, ValueT>> perUser = readPerUser();
perUser.apply(ParDo.of(new DoFn<KV<String, ValueT>, OutputT>() {
// The bag of elements accumulated.
@StateId("elementBag") private final StateSpec<BagState<ValueT>> elementBag = StateSpecs.bag();
// The timestamp of the timer set.
@StateId("timerTimestamp") private final StateSpec<ValueState<Long>> timerTimestamp = StateSpecs.value();
// The minimum timestamp stored in the bag.
@StateId("minTimestampInBag") private final StateSpec<CombiningState<Long, long[], Long>>
minTimestampInBag = StateSpecs.combining(Min.ofLongs());
@TimerId("outputState") private final TimerSpec timer = TimerSpecs.timer(TimeDomain.PROCESSING_TIME);
@ProcessElement public void process(
@Element KV<String, ValueT> element,
@StateId("elementBag") BagState<ValueT> elementBag,
@AlwaysFetched @StateId("timerTimestamp") ValueState<Long> timerTimestamp,
@AlwaysFetched @StateId("minTimestampInBag") CombiningState<Long, long[], Long> minTimestamp,
@TimerId("outputState") Timer timer) {
// Add the current element to the bag for this key.
elementBag.add(element.getValue());
// Keep track of the minimum element timestamp currently stored in the bag.
minTimestamp.add(element.getValue().timestamp());
// If the timer is already set, then reset it at the same time but with an updated output timestamp (otherwise
// we would keep resetting the timer to the future). If there is no timer set, then set one to expire in a minute.
Long timerTimestampMs = timerTimestamp.read();
Instant timerToSet = (timerTimestamp.isEmpty().read())
? Instant.now().plus(Duration.standardMinutes(1)) : new Instant(timerTimestampMs);
// Setting the outputTimestamp to the minimum timestamp in the bag holds the watermark to that timestamp until the
// timer fires. This allows outputting all the elements with their timestamp.
timer.withOutputTimestamp(minTimestamp.read()).s et(timerToSet).
timerTimestamp.write(timerToSet.getMillis());
}
@OnTimer("outputState") public void onTimer(
@StateId("elementBag") BagState<ValueT> elementBag,
@StateId("timerTimestamp") ValueState<Long> timerTimestamp,
OutputReceiver<ValueT> output) {
for (ValueT bufferedElement : elementBag.read()) {
// Output each element.
output.outputWithTimestamp(bufferedElement, bufferedElement.timestamp());
}
// Note that the timer has now fired.
timerTimestamp.clear();
}
}));Timer output timestamps is not yet supported in Python SDK. See https://github.com/apache/beam/issues/20705.type element[V any] struct {
Timestamp int64
Value V
}
type goodTimerOutputTimestampsFn[V any] struct {
ElementBag state.Bag[element[V]] // The bag of elements accumulated.
TimerTimerstamp state.Value[int64] // The timestamp of the timer set.
MinTimestampInBag state.Combining[int64, int64, int64] // The minimum timestamp stored in the bag.
OutputState timers.ProcessingTime // The timestamp of the timer.
}
func (fn *goodTimerOutputTimestampsFn[V]) ProcessElement(et beam.EventTime, sp state.Provider, tp timers.Provider, key string, value V, emit func(beam.EventTime, string)) error {
// ...
// Add the current element to the bag for this key, and preserve the event time.
if err := fn.ElementBag.Add(sp, element[V]{Timestamp: et.Milliseconds(), Value: value}); err != nil {
return err
}
// Keep track of the minimum element timestamp currently stored in the bag.
fn.MinTimestampInBag.Add(sp, et.Milliseconds())
// If the timer is already set, then reset it at the same time but with an updated output timestamp (otherwise
// we would keep resetting the timer to the future). If there is no timer set, then set one to expire in a minute.
ts, ok, _ := fn.TimerTimerstamp.Read(sp)
var tsToSet time.Time
if ok {
tsToSet = time.UnixMilli(ts)
} else {
tsToSet = time.Now().Add(1 * time.Minute)
}
minTs, _, _ := fn.MinTimestampInBag.Read(sp)
outputTs := time.UnixMilli(minTs)
// Setting the outputTimestamp to the minimum timestamp in the bag holds the watermark to that timestamp until the
// timer fires. This allows outputting all the elements with their timestamp.
fn.OutputState.Set(tp, tsToSet, timers.WithOutputTimestamp(outputTs))
fn.TimerTimerstamp.Write(sp, tsToSet.UnixMilli())
return nil
}
func (fn *goodTimerOutputTimestampsFn[V]) OnTimer(sp state.Provider, tp timers.Provider, w beam.Window, key string, timer timers.Context, emit func(beam.EventTime, string)) error {
switch timer.Family {
case fn.OutputState.Family:
vs, _, err := fn.ElementBag.Read(sp)
if err != nil {
return err
}
for _, v := range vs {
// Output each element with their timestamp
emit(beam.EventTime(v.Timestamp), fmt.Sprintf("%v", v.Value))
}
fn.ElementBag.Clear(sp)
// Note that the timer has now fired.
fn.TimerTimerstamp.Clear(sp)
}
return nil
}
func AddTimedOutputBatching[V any](s beam.Scope, in beam.PCollection) beam.PCollection {
return beam.ParDo(s, &goodTimerOutputTimestampsFn[V]{
ElementBag: state.MakeBagState[element[V]]("elementBag"),
TimerTimerstamp: state.MakeValueState[int64]("timerTimestamp"),
MinTimestampInBag: state.MakeCombiningState[int64, int64, int64]("minTimestampInBag", func(a, b int64) int64 {
if a < b {
return a
}
return b
}),
OutputState: timers.InProcessingTime("outputState"),
}, in)
}11.4. 垃圾收集狀態
每個鍵的狀態都需要進行垃圾收集,否則狀態的增加大小最終可能會對效能產生負面影響。有兩種常見的垃圾收集狀態策略。
11.4.1. 使用視窗進行垃圾收集
鍵的所有狀態和計時器都限定在它所在的視窗中。這意味著,根據輸入元素的時間戳記,ParDo 將根據該元素所屬的視窗看到不同的狀態值。此外,一旦輸入浮水印通過視窗的末尾,執行器應該垃圾收集該視窗的所有狀態。(注意:如果視窗的允許延遲設定為正值,則執行器必須等待浮水印通過視窗的末尾加上允許延遲,然後才能垃圾收集狀態)。這可以用作垃圾收集策略。
例如,給定以下
PCollection<KV<String, ValueT>> perUser = readPerUser();
perUser.apply(Window.into(CalendarWindows.days(1)
.withTimeZone(DateTimeZone.forID("America/Los_Angeles"))));
.apply(ParDo.of(new DoFn<KV<String, ValueT>, OutputT>() {
@StateId("state") private final StateSpec<ValueState<Integer>> state = StateSpecs.value();
...
@ProcessElement public void process(@Timestamp Instant ts, @StateId("state") ValueState<Integer> state) {
// The state is scoped to a calendar day window. That means that if the input timestamp ts is after
// midnight PST, then a new copy of the state will be seen for the next day.
}
}));class StateDoFn(DoFn):
ALL_ELEMENTS = BagStateSpec('buffer', coders.VarIntCoder())
def process(self,
element_pair,
buffer = DoFn.StateParam(ALL_ELEMENTS)):
...
_ = (p | 'Read per user' >> ReadPerUser()
| 'Windowing' >> beam.WindowInto(FixedWindows(60 * 60 * 24))
| 'DoFn' >> beam.ParDo(StateDoFn())) items := beam.ParDo(s, statefulDoFn{
S: state.MakeValueState[int]("S"),
}, elements)
out := beam.WindowInto(s, window.NewFixedWindows(24*time.Hour), items)此 ParDo 每天儲存狀態。一旦管線完成處理特定一天的數據,該天的所有狀態都會被垃圾收集。
11.4.1. 使用計時器進行垃圾收集
在某些情況下,很難找到對所需垃圾收集策略進行建模的視窗化策略。例如,常見的願望是,一旦在某個鍵上看不到任何活動一段時間後,就垃圾收集該鍵的狀態。這可以通過更新垃圾收集狀態的計時器來完成。例如
PCollection<KV<String, ValueT>> perUser = readPerUser();
perUser.apply(ParDo.of(new DoFn<KV<String, ValueT>, OutputT>() {
// The state for the key.
@StateId("state") private final StateSpec<ValueState<ValueT>> state = StateSpecs.value();
// The maximum element timestamp seen so far.
@StateId("maxTimestampSeen") private final StateSpec<CombiningState<Long, long[], Long>>
maxTimestamp = StateSpecs.combining(Max.ofLongs());
@TimerId("gcTimer") private final TimerSpec gcTimer = TimerSpecs.timer(TimeDomain.EVENT_TIME);
@ProcessElement public void process(
@Element KV<String, ValueT> element,
@Timestamp Instant ts,
@StateId("state") ValueState<ValueT> state,
@StateId("maxTimestampSeen") CombiningState<Long, long[], Long> maxTimestamp,
@TimerId("gcTimer") gcTimer) {
updateState(state, element);
maxTimestamp.add(ts.getMillis());
// Set the timer to be one hour after the maximum timestamp seen. This will keep overwriting the same timer, so
// as long as there is activity on this key the state will stay active. Once the key goes inactive for one hour's
// worth of event time (as measured by the watermark), then the gc timer will fire.
Instant expirationTime = new Instant(maxTimestamp.read()).plus(Duration.standardHours(1));
timer.set(expirationTime);
}
@OnTimer("gcTimer") public void onTimer(
@StateId("state") ValueState<ValueT> state,
@StateId("maxTimestampSeen") CombiningState<Long, long[], Long> maxTimestamp) {
// Clear all state for the key.
state.clear();
maxTimestamp.clear();
}
}class UserDoFn(DoFn):
ALL_ELEMENTS = BagStateSpec('state', coders.VarIntCoder())
MAX_TIMESTAMP = CombiningValueStateSpec('max_timestamp_seen', max)
TIMER = TimerSpec('gc-timer', TimeDomain.WATERMARK)
def process(self,
element,
t = DoFn.TimestampParam,
state = DoFn.StateParam(ALL_ELEMENTS),
max_timestamp = DoFn.StateParam(MAX_TIMESTAMP),
timer = DoFn.TimerParam(TIMER)):
update_state(state, element)
max_timestamp.add(t.micros)
# Set the timer to be one hour after the maximum timestamp seen. This will keep overwriting the same timer, so
# as long as there is activity on this key the state will stay active. Once the key goes inactive for one hour's
# worth of event time (as measured by the watermark), then the gc timer will fire.
expiration_time = Timestamp(micros=max_timestamp.read()) + Duration(seconds=60*60)
timer.set(expiration_time)
@on_timer(TIMER)
def expiry_callback(self,
state = DoFn.StateParam(ALL_ELEMENTS),
max_timestamp = DoFn.StateParam(MAX_TIMESTAMP)):
state.clear()
max_timestamp.clear()
_ = (p | 'Read per user' >> ReadPerUser()
| 'User DoFn' >> beam.ParDo(UserDoFn()))type timerGarbageCollectionFn[V any] struct {
State state.Value[V] // The state for the key.
MaxTimestampInBag state.Combining[int64, int64, int64] // The maximum element timestamp seen so far.
GcTimer timers.EventTime // The timestamp of the timer.
}
func (fn *timerGarbageCollectionFn[V]) ProcessElement(et beam.EventTime, sp state.Provider, tp timers.Provider, key string, value V, emit func(beam.EventTime, string)) {
updateState(sp, fn.State, key, value)
fn.MaxTimestampInBag.Add(sp, et.Milliseconds())
// Set the timer to be one hour after the maximum timestamp seen. This will keep overwriting the same timer, so
// as long as there is activity on this key the state will stay active. Once the key goes inactive for one hour's
// worth of event time (as measured by the watermark), then the gc timer will fire.
maxTs, _, _ := fn.MaxTimestampInBag.Read(sp)
expirationTime := time.UnixMilli(maxTs).Add(1 * time.Hour)
fn.GcTimer.Set(tp, expirationTime)
}
func (fn *timerGarbageCollectionFn[V]) OnTimer(sp state.Provider, tp timers.Provider, w beam.Window, key string, timer timers.Context, emit func(beam.EventTime, string)) {
switch timer.Family {
case fn.GcTimer.Family:
// Clear all the state for the key
fn.State.Clear(sp)
fn.MaxTimestampInBag.Clear(sp)
}
}
func AddTimerGarbageCollection[V any](s beam.Scope, in beam.PCollection) beam.PCollection {
return beam.ParDo(s, &timerGarbageCollectionFn[V]{
State: state.MakeValueState[V]("timerTimestamp"),
MaxTimestampInBag: state.MakeCombiningState[int64, int64, int64]("maxTimestampInBag", func(a, b int64) int64 {
if a > b {
return a
}
return b
}),
GcTimer: timers.InEventTime("gcTimer"),
}, in)
}11.5. 狀態和計時器範例
以下是狀態和計時器的一些範例用法
11.5.1. 加入點擊和檢視
在這個範例中,管道正在處理來自電子商務網站首頁的資料。有兩個輸入串流:一個是瀏覽串流,代表在首頁上向使用者顯示的建議產品連結;另一個是點擊串流,代表使用者實際點擊這些連結。管道的目標是將點擊事件與瀏覽事件合併,輸出一個新的合併事件,其中包含來自這兩個事件的資訊。每個連結都有一個唯一的識別碼,該識別碼同時存在於瀏覽事件和合併事件中。
許多瀏覽事件永遠不會有後續的點擊。這個管道會等待點擊發生一個小時,之後就會放棄這個合併。雖然每個點擊事件都應該有一個瀏覽事件,但少數瀏覽事件可能會遺失,而永遠無法到達 Beam 管道;管道也會在看到點擊事件後等待一個小時,如果瀏覽事件在這段時間內沒有到達,就會放棄。輸入事件並非依序排列 - 有可能在瀏覽事件之前就看到點擊事件。一小時的合併逾時應該基於事件時間,而非處理時間。
// Read the event stream and key it by the link id.
PCollection<KV<String, Event>> eventsPerLinkId =
readEvents()
.apply(WithKeys.of(Event::getLinkId).withKeyType(TypeDescriptors.strings()));
eventsPerLinkId.apply(ParDo.of(new DoFn<KV<String, Event>, JoinedEvent>() {
// Store the view event.
@StateId("view") private final StateSpec<ValueState<Event>> viewState = StateSpecs.value();
// Store the click event.
@StateId("click") private final StateSpec<ValueState<Event>> clickState = StateSpecs.value();
// The maximum element timestamp seen so far.
@StateId("maxTimestampSeen") private final StateSpec<CombiningState<Long, long[], Long>>
maxTimestamp = StateSpecs.combining(Max.ofLongs());
// Timer that fires when an hour goes by with an incomplete join.
@TimerId("gcTimer") private final TimerSpec gcTimer = TimerSpecs.timer(TimeDomain.EVENT_TIME);
@ProcessElement public void process(
@Element KV<String, Event> element,
@Timestamp Instant ts,
@AlwaysFetched @StateId("view") ValueState<Event> viewState,
@AlwaysFetched @StateId("click") ValueState<Event> clickState,
@AlwaysFetched @StateId("maxTimestampSeen") CombiningState<Long, long[], Long> maxTimestampState,
@TimerId("gcTimer") gcTimer,
OutputReceiver<JoinedEvent> output) {
// Store the event into the correct state variable.
Event event = element.getValue();
ValueState<Event> valueState = event.getType().equals(VIEW) ? viewState : clickState;
valueState.write(event);
Event view = viewState.read();
Event click = clickState.read();
(if view != null && click != null) {
// We've seen both a view and a click. Output a joined event and clear state.
output.output(JoinedEvent.of(view, click));
clearState(viewState, clickState, maxTimestampState);
} else {
// We've only seen on half of the join.
// Set the timer to be one hour after the maximum timestamp seen. This will keep overwriting the same timer, so
// as long as there is activity on this key the state will stay active. Once the key goes inactive for one hour's
// worth of event time (as measured by the watermark), then the gc timer will fire.
maxTimestampState.add(ts.getMillis());
Instant expirationTime = new Instant(maxTimestampState.read()).plus(Duration.standardHours(1));
gcTimer.set(expirationTime);
}
}
@OnTimer("gcTimer") public void onTimer(
@StateId("view") ValueState<Event> viewState,
@StateId("click") ValueState<Event> clickState,
@StateId("maxTimestampSeen") CombiningState<Long, long[], Long> maxTimestampState) {
// An hour has gone by with an incomplete join. Give up and clear the state.
clearState(viewState, clickState, maxTimestampState);
}
private void clearState(
@StateId("view") ValueState<Event> viewState,
@StateId("click") ValueState<Event> clickState,
@StateId("maxTimestampSeen") CombiningState<Long, long[], Long> maxTimestampState) {
viewState.clear();
clickState.clear();
maxTimestampState.clear();
}
}));class JoinDoFn(DoFn):
# stores the view event.
VIEW_STATE_SPEC = ReadModifyWriteStateSpec('view', EventCoder())
# stores the click event.
CLICK_STATE_SPEC = ReadModifyWriteStateSpec('click', EventCoder())
# The maximum element timestamp value seen so far.
MAX_TIMESTAMP = CombiningValueStateSpec('max_timestamp_seen', max)
# Timer that fires when an hour goes by with an incomplete join.
GC_TIMER = TimerSpec('gc', TimeDomain.WATERMARK)
def process(self,
element,
view=DoFn.StateParam(VIEW_STATE_SPEC),
click=DoFn.StateParam(CLICK_STATE_SPEC),
max_timestamp_seen=DoFn.StateParam(MAX_TIMESTAMP),
ts=DoFn.TimestampParam,
gc=DoFn.TimerParam(GC_TIMER)):
event = element
if event.type == 'view':
view.write(event)
else:
click.write(event)
previous_view = view.read()
previous_click = click.read()
# We've seen both a view and a click. Output a joined event and clear state.
if previous_view and previous_click:
yield (previous_view, previous_click)
view.clear()
click.clear()
max_timestamp_seen.clear()
else:
max_timestamp_seen.add(ts)
gc.set(max_timestamp_seen.read() + Duration(seconds=3600))
@on_timer(GC_TIMER)
def gc_callback(self,
view=DoFn.StateParam(VIEW_STATE_SPEC),
click=DoFn.StateParam(CLICK_STATE_SPEC),
max_timestamp_seen=DoFn.StateParam(MAX_TIMESTAMP)):
view.clear()
click.clear()
max_timestamp_seen.clear()
_ = (p | 'EventsPerLinkId' >> ReadPerLinkEvents()
| 'Join DoFn' >> beam.ParDo(JoinDoFn()))type JoinedEvent struct {
View, Click *Event
}
type joinDoFn struct {
View state.Value[*Event] // Store the view event.
Click state.Value[*Event] // Store the click event.
MaxTimestampSeen state.Combining[int64, int64, int64] // The maximum element timestamp seen so far.
GcTimer timers.EventTime // The timestamp of the timer.
}
func (fn *joinDoFn) ProcessElement(et beam.EventTime, sp state.Provider, tp timers.Provider, key string, event *Event, emit func(JoinedEvent)) {
valueState := fn.View
if event.isClick() {
valueState = fn.Click
}
valueState.Write(sp, event)
view, _, _ := fn.View.Read(sp)
click, _, _ := fn.Click.Read(sp)
if view != nil && click != nil {
emit(JoinedEvent{View: view, Click: click})
fn.clearState(sp)
return
}
fn.MaxTimestampSeen.Add(sp, et.Milliseconds())
expTs, _, _ := fn.MaxTimestampSeen.Read(sp)
fn.GcTimer.Set(tp, time.UnixMilli(expTs).Add(1*time.Hour))
}
func (fn *joinDoFn) OnTimer(sp state.Provider, tp timers.Provider, w beam.Window, key string, timer timers.Context, emit func(beam.EventTime, string)) {
switch timer.Family {
case fn.GcTimer.Family:
fn.clearState(sp)
}
}
func (fn *joinDoFn) clearState(sp state.Provider) {
fn.View.Clear(sp)
fn.Click.Clear(sp)
fn.MaxTimestampSeen.Clear(sp)
}
func AddJoinDoFn(s beam.Scope, in beam.PCollection) beam.PCollection {
return beam.ParDo(s, &joinDoFn{
View: state.MakeValueState[*Event]("view"),
Click: state.MakeValueState[*Event]("click"),
MaxTimestampSeen: state.MakeCombiningState[int64, int64, int64]("maxTimestampSeen", func(a, b int64) int64 {
if a > b {
return a
}
return b
}),
GcTimer: timers.InEventTime("gcTimer"),
}, in)
}11.5.2. 批次 RPC
在這個範例中,輸入元素會被轉發到外部 RPC 服務。RPC 接受批次請求 - 同一個使用者的多個事件可以批次處理在單一的 RPC 呼叫中。由於這個 RPC 服務也有速率限制,我們希望將十秒鐘的事件批次處理在一起,以減少呼叫次數。
PCollection<KV<String, ValueT>> perUser = readPerUser();
perUser.apply(ParDo.of(new DoFn<KV<String, ValueT>, OutputT>() {
// Store the elements buffered so far.
@StateId("state") private final StateSpec<BagState<ValueT>> elements = StateSpecs.bag();
// Keep track of whether a timer is currently set or not.
@StateId("isTimerSet") private final StateSpec<ValueState<Boolean>> isTimerSet = StateSpecs.value();
// The processing-time timer user to publish the RPC.
@TimerId("outputState") private final TimerSpec timer = TimerSpecs.timer(TimeDomain.PROCESSING_TIME);
@ProcessElement public void process(
@Element KV<String, ValueT> element,
@StateId("state") BagState<ValueT> elementsState,
@StateId("isTimerSet") ValueState<Boolean> isTimerSetState,
@TimerId("outputState") Timer timer) {
// Add the current element to the bag for this key.
state.add(element.getValue());
if (!MoreObjects.firstNonNull(isTimerSetState.read(), false)) {
// If there is no timer currently set, then set one to go off in 10 seconds.
timer.offset(Duration.standardSeconds(10)).setRelative();
isTimerSetState.write(true);
}
}
@OnTimer("outputState") public void onTimer(
@StateId("state") BagState<ValueT> elementsState,
@StateId("isTimerSet") ValueState<Boolean> isTimerSetState) {
// Send an RPC containing the batched elements and clear state.
sendRPC(elementsState.read());
elementsState.clear();
isTimerSetState.clear();
}
}));class BufferDoFn(DoFn):
BUFFER = BagStateSpec('buffer', EventCoder())
IS_TIMER_SET = ReadModifyWriteStateSpec('is_timer_set', BooleanCoder())
OUTPUT = TimerSpec('output', TimeDomain.REAL_TIME)
def process(self,
buffer=DoFn.StateParam(BUFFER),
is_timer_set=DoFn.StateParam(IS_TIMER_SET),
timer=DoFn.TimerParam(OUTPUT)):
buffer.add(element)
if not is_timer_set.read():
timer.set(Timestamp.now() + Duration(seconds=10))
is_timer_set.write(True)
@on_timer(OUTPUT)
def output_callback(self,
buffer=DoFn.StateParam(BUFFER),
is_timer_set=DoFn.StateParam(IS_TIMER_SET)):
send_rpc(list(buffer.read()))
buffer.clear()
is_timer_set.clear()type bufferDoFn[V any] struct {
Elements state.Bag[V] // Store the elements buffered so far.
IsTimerSet state.Value[bool] // Keep track of whether a timer is currently set or not.
OutputElements timers.ProcessingTime // The processing-time timer user to publish the RPC.
}
func (fn *bufferDoFn[V]) ProcessElement(et beam.EventTime, sp state.Provider, tp timers.Provider, key string, value V) {
fn.Elements.Add(sp, value)
isSet, _, _ := fn.IsTimerSet.Read(sp)
if !isSet {
fn.OutputElements.Set(tp, time.Now().Add(10*time.Second))
fn.IsTimerSet.Write(sp, true)
}
}
func (fn *bufferDoFn[V]) OnTimer(sp state.Provider, tp timers.Provider, w beam.Window, key string, timer timers.Context) {
switch timer.Family {
case fn.OutputElements.Family:
elements, _, _ := fn.Elements.Read(sp)
sendRpc(elements)
fn.Elements.Clear(sp)
fn.IsTimerSet.Clear(sp)
}
}
func AddBufferDoFn[V any](s beam.Scope, in beam.PCollection) beam.PCollection {
return beam.ParDo(s, &bufferDoFn[V]{
Elements: state.MakeBagState[V]("elements"),
IsTimerSet: state.MakeValueState[bool]("isTimerSet"),
OutputElements: timers.InProcessingTime("outputElements"),
}, in)
}12. 可分割的 DoFn
可分割 DoFn (SDF) 讓使用者可以建立包含 I/O (以及一些進階的非 I/O 用例) 的模組化元件。擁有可以彼此連接的模組化 I/O 元件,簡化了使用者想要的典型模式。例如,一個常見的用例是從訊息佇列中讀取檔案名稱,然後解析這些檔案。傳統上,使用者必須編寫一個包含訊息佇列和檔案讀取器邏輯的單一 I/O 連接器(增加複雜性),或者選擇重複使用訊息佇列 I/O,然後使用讀取檔案的常規 DoFn(降低效能)。透過 SDF,我們將 Apache Beam 的 I/O API 的豐富性帶入 DoFn,在保持傳統 I/O 連接器效能的同時,實現模組化。
12.1. SDF 基礎
在高層次上,SDF 負責處理元素和限制配對。限制代表處理元素時需要完成的工作子集。
執行 SDF 遵循以下步驟
- 每個元素都與一個限制配對(例如,檔案名稱與代表整個檔案的偏移範圍配對)。
- 每個元素和限制配對都會被分割(例如,偏移範圍會被分解成較小的片段)。
- 執行器將元素和限制配對重新分配給數個工作者。
- 元素和限制配對會並行處理(例如,讀取檔案)。在這個最後步驟中,元素和限制配對可以暫停自己的處理,和/或被分割成更多的元素和限制配對。

12.1.1. 基本 SDF
基本的 SDF 由三個部分組成:限制、限制提供者和限制追蹤器。如果您想要控制浮水印,特別是在串流管道中,則需要另外兩個元件:浮水印估算器提供者和浮水印估算器。
限制是一個使用者定義的物件,用於表示給定元素的子集工作。例如,我們將 OffsetRange 定義為限制,以表示 Java 和 Python 中的偏移位置。
限制提供者讓 SDF 作者覆寫預設實作,包括分割和大小調整的實作。在 Java 和 Go 中,這是 DoFn。Python 有一個專用的 RestrictionProvider 類型。
限制追蹤器負責追蹤在處理過程中已完成的限制子集。如需 API 詳細資訊,請閱讀 Java 和 Python 參考文件。
在 Java 中定義了一些內建的 RestrictionTracker 實作
SDF 在 Python 中也有一個內建的 RestrictionTracker 實作
Go 也有一個內建的 RestrictionTracker 類型
浮水印狀態是一個使用者定義的物件,用於從 WatermarkEstimatorProvider 建立 WatermarkEstimator。最簡單的浮水印狀態可以是 timestamp。
浮水印估算器提供者讓 SDF 作者定義如何初始化浮水印狀態並建立浮水印估算器。在 Java 和 Go 中,這是 DoFn。Python 有一個專用的 WatermarkEstimatorProvider 類型。
當元素-限制配對正在進行中時,浮水印估算器會追蹤浮水印。如需 API 詳細資訊,請閱讀 Java、Python 和 Go 參考文件。
在 Java 中有一些內建的 WatermarkEstimator 實作
除了預設的 WatermarkEstimatorProvider,在 Python 中還有相同的一組內建 WatermarkEstimator 實作
以下 WatermarkEstimator 類型在 Go 中實作
若要定義 SDF,您必須選擇 SDF 是有界限的(預設)還是無界限的,並定義一種初始化元素初始限制的方法。區別在於如何表示工作量
- 有界限的 DoFn 是指元素所代表的工作量事先已知且有結束。有界限元素的範例包括檔案或檔案群組。
- 無界限的 DoFn 是指工作量沒有特定結束,或者工作量事先未知。無界限元素的範例包括 Kafka 或 PubSub 主題。
在 Java 中,您可以使用 @UnboundedPerElement 或 @BoundedPerElement 來註解您的 DoFn。在 Python 中,您可以使用 @unbounded_per_element 來註解 DoFn。
@BoundedPerElement
private static class FileToWordsFn extends DoFn<String, Integer> {
@GetInitialRestriction
public OffsetRange getInitialRestriction(@Element String fileName) throws IOException {
return new OffsetRange(0, new File(fileName).length());
}
@ProcessElement
public void processElement(
@Element String fileName,
RestrictionTracker<OffsetRange, Long> tracker,
OutputReceiver<Integer> outputReceiver)
throws IOException {
RandomAccessFile file = new RandomAccessFile(fileName, "r");
seekToNextRecordBoundaryInFile(file, tracker.currentRestriction().getFrom());
while (tracker.tryClaim(file.getFilePointer())) {
outputReceiver.output(readNextRecord(file));
}
}
// Providing the coder is only necessary if it can not be inferred at runtime.
@GetRestrictionCoder
public Coder<OffsetRange> getRestrictionCoder() {
return OffsetRange.Coder.of();
}
}class FileToWordsRestrictionProvider(beam.transforms.core.RestrictionProvider
):
def initial_restriction(self, file_name):
return OffsetRange(0, os.stat(file_name).st_size)
def create_tracker(self, restriction):
return beam.io.restriction_trackers.OffsetRestrictionTracker()
class FileToWordsFn(beam.DoFn):
def process(
self,
file_name,
# Alternatively, we can let FileToWordsFn itself inherit from
# RestrictionProvider, implement the required methods and let
# tracker=beam.DoFn.RestrictionParam() which will use self as
# the provider.
tracker=beam.DoFn.RestrictionParam(FileToWordsRestrictionProvider())):
with open(file_name) as file_handle:
file_handle.seek(tracker.current_restriction.start())
while tracker.try_claim(file_handle.tell()):
yield read_next_record(file_handle)
# Providing the coder is only necessary if it can not be inferred at
# runtime.
def restriction_coder(self):
return ...func (fn *splittableDoFn) CreateInitialRestriction(filename string) offsetrange.Restriction {
return offsetrange.Restriction{
Start: 0,
End: getFileLength(filename),
}
}
func (fn *splittableDoFn) CreateTracker(rest offsetrange.Restriction) *sdf.LockRTracker {
return sdf.NewLockRTracker(offsetrange.NewTracker(rest))
}
func (fn *splittableDoFn) ProcessElement(rt *sdf.LockRTracker, filename string, emit func(int)) error {
file, err := os.Open(filename)
if err != nil {
return err
}
offset, err := seekToNextRecordBoundaryInFile(file, rt.GetRestriction().(offsetrange.Restriction).Start)
if err != nil {
return err
}
for rt.TryClaim(offset) {
record, newOffset := readNextRecord(file)
emit(record)
offset = newOffset
}
return nil
}在此時,我們有一個支援執行器啟動分割的 SDF,可實現動態工作重新平衡。為了提高初始工作並行化的速度,或對於那些不支援執行器啟動分割的執行器,我們建議提供一組初始分割
void splitRestriction(
@Restriction OffsetRange restriction, OutputReceiver<OffsetRange> splitReceiver) {
long splitSize = 64 * (1 << 20);
long i = restriction.getFrom();
while (i < restriction.getTo() - splitSize) {
// Compute and output 64 MiB size ranges to process in parallel
long end = i + splitSize;
splitReceiver.output(new OffsetRange(i, end));
i = end;
}
// Output the last range
splitReceiver.output(new OffsetRange(i, restriction.getTo()));
}class FileToWordsRestrictionProvider(beam.transforms.core.RestrictionProvider
):
def split(self, file_name, restriction):
# Compute and output 64 MiB size ranges to process in parallel
split_size = 64 * (1 << 20)
i = restriction.start
while i < restriction.end - split_size:
yield OffsetRange(i, i + split_size)
i += split_size
yield OffsetRange(i, restriction.end)func (fn *splittableDoFn) SplitRestriction(filename string, rest offsetrange.Restriction) (splits []offsetrange.Restriction) {
size := 64 * (1 << 20)
i := rest.Start
for i < rest.End - size {
// Compute and output 64 MiB size ranges to process in parallel
end := i + size
splits = append(splits, offsetrange.Restriction{i, end})
i = end
}
// Output the last range
splits = append(splits, offsetrange.Restriction{i, rest.End})
return splits
}12.2. 大小調整和進度
在執行 SDF 期間,會使用大小調整和進度來通知執行器,以便他們可以針對要分割的限制以及如何並行處理工作做出明智的決策。
在處理元素和限制之前,執行器可以使用初始大小來選擇如何處理限制以及由誰處理限制,以嘗試改善初始平衡和工作並行化。在處理元素和限制期間,會使用大小調整和進度來選擇要分割的限制以及應該由誰處理這些限制。
依預設,我們使用限制追蹤器對剩餘工作量的估計值,如果無法估計,則假設所有限制具有相同的成本。若要覆寫預設值,SDF 作者可以在限制提供者中提供適當的方法。SDF 作者需要知道,由於執行器啟動分割和進度估計,大小調整方法將在捆綁處理期間並行叫用。
@GetSize
double getSize(@Element String fileName, @Restriction OffsetRange restriction) {
return (fileName.contains("expensiveRecords") ? 2 : 1) * restriction.getTo()
- restriction.getFrom();
}# The RestrictionProvider is responsible for calculating the size of given
# restriction.
class MyRestrictionProvider(beam.transforms.core.RestrictionProvider):
def restriction_size(self, file_name, restriction):
weight = 2 if "expensiveRecords" in file_name else 1
return restriction.size() * weightfunc (fn *splittableDoFn) RestrictionSize(filename string, rest offsetrange.Restriction) float64 {
weight := float64(1)
if strings.Contains(filename, “expensiveRecords”) {
weight = 2
}
return weight * (rest.End - rest.Start)
}12.3. 使用者起始的檢查點
某些 I/O 無法在單一捆綁的生命週期內產生完成限制所需的所有資料。這種情況通常發生在無界限的限制中,但也可能發生在有界限的限制中。例如,可能需要擷取更多資料,但尚未可用。導致這種情況的另一個原因是來源系統正在節流您的資料。
您的 SDF 可以向您發出訊號,表示您尚未完成處理目前的限制。這個訊號可以建議恢復時間。雖然執行器會嘗試遵守恢復時間,但這並不能保證。這讓執行可以繼續處理具有可用工作的限制,從而提高資源利用率。
@ProcessElement
public ProcessContinuation processElement(
RestrictionTracker<OffsetRange, Long> tracker,
OutputReceiver<RecordPosition> outputReceiver) {
long currentPosition = tracker.currentRestriction().getFrom();
Service service = initializeService();
try {
while (true) {
List<RecordPosition> records = service.readNextRecords(currentPosition);
if (records.isEmpty()) {
// Return a short delay if there is no data to process at the moment.
return ProcessContinuation.resume().withResumeDelay(Duration.standardSeconds(10));
}
for (RecordPosition record : records) {
if (!tracker.tryClaim(record.getPosition())) {
return ProcessContinuation.stop();
}
currentPosition = record.getPosition() + 1;
outputReceiver.output(record);
}
}
} catch (ThrottlingException exception) {
// Return a longer delay in case we are being throttled.
return ProcessContinuation.resume().withResumeDelay(Duration.standardSeconds(60));
}
}class MySplittableDoFn(beam.DoFn):
def process(
self,
element,
restriction_tracker=beam.DoFn.RestrictionParam(
MyRestrictionProvider())):
current_position = restriction_tracker.current_restriction.start()
while True:
# Pull records from an external service.
try:
records = external_service.fetch(current_position)
if records.empty():
# Set a shorter delay in case we are being throttled.
restriction_tracker.defer_remainder(timestamp.Duration(second=10))
return
for record in records:
if restriction_tracker.try_claim(record.position):
current_position = record.position
yield record
else:
return
except TimeoutError:
# Set a longer delay in case we are being throttled.
restriction_tracker.defer_remainder(timestamp.Duration(seconds=60))
returnfunc (fn *checkpointingSplittableDoFn) ProcessElement(rt *sdf.LockRTracker, emit func(Record)) (sdf.ProcessContinuation, error) {
position := rt.GetRestriction().(offsetrange.Restriction).Start
for {
records, err := fn.ExternalService.readNextRecords(position)
if err != nil {
if err == fn.ExternalService.ThrottlingErr {
// Resume at a later time to avoid throttling.
return sdf.ResumeProcessingIn(60 * time.Second), nil
}
return sdf.StopProcessing(), err
}
if len(records) == 0 {
// Wait for data to be available.
return sdf.ResumeProcessingIn(10 * time.Second), nil
}
for _, record := range records {
if !rt.TryClaim(position) {
// Records have been claimed, finish processing.
return sdf.StopProcessing(), nil
}
position += 1
emit(record)
}
}
}12.4. 執行器起始的分割
執行器可能會隨時嘗試在處理限制時分割限制。這讓執行器可以暫停限制的處理,以便可以完成其他工作(對於無界限的限制來說,這很常見,目的是限制輸出量和/或改善延遲),或將限制分割成兩個部分,從而增加系統內的可用並行性。不同的執行器(例如,Dataflow、Flink、Spark)在批次和串流執行下具有不同的發出分割策略。
在編寫 SDF 時請考慮到這一點,因為限制的結束可能會改變。在編寫處理迴圈時,請使用嘗試要求限制一部分的結果,而不是假設您可以處理到最後。
一個不正確的範例可能是
@ProcessElement
public void badTryClaimLoop(
@Element String fileName,
RestrictionTracker<OffsetRange, Long> tracker,
OutputReceiver<Integer> outputReceiver)
throws IOException {
RandomAccessFile file = new RandomAccessFile(fileName, "r");
seekToNextRecordBoundaryInFile(file, tracker.currentRestriction().getFrom());
// The restriction tracker can be modified by another thread in parallel
// so storing state locally is ill advised.
long end = tracker.currentRestriction().getTo();
while (file.getFilePointer() < end) {
// Only after successfully claiming should we produce any output and/or
// perform side effects.
tracker.tryClaim(file.getFilePointer());
outputReceiver.output(readNextRecord(file));
}
}class BadTryClaimLoop(beam.DoFn):
def process(
self,
file_name,
tracker=beam.DoFn.RestrictionParam(FileToWordsRestrictionProvider())):
with open(file_name) as file_handle:
file_handle.seek(tracker.current_restriction.start())
# The restriction tracker can be modified by another thread in parallel
# so storing state locally is ill advised.
end = tracker.current_restriction.end()
while file_handle.tell() < end:
# Only after successfully claiming should we produce any output and/or
# perform side effects.
tracker.try_claim(file_handle.tell())
yield read_next_record(file_handle)func (fn *badTryClaimLoop) ProcessElement(rt *sdf.LockRTracker, filename string, emit func(int)) error {
file, err := os.Open(filename)
if err != nil {
return err
}
offset, err := seekToNextRecordBoundaryInFile(file, rt.GetRestriction().(offsetrange.Restriction).Start)
if err != nil {
return err
}
// The restriction tracker can be modified by another thread in parallel
// so storing state locally is ill advised.
end = rt.GetRestriction().(offsetrange.Restriction).End
for offset < end {
// Only after successfully claiming should we produce any output and/or
// perform side effects.
rt.TryClaim(offset)
record, newOffset := readNextRecord(file)
emit(record)
offset = newOffset
}
return nil
}12.5. 浮水印估算
預設的浮水印估算器不會產生浮水印估計值。因此,輸出浮水印僅由上游浮水印的最小值計算得出。
SDF 可以透過指定此元素和限制配對將產生的所有未來輸出的下限來提前輸出浮水印。執行器透過取所有上游浮水印的最小值,以及每個元素和限制配對報告的最小值,來計算最小輸出浮水印。對於每個元素和限制配對,在捆綁邊界之間,報告的浮水印必須單調遞增。當元素和限制配對停止處理其浮水印時,它就不再被視為上述計算的一部分。
提示
- 如果您編寫的 SDF 輸出具有時間戳記的記錄,您應該公開方法,讓此 SDF 的使用者可以設定要使用的浮水印估算器。
- 在浮水印之前產生的任何資料都可能被視為延遲資料。如需更多詳細資訊,請參閱浮水印和延遲資料。
12.5.1. 控制浮水印
浮水印估算器有兩種常見類型:觀察時間戳記和觀察外部時鐘。觀察時間戳記的浮水印估算器使用每個記錄的輸出時間戳記來計算浮水印估計值,而觀察外部時鐘的浮水印估算器則透過使用未與任何個別輸出相關聯的時鐘(例如機器上的本機時鐘或透過外部服務公開的時鐘)來控制浮水印。
浮水印估算器提供者讓您可以覆寫預設的浮水印估計邏輯,並使用現有的浮水印估算器實作。您也可以提供自己的浮水印估算器實作。
// (Optional) Define a custom watermark state type to save information between bundle
// processing rounds.
public static class MyCustomWatermarkState {
public MyCustomWatermarkState(String element, OffsetRange restriction) {
// Store data necessary for future watermark computations
}
}
// (Optional) Choose which coder to use to encode the watermark estimator state.
@GetWatermarkEstimatorStateCoder
public Coder<MyCustomWatermarkState> getWatermarkEstimatorStateCoder() {
return AvroCoder.of(MyCustomWatermarkState.class);
}
// Define a WatermarkEstimator
public static class MyCustomWatermarkEstimator
implements TimestampObservingWatermarkEstimator<MyCustomWatermarkState> {
public MyCustomWatermarkEstimator(MyCustomWatermarkState type) {
// Initialize watermark estimator state
}
@Override
public void observeTimestamp(Instant timestamp) {
// Will be invoked on each output from the SDF
}
@Override
public Instant currentWatermark() {
// Return a monotonically increasing value
return currentWatermark;
}
@Override
public MyCustomWatermarkState getState() {
// Return state to resume future watermark estimation after a checkpoint/split
return null;
}
}
// Then, update the DoFn to generate the initial watermark estimator state for all new element
// and restriction pairs and to create a new instance given watermark estimator state.
@GetInitialWatermarkEstimatorState
public MyCustomWatermarkState getInitialWatermarkEstimatorState(
@Element String element, @Restriction OffsetRange restriction) {
// Compute and return the initial watermark estimator state for each element and
// restriction. All subsequent processing of an element and restriction will be restored
// from the existing state.
return new MyCustomWatermarkState(element, restriction);
}
@NewWatermarkEstimator
public WatermarkEstimator<MyCustomWatermarkState> newWatermarkEstimator(
@WatermarkEstimatorState MyCustomWatermarkState oldState) {
return new MyCustomWatermarkEstimator(oldState);
}
}# (Optional) Define a custom watermark state type to save information between
# bundle processing rounds.
class MyCustomerWatermarkEstimatorState(object):
def __init__(self, element, restriction):
# Store data necessary for future watermark computations
pass
# Define a WatermarkEstimator
class MyCustomWatermarkEstimator(WatermarkEstimator):
def __init__(self, estimator_state):
self.state = estimator_state
def observe_timestamp(self, timestamp):
# Will be invoked on each output from the SDF
pass
def current_watermark(self):
# Return a monotonically increasing value
return current_watermark
def get_estimator_state(self):
# Return state to resume future watermark estimation after a
# checkpoint/split
return self.state
# Then, a WatermarkEstimatorProvider needs to be created for this
# WatermarkEstimator
class MyWatermarkEstimatorProvider(WatermarkEstimatorProvider):
def initial_estimator_state(self, element, restriction):
return MyCustomerWatermarkEstimatorState(element, restriction)
def create_watermark_estimator(self, estimator_state):
return MyCustomWatermarkEstimator(estimator_state)
# Finally, define the SDF using your estimator.
class MySplittableDoFn(beam.DoFn):
def process(
self,
element,
restriction_tracker=beam.DoFn.RestrictionParam(MyRestrictionProvider()),
watermark_estimator=beam.DoFn.WatermarkEstimatorParam(
MyWatermarkEstimatorProvider())):
# The current watermark can be inspected.
watermark_estimator.current_watermark()// WatermarkState is a custom type.`
//
// It is optional to write your own state type when making a custom estimator.
type WatermarkState struct {
Watermark time.Time
}
// CustomWatermarkEstimator is a custom watermark estimator.
// You may use any type here, including some of Beam's built in watermark estimator types,
// e.g. sdf.WallTimeWatermarkEstimator, sdf.TimestampObservingWatermarkEstimator, and sdf.ManualWatermarkEstimator
type CustomWatermarkEstimator struct {
state WatermarkState
}
// CurrentWatermark returns the current watermark and is invoked on DoFn splits and self-checkpoints.
// Watermark estimators must implement CurrentWatermark() time.Time
func (e *CustomWatermarkEstimator) CurrentWatermark() time.Time {
return e.state.Watermark
}
// ObserveTimestamp is called on the output timestamps of all
// emitted elements to update the watermark. It is optional
func (e *CustomWatermarkEstimator) ObserveTimestamp(ts time.Time) {
e.state.Watermark = ts
}
// InitialWatermarkEstimatorState defines an initial state used to initialize the watermark
// estimator. It is optional. If this is not defined, WatermarkEstimatorState may not be
// defined and CreateWatermarkEstimator must not take in parameters.
func (fn *weDoFn) InitialWatermarkEstimatorState(et beam.EventTime, rest offsetrange.Restriction, element string) WatermarkState {
// Return some watermark state
return WatermarkState{Watermark: time.Now()}
}
// CreateWatermarkEstimator creates the watermark estimator used by this Splittable DoFn.
// Must take in a state parameter if InitialWatermarkEstimatorState is defined, otherwise takes no parameters.
func (fn *weDoFn) CreateWatermarkEstimator(initialState WatermarkState) *CustomWatermarkEstimator {
return &CustomWatermarkEstimator{state: initialState}
}
// WatermarkEstimatorState returns the state used to resume future watermark estimation
// after a checkpoint/split. It is required if InitialWatermarkEstimatorState is defined,
// otherwise it must not be defined.
func (fn *weDoFn) WatermarkEstimatorState(e *CustomWatermarkEstimator) WatermarkState {
return e.state
}
// ProcessElement is the method to execute for each element.
// It can optionally take in a watermark estimator.
func (fn *weDoFn) ProcessElement(e *CustomWatermarkEstimator, element string) {
// ...
e.state.Watermark = time.Now()
}12.6. 在排空期間截斷
支援排空管道的執行器需要能夠排空 SDF;否則,管道可能永遠不會停止。依預設,有界限的限制會處理限制的剩餘部分,而無界限的限制會在下一個 SDF 啟動的檢查點或執行器啟動的分割時完成處理。您可以透過在限制提供者上定義適當的方法來覆寫此預設行為。
注意:一旦管道排空開始並觸發截斷限制轉換,sdf.ProcessContinuation 將不會重新排程。
@TruncateRestriction
@Nullable
TruncateResult<OffsetRange> truncateRestriction(
@Element String fileName, @Restriction OffsetRange restriction) {
if (fileName.contains("optional")) {
// Skip optional files
return null;
}
return TruncateResult.of(restriction);
}class MyRestrictionProvider(beam.transforms.core.RestrictionProvider):
def truncate(self, file_name, restriction):
if "optional" in file_name:
# Skip optional files
return None
return restriction// TruncateRestriction is a transform that is triggered when pipeline starts to drain. It helps to finish a
// pipeline quicker by truncating the restriction.
func (fn *splittableDoFn) TruncateRestriction(rt *sdf.LockRTracker, element string) offsetrange.Restriction {
start := rt.GetRestriction().(offsetrange.Restriction).Start
prevEnd := rt.GetRestriction().(offsetrange.Restriction).End
// truncate the restriction by half.
newEnd := prevEnd / 2
return offsetrange.Restriction{
Start: start,
End: newEnd,
}
}12.7. 捆綁最終化
捆綁完成 (Bundle finalization) 允許 DoFn 透過註冊回呼函數來執行副作用。一旦執行器 (runner) 確知輸出已被持久保存,就會調用此回呼函數。舉例來說,訊息佇列可能需要確認已將訊息攝取至管線中。捆綁完成不限於 SDF,但在此特別提出,因為這是主要的使用案例。
@ProcessElement
public void processElement(ProcessContext c, BundleFinalizer bundleFinalizer) {
// ... produce output ...
bundleFinalizer.afterBundleCommit(
Instant.now().plus(Duration.standardMinutes(5)),
() -> {
// ... perform a side effect ...
});
}class MySplittableDoFn(beam.DoFn):
def process(self, element, bundle_finalizer=beam.DoFn.BundleFinalizerParam):
# ... produce output ...
# Register callback function for this bundle that performs the side
# effect.
bundle_finalizer.register(my_callback_func)func (fn *splittableDoFn) ProcessElement(bf beam.BundleFinalization, rt *sdf.LockRTracker, element string) {
// ... produce output ...
bf.RegisterCallback(5*time.Minute, func() error {
// ... perform a side effect ...
return nil
})
}13. 多語言管線
本節提供多語言管線的完整文件。若要開始建立多語言管線,請參閱
Beam 讓您可以結合以任何支援的 SDK 語言 (目前為 Java 和 Python) 編寫的轉換 (transform),並在一個多語言管線中使用它們。此功能讓您能輕鬆地透過單一跨語言轉換,同時在不同的 Apache Beam SDK 中提供新功能。例如,來自 Java SDK 的 Apache Kafka 連接器和 SQL 轉換,可以在 Python 管線中使用。
使用來自多個 SDK 語言的轉換的管線稱為多語言管線。
Beam YAML 完全建立在跨語言轉換之上。除了內建的轉換之外,您還可以撰寫自己的轉換 (使用 Beam API 的完整表達能力),並透過稱為提供者的概念來呈現它們。
13.1. 建立跨語言轉換
為了使以一種語言編寫的轉換可供以另一種語言編寫的管線使用,Beam 使用擴展服務,該服務會建立並將適當的語言特定管線片段注入到管線中。
在以下範例中,Beam Python 管線啟動本機 Java 擴展服務,以建立並將適當的 Java 管線片段注入到 Python 管線中,以執行 Java Kafka 跨語言轉換。然後,SDK 會下載並暫存執行這些轉換所需的必要 Java 相依性。

在執行時,Beam 執行器將會執行 Python 和 Java 轉換來執行管線。
在本節中,我們將使用 KafkaIO.Read來說明如何為 Java 建立跨語言轉換,以及為 Python 建立測試範例。
13.1.1. 建立跨語言 Java 轉換
有兩種方式可以使 Java 轉換可供其他 SDK 使用。
- 選項 1:在某些情況下,您可以使用來自其他 SDK 的現有 Java 轉換,而無需編寫任何額外的 Java 程式碼。
- 選項 2:您可以透過新增一些 Java 類別來使用來自其他 SDK 的任意 Java 轉換。
13.1.1.1 使用現有 Java 轉換,而無需編寫更多 Java 程式碼
從 Beam 2.34.0 開始,Python SDK 使用者可以使用某些 Java 轉換,而無需編寫額外的 Java 程式碼。這在許多情況下都很有用。例如
- 不熟悉 Java 的開發人員可能需要從 Python 管線中使用現有的 Java 轉換。
- 開發人員可能需要在不編寫/發布更多 Java 程式碼的情況下,使現有的 Java 轉換可供 Python 管線使用。
注意:此功能目前僅在使用來自 Python 管線的 Java 轉換時可用。
若要符合直接使用的資格,Java 轉換的 API 必須符合以下要求
- Java 轉換可以使用相同 Java 類別中的可用公用建構函式或公用靜態方法(建構函式方法)來建構。
- Java 轉換可以使用一個或多個建構器方法來設定。每個建構器方法都應該是公用的,並且應該傳回 Java 轉換的實例。
這是一個可以從 Python API 直接使用的 Java 類別範例。
public class JavaDataGenerator extends PTransform<PBegin, PCollection<String>> {
. . .
// The following method satisfies requirement 1.
// Note that you could use a class constructor instead of a static method.
public static JavaDataGenerator create(Integer size) {
return new JavaDataGenerator(size);
}
static class JavaDataGeneratorConfig implements Serializable {
public String prefix;
public long length;
public String suffix;
. . .
}
// The following method conforms to requirement 2.
public JavaDataGenerator withJavaDataGeneratorConfig(JavaDataGeneratorConfig dataConfig) {
return new JavaDataGenerator(this.size, javaDataGeneratorConfig);
}
. . .
}
如需完整範例,請參閱 JavaDataGenerator。
若要從 Python SDK 管線使用符合上述要求的 Java 類別,請依照下列步驟
- 建立一個 yaml 允許清單,其中描述將直接從 Python 存取的 Java 轉換類別和方法。
- 啟動擴展服務,使用
javaClassLookupAllowlistFile選項傳遞允許清單的路徑。 - 使用 Python JavaExternalTransform API,直接從 Python 端存取允許清單中定義的 Java 轉換。
從 Beam 2.36.0 開始,可以跳過步驟 1 和 2,如下面相應章節所述。
步驟 1
若要從 Python 使用符合資格的 Java 轉換,請定義一個 yaml 允許清單。此允許清單會列出可以直接從 Python 端使用的類別名稱、建構函式方法和建構器方法。
從 Beam 2.35.0 開始,您可以選擇將 * 傳遞給 javaClassLookupAllowlistFile 選項,而不是定義實際的允許清單。* 指定可以透過 API 存取擴展服務類路徑中的所有支援的轉換。我們建議在生產環境中使用實際的允許清單,因為允許客戶端存取任意 Java 類別可能會構成安全風險。
version: v1
allowedClasses:
- className: my.beam.transforms.JavaDataGenerator
allowedConstructorMethods:
- create
allowedBuilderMethods:
- withJavaDataGeneratorConfig步驟 2
在啟動 Java 擴展服務時,請提供允許清單作為引數。例如,您可以使用以下命令將擴展服務啟動為本機 Java 處理程序
java -jar <jar file> <port> --javaClassLookupAllowlistFile=<path to the allowlist file>從 Beam 2.36.0 開始,如果未提供擴展服務位址,JavaExternalTransform API 將自動使用給定的 jar 檔案相依性啟動擴展服務。
步驟 3
您可以使用從 JavaExternalTransform API 建立的存根轉換,直接從 Python 管線中使用 Java 類別。此 API 允許您使用 Java 類別名稱建構轉換,並允許您呼叫建構器方法來設定類別。
建構函式和方法參數類型會使用 Beam 綱要 (schema) 在 Python 和 Java 之間對應。綱要是使用 Python 端提供的物件類型自動產生的。如果 Java 類別建構函式方法或建構器方法接受任何複雜的物件類型,請確保這些物件的 Beam 綱已註冊並可供 Java 擴展服務使用。如果尚未註冊綱要,Java 擴展服務將嘗試使用 JavaFieldSchema 註冊綱要。在 Python 中,可以使用 NamedTuple 表示任意物件,這些物件將在綱要中表示為 Beam 列。這是一個代表上述 Java 轉換的 Python 存根轉換
JavaDataGeneratorConfig = typing.NamedTuple(
'JavaDataGeneratorConfig', [('prefix', str), ('length', int), ('suffix', str)])
data_config = JavaDataGeneratorConfig(prefix='start', length=20, suffix='end')
java_transform = JavaExternalTransform(
'my.beam.transforms.JavaDataGenerator', expansion_service='localhost:<port>').create(numpy.int32(100)).withJavaDataGeneratorConfig(data_config)
您可以在 Python 管線中與其他 Python 轉換一起使用此轉換。如需完整範例,請參閱 javadatagenerator.py。
13.1.1.2 使用 API 使現有的 Java 轉換可供其他 SDK 使用
若要使您的 Beam Java SDK 轉換可在跨 SDK 語言之間攜帶,您必須實作兩個介面:ExternalTransformBuilder 和 ExternalTransformRegistrar。ExternalTransformBuilder 介面使用從管線傳入的設定值來建構跨語言轉換,而 ExternalTransformRegistrar 介面會註冊跨語言轉換以供擴展服務使用。
實作介面
為您的轉換定義一個 Builder 類別,該類別實作
ExternalTransformBuilder介面並覆寫buildExternal方法,該方法將用於建置您的轉換物件。轉換的初始設定值應在buildExternal方法中定義。在大多數情況下,使 Java 轉換建構器類別實作ExternalTransformBuilder會很方便。注意:
ExternalTransformBuilder需要您定義一個設定物件 (一個簡單的 POJO) 來擷取外部 SDK 發送的一組參數,以啟動 Java 轉換。通常,這些參數會直接對應到 Java 轉換的建構函式參數。@AutoValue.Builder abstract static class Builder<K, V> implements ExternalTransformBuilder<External.Configuration, PBegin, PCollection<KV<K, V>>> { abstract Builder<K, V> setConsumerConfig(Map<String, Object> config); abstract Builder<K, V> setTopics(List<String> topics); /** Remaining property declarations omitted for clarity. */ abstract Read<K, V> build(); @Override public PTransform<PBegin, PCollection<KV<K, V>>> buildExternal( External.Configuration config) { setTopics(ImmutableList.copyOf(config.topics)); /** Remaining property defaults omitted for clarity. */ } }如需完整範例,請參閱 JavaCountBuilder 和 JavaPrefixBuilder。
請注意,
buildExternal方法可以在設定從外部 SDK 接收的屬性之前,執行其他操作。例如,buildExternal可以驗證設定物件中可用的屬性,然後再將它們設定到轉換中。透過定義一個實作
ExternalTransformRegistrar的類別,將轉換註冊為外部跨語言轉換。您必須使用AutoService註解註解您的類別,以確保您的轉換已註冊並由擴展服務正確實例化。在您的註冊器類別中,為您的轉換定義一個統一資源名稱 (URN)。URN 必須是一個唯一的字串,用於透過擴展服務識別您的轉換。
在您的註冊器類別中,定義一個用於在外部 SDK 初始化您的轉換期間使用的參數的設定類別。
以下來自 KafkaIO 轉換的範例顯示了如何實作步驟 2 到 4
@AutoService(ExternalTransformRegistrar.class) public static class External implements ExternalTransformRegistrar { public static final String URN = "beam:external:java:kafka:read:v1"; @Override public Map<String, Class<? extends ExternalTransformBuilder<?, ?, ?>>> knownBuilders() { return ImmutableMap.of( URN, (Class<? extends ExternalTransformBuilder<?, ?, ?>>) (Class<?>) AutoValue_KafkaIO_Read.Builder.class); } /** Parameters class to expose the Read transform to an external SDK. */ public static class Configuration { private Map<String, String> consumerConfig; private List<String> topics; public void setConsumerConfig(Map<String, String> consumerConfig) { this.consumerConfig = consumerConfig; } public void setTopics(List<String> topics) { this.topics = topics; } /** Remaining properties omitted for clarity. */ } }如需其他範例,請參閱 JavaCountRegistrar 和 JavaPrefixRegistrar。
在您實作 ExternalTransformBuilder 和 ExternalTransformRegistrar 介面之後,您的轉換可以由預設的 Java 擴展服務成功註冊和建立。
啟動擴展服務
您可以在同一個管線中使用具有多個轉換的擴展服務。Beam Java SDK 為 Java 轉換提供預設的擴展服務。您也可以撰寫自己的擴展服務,但通常不需要,因此本節不涵蓋。
執行以下操作以直接啟動 Java 擴展服務
# Build a JAR with both your transform and the expansion service
# Start the expansion service at the specified port.
$ jar -jar /path/to/expansion_service.jar <PORT_NUMBER>擴展服務現在已準備好在指定的埠上提供轉換。
在為您的轉換建立 SDK 特定的包裝函式時,您可以使用 SDK 提供的公用程式來啟動擴展服務。例如,Python SDK 提供公用程式 JavaJarExpansionService 和 BeamJarExpansionService,用於使用 JAR 檔案啟動 Java 擴展服務。
包含相依性
如果您的轉換需要外部程式庫,您可以將它們新增至擴展服務的類路徑中來包含它們。將它們包含在類路徑中後,當您的轉換由擴展服務展開時,它們將被暫存。
撰寫 SDK 專屬的包裝函式
您的跨語言 Java 轉換可以透過多語言管道中較低層級的 ExternalTransform 類別來呼叫(如下一節所述);但是,如果可以的話,您應該以管道的語言(例如 Python)撰寫一個 SDK 專屬的包裝函式,以便存取轉換。這種更高層級的抽象化將使管道作者更容易使用您的轉換。
若要建立用於 Python 管道的 SDK 包裝函式,請執行下列操作
為您的跨語言轉換建立一個 Python 模組。
在模組中,使用其中一個
PayloadBuilder類別來為初始跨語言轉換擴充請求建立酬載。酬載的參數名稱和類型應對應於提供給 Java
ExternalTransformBuilder的組態 POJO 的參數名稱和類型。參數類型會使用 Beam 結構描述在 SDK 之間對應。參數名稱會透過簡單地將 Python 底線分隔的變數名稱轉換為駝峰式大小寫(Java 標準)來對應。在以下範例中,kafka.py 使用
NamedTupleBasedPayloadBuilder來建立酬載。這些參數會對應到先前章節中定義的 Java KafkaIO.External.Configuration 組態物件。class ReadFromKafkaSchema(typing.NamedTuple): consumer_config: typing.Mapping[str, str] topics: typing.List[str] # Other properties omitted for clarity. payload = NamedTupleBasedPayloadBuilder(ReadFromKafkaSchema(...))啟動擴充服務,除非管道建立者指定。Beam Python SDK 提供
JavaJarExpansionService和BeamJarExpansionService公用程式,可使用 JAR 檔案啟動擴充服務。JavaJarExpansionService可用於使用給定 JAR 檔案的路徑(本機路徑或 URL)啟動擴充服務。BeamJarExpansionService可用於從 Beam 隨附發布的 JAR 檔案啟動擴充服務。對於隨附 Beam 發布的轉換,請執行下列操作
在 Beam 中新增一個 Gradle 目標,可用於為目標 Java 轉換建立陰影的擴充服務 JAR。此目標應產生一個 Beam JAR,其中包含擴充 Java 轉換所需的所有依賴項,並且 JAR 應隨附 Beam 發布。您或許可以使用現有的 Gradle 目標,該目標提供擴充服務 JAR 的彙總版本(例如,針對所有 GCP IO)。
在您的 Python 模組中,使用 Gradle 目標來實例化
BeamJarExpansionService。expansion_service = BeamJarExpansionService('sdks:java:io:expansion-service:shadowJar')
新增一個 Python 包裝函式轉換類別,該類別會擴充
ExternalTransform。將上述定義的酬載和擴充服務作為參數傳遞給ExternalTransform父類別的建構函式。
13.1.2. 建立跨語言 Python 轉換
在擴充服務範圍內定義的任何 Python 轉換,都應可透過指定其完整名稱來存取。例如,您可以在 Java 管道中使用 Python 的 ReadFromText 轉換,其完整名稱為 apache_beam.io.ReadFromText。
p.apply("Read",
PythonExternalTransform.<PBegin, PCollection<String>>from("apache_beam.io.ReadFromText")
.withKwarg("file_pattern", options.getInputFile())
.withKwarg("validate", false))
PythonExternalTransform 還有其他有用的方法,例如用於暫存 PyPI 套件依賴項的 withExtraPackages 和用於設定輸出編碼器的 withOutputCoder。如果您的轉換存在於外部套件中,請務必使用 withExtraPackages 指定該套件,例如
p.apply("Read",
PythonExternalTransform.<PBegin, PCollection<String>>from("my_python_package.BeamReadPTransform")
.withExtraPackages(ImmutableList.of("my_python_package")))
或者,您可能想要建立一個 Python 模組,該模組會將現有的 Python 轉換註冊為跨語言轉換,以供 Python 擴充服務使用,並呼叫該現有轉換以執行其預期操作。稍後可以在擴充請求中使用已註冊的 URN 來指示擴充目標。
定義 Python 模組
為您的轉換定義一個統一資源名稱 (URN)。URN 必須是一個唯一的字串,用於透過擴充服務識別您的轉換。
TEST_COMPK_URN = "beam:transforms:xlang:test:compk"對於現有的 Python 轉換,請建立一個新類別,以使用 Python 擴充服務註冊 URN。
@ptransform.PTransform.register_urn(TEST_COMPK_URN, None) class CombinePerKeyTransform(ptransform.PTransform):在類別內,定義一個 expand 方法,該方法會取得輸入 PCollection、執行 Python 轉換,然後傳回輸出 PCollection。
def expand(self, pcoll): return pcoll \ | beam.CombinePerKey(sum).with_output_types( typing.Tuple[unicode, int])與其他 Python 轉換一樣,定義一個
to_runner_api_parameter方法,該方法會傳回 URN。def to_runner_api_parameter(self, unused_context): return TEST_COMPK_URN, None定義一個靜態
from_runner_api_parameter方法,該方法會傳回跨語言 Python 轉換的實例化。@staticmethod def from_runner_api_parameter( unused_ptransform, unused_parameter, unused_context): return CombinePerKeyTransform()
啟動擴展服務
擴充服務可以與同一管道中的多個轉換搭配使用。Beam Python SDK 提供預設的擴充服務,供您與 Python 轉換搭配使用。您可以自由撰寫自己的擴充服務,但通常不需要,因此本節不涵蓋此部分。
執行下列步驟以直接啟動預設的 Python 擴充服務
建立虛擬環境並安裝 Apache Beam SDK。
使用指定的埠啟動 Python SDK 的擴充服務。

$ export PORT_FOR_EXPANSION_SERVICE=12345匯入任何包含要使用擴充服務提供的轉換的模組。
$ python -m apache_beam.runners.portability.expansion_service_test -p $PORT_FOR_EXPANSION_SERVICE --pickle_library=cloudpickle此擴充服務現在已準備好在位址 `localhost:$PORT_FOR_EXPANSION_SERVICE` 上提供轉換。
13.1.3. 建立跨語言的 Go 轉換
Go 目前不支援建立跨語言轉換,僅支援使用其他語言的跨語言轉換;如需詳細資訊,請參閱Issue 21767。
13.1.4. 定義 URN
開發跨語言轉換需要定義一個 URN,以使用擴充服務註冊轉換。在本節中,我們提供定義此類 URN 的慣例。遵循此慣例是可選的,但它將確保您的轉換在與其他開發人員開發的轉換一起註冊到擴充服務時不會發生衝突。
13.1.4.1. 結構描述
URN 應包含下列元件
- ns-id:命名空間識別碼。預設建議為
beam:transform。 - org-identifier:識別定義轉換的組織。在 Apache Beam 中定義的轉換會使用
org.apache.beam來達成此目的。 - functionality-identifier:識別跨語言轉換的功能。
- version:轉換的版本號碼。
我們在 增強巴科斯範式中提供 URN 慣例的結構描述。大寫關鍵字來自 URN 規格。
transform-urn = ns-id “:” org-identifier “:” functionality-identifier “:” version
ns-id = (“beam” / NID) “:” “transform”
id-char = ALPHA / DIGIT / "-" / "." / "_" / "~" ; A subset of characters allowed in a URN
org-identifier = 1*id-char
functionality-identifier = 1*id-char
version = “v” 1*(DIGIT / “.”) ; For example, ‘v1.2’13.1.4.2. 範例
以下我們提供一些範例轉換類別和要使用的對應 URN。
- Apache Beam 提供的轉換,會寫入 Parquet 檔案。
beam:transform:org.apache.beam:parquet_write:v1
- Apache Beam 提供的轉換,會讀取包含中繼資料的 Kafka。
beam:transform:org.apache.beam:kafka_read_with_metadata:v1
- 由組織 abc.org 開發的轉換,會從資料儲存區 MyDatastore 讀取。
beam:transform:org.abc:mydatastore_read:v1
13.2. 使用跨語言轉換
根據管道的 SDK 語言,您可以使用高層級的 SDK 包裝函式類別或低層級的轉換類別來存取跨語言轉換。
13.2.1. 在 Java 管道中使用跨語言轉換
使用者有三個選項可以在 Java 管道中使用跨語言轉換。在最高層級的抽象化中,某些常用的 Python 轉換可透過專用的 Java 包裝函式轉換存取。例如,Java SDK 具有 DataframeTransform 類別,該類別會使用 Python SDK 的 DataframeTransform,而且它具有 RunInference 類別,該類別會使用 Python SDK 的 RunInference,依此類推。當 SDK 專屬的包裝函式轉換不適用於目標 Python 轉換時,您可以使用較低層級的 PythonExternalTransform 類別,方法是指定 Python 轉換的完整名稱。如果您想要嘗試其他 SDK(包括 Java SDK 本身)中的外部轉換,您也可以使用最低層級的 External 類別。
使用 SDK 包裝函式
若要透過 SDK 包裝函式使用跨語言轉換,請匯入 SDK 包裝函式的模組,並從您的管道中呼叫它,如範例所示
import org.apache.beam.sdk.extensions.python.transforms.DataframeTransform;
input.apply(DataframeTransform.of("lambda df: df.groupby('a').sum()").withIndexes())
使用 PythonExternalTransform 類別
當 SDK 專屬的包裝函式不可用時,您可以透過 PythonExternalTransform 類別存取 Python 跨語言轉換,方法是指定目標 Python 轉換的完整名稱和建構函式引數。
input.apply(
PythonExternalTransform.<PCollection<Row>, PCollection<Row>>from(
"apache_beam.dataframe.transforms.DataframeTransform")
.withKwarg("func", PythonCallableSource.of("lambda df: df.groupby('a').sum()"))
.withKwarg("include_indexes", true))
使用 External 類別
請確保您的本機電腦上已安裝任何執行階段環境依賴項(如 JRE)(直接在本機電腦上,或透過容器提供)。如需更多詳細資訊,請參閱擴充服務章節。
注意:當從 Java 管道中包含 Python 轉換時,所有 Python 依賴項都必須包含在 SDK 執行單元容器中。
啟動您嘗試使用的轉換所屬語言 SDK 的擴充服務(如果沒有可用的話)。
確保您嘗試使用的轉換可用,並且擴充服務可以使用它。
在實例化您的管道時包含 External.of(…)。參考 URN、酬載和擴充服務。如需範例,請參閱跨語言轉換測試套件。
在將工作提交給 Beam 執行器後,請終止擴充服務程序以關閉擴充服務。
13.2.2. 在 Python 管道中使用跨語言轉換
如果跨語言轉換有 Python 專屬的包裝函式可用,請使用該包裝函式。否則,您必須使用較低層級的 ExternalTransform 類別來存取轉換。
使用 SDK 包裝函式
若要透過 SDK 包裝函式使用跨語言轉換,請匯入 SDK 包裝函式的模組,並從您的管道中呼叫它,如範例所示
from apache_beam.io.kafka import ReadFromKafka
kafka_records = (
pipeline
| 'ReadFromKafka' >> ReadFromKafka(
consumer_config={
'bootstrap.servers': self.bootstrap_servers,
'auto.offset.reset': 'earliest'
},
topics=[self.topic],
max_num_records=max_num_records,
expansion_service=<Address of expansion service>))
使用 ExternalTransform 類別
當 SDK 專屬的包裝函式不可用時,您將必須透過 ExternalTransform 類別存取跨語言轉換。
請確保您的本機電腦上已安裝任何執行階段環境依賴項(如 JRE)。如需更多詳細資訊,請參閱擴充服務章節。
啟動您嘗試使用的轉換所屬語言 SDK 的擴充服務(如果沒有可用的話)。Python 提供多個類別,可自動啟動擴充 java 服務,例如 JavaJarExpansionService 和 BeamJarExpansionService,可以直接作為擴充服務傳遞給
beam.ExternalTransform。確保您嘗試使用的轉換可用,並且擴充服務可以使用它。對於 Java,請確保轉換的建立器和註冊器在擴充服務的類別路徑中可用。
在實例化您的管道時包含
ExternalTransform。參考 URN、酬載和擴充服務。您可以使用可用的PayloadBuilder類別之一,為ExternalTransform建立酬載。with pipeline as p: res = ( p | beam.Create(['a', 'b']).with_output_types(unicode) | beam.ExternalTransform( TEST_PREFIX_URN, ImplicitSchemaPayloadBuilder({'data': '0'}), <expansion service>)) assert_that(res, equal_to(['0a', '0b']))如需其他範例,請參閱 addprefix.py 和 javacount.py。
在將工作提交給 Beam 執行器後,請終止擴充服務程序以關閉任何手動啟動的擴充服務。
使用 JavaExternalTransform 類別
Python 能夠透過 proxy 物件來叫用 Java 定義的轉換,就像它們是 Python 轉換一樣。這些的叫用方式如下
```py
MyJavaTransform = beam.JavaExternalTransform('fully.qualified.ClassName', classpath=[jars])
with pipeline as p:
res = (
p
| beam.Create(['a', 'b']).with_output_types(unicode)
| MyJavaTransform(javaConstructorArg, ...).builderMethod(...)
assert_that(res, equal_to(['0a', '0b']))
```
如果 java 中的方法名稱是保留的 Python 關鍵字(例如 from),則可以使用 Python 的 getattr 方法。
如同其他外部轉換,可以提供預先啟動的擴展服務,或者提供包含轉換、其依賴項以及 Beam 擴展服務的 jar 檔案,在這種情況下,擴展服務將會自動啟動。
13.2.3. 在 Go 管道中使用跨語言轉換
如果有針對跨語言的 Go 專用包裝器,請使用該包裝器。否則,您必須使用較低層級的 CrossLanguage 函式來存取轉換。
擴展服務
如果沒有提供擴展位址,Go SDK 支援自動啟動 Java 擴展服務,雖然這比提供持續的擴展服務來得慢。許多包裝過的 Java 轉換會自動執行此操作;如果您想手動執行此操作,請使用 xlangx 套件的 UseAutomatedJavaExpansionService() 函式。為了使用 Python 跨語言轉換,您必須在本地電腦上手動啟動任何必要的擴展服務,並確保它們在管道建構期間可以被您的程式碼存取。
使用 SDK 包裝函式
若要透過 SDK 包裝器使用跨語言轉換,請匯入 SDK 包裝器的套件,並從您的管道中呼叫它,如範例所示
import (
"github.com/apache/beam/sdks/v2/go/pkg/beam/io/xlang/kafkaio"
)
// Kafka Read using previously defined values.
kafkaRecords := kafkaio.Read(
s,
expansionAddr, // Address of expansion service.
bootstrapAddr,
[]string{topicName},
kafkaio.MaxNumRecords(numRecords),
kafkaio.ConsumerConfigs(map[string]string{"auto.offset.reset": "earliest"}))
使用 CrossLanguage 函式
當沒有可用的 SDK 特定包裝器時,您必須透過 beam.CrossLanguage 函式存取跨語言轉換。
請確保您已執行適當的擴展服務。有關詳細資訊,請參閱擴展服務章節。
請確保您嘗試使用的轉換可用,並且可以被擴展服務使用。有關詳細資訊,請參閱建立跨語言轉換。
在您的管道中適當地使用
beam.CrossLanguage函式。參考 URN、payload、擴展服務位址,並定義輸入和輸出。您可以使用 beam.CrossLanguagePayload 函式作為編碼 payload 的輔助工具。您可以使用 beam.UnnamedInput 和 beam.UnnamedOutput 函式作為單一、未命名輸入/輸出的快捷方式,或者定義一個具名輸入/輸出的映射。type prefixPayload struct { Data string `beam:"data"` } urn := "beam:transforms:xlang:test:prefix" payload := beam.CrossLanguagePayload(prefixPayload{Data: prefix}) expansionAddr := "localhost:8097" outT := beam.UnnamedOutput(typex.New(reflectx.String)) res := beam.CrossLanguage(s, urn, payload, expansionAddr, beam.UnnamedInput(inputPCol), outT)在將工作提交給 Beam 執行器後,請終止擴充服務程序以關閉擴充服務。
13.2.4. 在 Typescript 管道中使用跨語言轉換
使用 Typescript 包裝器來進行跨語言管道,類似於使用任何其他轉換,前提是依賴項(例如,最近的 Python 直譯器或 Java JRE)可用。例如,大多數 Typescript IO 只是其他語言的 Beam 轉換的包裝器。
如果沒有可用的包裝器,可以使用 apache_beam.transforms.external.rawExternalTransform 明確地使用它。它接受一個 `urn`(識別轉換的字串)、一個 `payload`(參數化轉換的二進制或 json 物件)以及一個 `expansionService`,它可以是預先啟動服務的位址,或者是一個返回自動啟動擴展服務物件的可呼叫物件。
例如,可以寫成
pcoll.applyAsync(
rawExternalTransform(
"beam:registered:urn",
{arg: value},
"localhost:expansion_service_port"
)
);
請注意,pcoll 必須具有跨語言相容的編碼器,例如 SchemaCoder。可以使用 withCoderInternal 或 withRowCoder 轉換來確保這一點,例如
const result = pcoll.apply(
beam.withRowCoder({ intFieldName: 0, stringFieldName: "" })
);
如果無法推斷,也可以在輸出上指定編碼器,例如
此外,還有一些實用工具,例如 pythonTransform,可以更輕鬆地從特定語言中呼叫轉換
const result: PCollection<number> = await pcoll
.apply(
beam.withName("UpdateCoder1", beam.withRowCoder({ a: 0, b: 0 }))
)
.applyAsync(
pythonTransform(
// Fully qualified name
"apache_beam.transforms.Map",
// Positional arguments
[pythonCallable("lambda x: x.a + x.b")],
// Keyword arguments
{},
// Output type if it cannot be inferred
{ requestedOutputCoders: { output: new VarIntCoder() } }
)
);
跨語言轉換也可以內聯定義,這對於存取呼叫 SDK 中不可用的功能或程式庫非常有用
const result: PCollection<string> = await pcoll
.apply(withCoderInternal(new StrUtf8Coder()))
.applyAsync(
pythonTransform(
// Define an arbitrary transform from a callable.
"__callable__",
[
pythonCallable(`
def apply(pcoll, prefix, postfix):
return pcoll | beam.Map(lambda s: prefix + s + postfix)
`),
],
// Keyword arguments to pass above, if any.
{ prefix: "x", postfix: "y" },
// Output type if it cannot be inferred
{ requestedOutputCoders: { output: new StrUtf8Coder() } }
)
);
13.3. 執行器支援
目前,可攜式執行器(例如 Flink、Spark 和直接執行器)可以與多語言管道一起使用。
Dataflow 透過 Dataflow Runner v2 後端架構支援多語言管道。
13.4. 提示與疑難排解
如需其他提示和疑難排解資訊,請參閱此處。
14. 批次 DoFn
批次 DoFn 目前是僅限 Python 的功能。
批次 DoFn 允許使用者建立可在多個邏輯元素批次上運作的模組化、可組合的元件。這些 DoFn 可以利用向量化的 Python 程式庫,例如 numpy、scipy 和 pandas,這些程式庫可針對數據批次運作以提高效率。
14.1. 基本概念
批次 DoFn 目前是僅限 Python 的功能。
一個簡單的批次 DoFn 可能如下所示
class MultiplyByTwo(beam.DoFn):
# Type
def process_batch(self, batch: np.ndarray) -> Iterator[np.ndarray]:
yield batch * 2
# Declare what the element-wise output type is
def infer_output_type(self, input_element_type):
return input_element_type此 DoFn 可用於 Beam 管道,該管道以其他方式對個別元素進行操作。Beam 會隱式緩衝元素並在輸入端建立 numpy 陣列,並在輸出端將 numpy 陣列展開回個別元素
(p | beam.Create([1, 2, 3, 4]).with_output_types(np.int64)
| beam.ParDo(MultiplyByTwo()) # Implicit buffering and batch creation
| beam.Map(lambda x: x/3)) # Implicit batch explosion請注意,我們使用 PTransform.with_output_types 來設定 beam.Create 輸出的元素式類型提示。然後,當 MultiplyByTwo 應用於此 PCollection 時,Beam 會識別出 np.ndarray 是一個可接受的批次類型,可與 np.int64 元素一起使用。我們將在本指南中使用類似的 numpy 類型提示,但 Beam 也支援來自其他程式庫的類型提示,請參閱支援的批次類型。
在先前的範例中,Beam 將隱式地在輸入和輸出邊界建立和展開批次。但是,如果具有相同類型的批次 DoFn 串聯在一起,則會省略此批次建立和展開。批次將會直接傳遞!這使得有效組合對批次進行操作的轉換變得更加簡單。
(p | beam.Create([1, 2, 3, 4]).with_output_types(np.int64)
| beam.ParDo(MultiplyByTwo()) # Implicit buffering and batch creation
| beam.ParDo(MultiplyByTwo()) # Batches passed through
| beam.ParDo(MultiplyByTwo()))14.2. 元素級回退
批次 DoFn 目前是僅限 Python 的功能。
對於某些 DoFn,您也許可以提供所需邏輯的批次和元素式實作。您只需同時定義 process 和 process_batch 即可
class MultiplyByTwo(beam.DoFn):
def process(self, element: np.int64) -> Iterator[np.int64]:
# Multiply an individual int64 by 2
yield element * 2
def process_batch(self, batch: np.ndarray) -> Iterator[np.ndarray]:
# Multiply a _batch_ of int64s by 2
yield batch * 2執行此 DoFn 時,Beam 會根據內容選擇最佳的實作來使用。一般來說,如果 DoFn 的輸入已經是批次的,Beam 將會使用批次實作;否則,它將會使用 process 方法中定義的元素式實作。
請注意,在這種情況下,無需定義 infer_output_type。這是因為 Beam 可以從 process 上的類型提示取得輸出類型。
14.3. 批次產生與批次消耗
批次 DoFn 目前是僅限 Python 的功能。
依照慣例,Beam 會假設使用批次輸入的 process_batch 方法也會產生批次輸出。同樣地,Beam 會假設 process 方法會產生個別元素。可以使用 @beam.DoFn.yields_elements 和 @beam.DoFn.yields_batches 修飾符來覆寫此行為。例如
# Consumes elements, produces batches
class ReadFromFile(beam.DoFn):
@beam.DoFn.yields_batches
def process(self, path: str) -> Iterator[np.ndarray]:
...
yield array
# Declare what the element-wise output type is
def infer_output_type(self):
return np.int64
# Consumes batches, produces elements
class WriteToFile(beam.DoFn):
@beam.DoFn.yields_elements
def process_batch(self, batch: np.ndarray) -> Iterator[str]:
...
yield output_path14.4. 支援的批次類型
批次 DoFn 目前是僅限 Python 的功能。
我們在本指南的批次 DoFn 實作中使用了 numpy 類型 – np.int64 作為元素類型提示,以及 np.ndarray 作為相應的批次類型提示 – 但 Beam 也支援來自其他程式庫的類型提示。
numpy
| 元素類型提示 | 批次類型提示 |
|---|---|
數值類型 (int、np.int32、bool、…) | np.ndarray (或 NumpyArray) |
pandas
| 元素類型提示 | 批次類型提示 |
|---|---|
數值類型 (int、np.int32、bool、…) | pd.Series |
bytes | |
任何 | |
| Beam 結構描述類型 | pd.DataFrame |
pyarrow
| 元素類型提示 | 批次類型提示 |
|---|---|
數值類型 (int、np.int32、bool、…) | pd.Series |
任何 | |
List | |
映射 | |
| Beam 結構描述類型 | pa.Table |
其他類型?
如果有其他您想用於批次 DoFn 的批次類型,請提交問題。
14.5. 動態批次輸入與輸出類型
批次 DoFn 目前是僅限 Python 的功能。
對於某些批次 DoFn,僅使用 process 和/或 process_batch 上的類型提示來靜態宣告批次類型可能不足。您可能需要動態宣告這些類型。您可以透過覆寫 DoFn 上的 get_input_batch_type 和 get_output_batch_type 方法來執行此操作
# Utilize Beam's parameterized NumpyArray typehint
from apache_beam.typehints.batch import NumpyArray
class MultipyByTwo(beam.DoFn):
# No typehints needed
def process_batch(self, batch):
yield batch * 2
def get_input_batch_type(self, input_element_type):
return NumpyArray[input_element_type]
def get_output_batch_type(self, input_element_type):
return NumpyArray[input_element_type]
def infer_output_type(self, input_element_type):
return input_element_type14.6. 批次與事件時間語義
批次 DoFn 目前是僅限 Python 的功能。
目前,批次必須具有一組單一的時序資訊(事件時間、視窗等),該資訊適用於批次中的每個邏輯元素。目前沒有建立跨越多個時間戳記的批次的機制。但是,可以在批次 DoFn 實作中檢索此時序資訊。可以使用傳統的 DoFn.*Param 屬性來存取此資訊
class RetrieveTimingDoFn(beam.DoFn):
def process_batch(
self,
batch: np.ndarray,
timestamp=beam.DoFn.TimestampParam,
pane_info=beam.DoFn.PaneInfoParam,
) -> Iterator[np.ndarray]:
...
def infer_output_type(self, input_type):
return input_type15. 轉換服務
Apache Beam SDK 2.49.0 版及更新版本包含一個名為轉換服務的 Docker Compose 服務。
下圖說明轉換服務的基本架構。
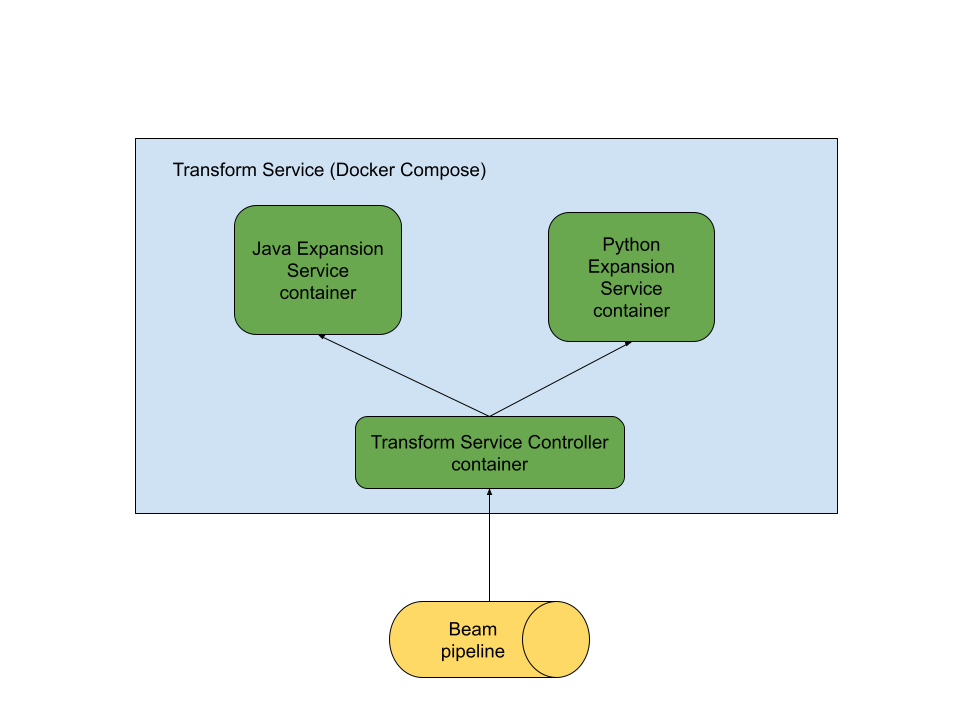
若要使用轉換服務,啟動該服務的機器上必須有 Docker。
轉換服務有幾個主要用例。
15.1. 使用轉換服務來升級轉換
轉換服務可以用於升級(或降級)Beam 管道使用的支援單個轉換的 Beam SDK 版本,而無需變更管道的 Beam 版本。此功能目前僅適用於 Beam Java SDK 2.53.0 及更新版本。目前,以下轉換可供升級
- BigQuery 讀取轉換 (URN: beam:transform:org.apache.beam:bigquery_read:v1)
- BigQuery 寫入轉換 (URN: beam:transform:org.apache.beam:bigquery_write:v1)
- Kafka 讀取轉換 (URN: beam:transform:org.apache.beam:kafka_read_with_metadata:v2)
- Kafka 寫入轉換 (URN: beam:transform:org.apache.beam:kafka_write:v2)
若要使用此功能,您可以簡單地執行 Java 管道,並使用額外的管道選項來指定您要升級的轉換的 URN 以及您要將轉換升級到的 Beam 版本。管道中所有具有相符 URN 的轉換都將被升級。
例如,若要將使用 Beam 2.53.0 執行的管道的 BigQuery 讀取轉換升級到未來的 Beam 版本 2.xy.z,您可以指定以下額外的管道選項。
--transformsToOverride=beam:transform:org.apache.beam:bigquery_read:v1 --transformServiceBeamVersion=2.xy.zThis feature is currently not available for Python SDK.This feature is currently not available for Go SDK.請注意,框架會自動下載相關的 Docker 容器並為您啟動轉換服務。
請參閱此處,以取得使用此功能升級 BigQuery 讀取和寫入轉換的完整範例。
15.2. 使用轉換服務進行多語言管道
轉換服務實作 Beam 擴展 API。這允許 Beam 多語言管道在擴展轉換服務中可用的轉換時使用轉換服務。這裡的主要優勢在於,多語言管道將能夠在不需要安裝對其他語言執行時間的支援的情況下運作。例如,使用 Java 轉換(例如 KafkaIO)的 Beam Python 管道可以在不需要在作業提交期間於本機安裝 Java 的情況下運作,前提是系統中可使用 Docker。
在某些情況下,Apache Beam SDK 可以自動啟動轉換服務。
Java
PythonExternalTransformAPI 在本機沒有可用的 Python 執行時間,但有 Docker 時,會自動啟動轉換服務。當您使用 Java 轉換,並且本機沒有可用的 Java 語言執行時間,但本機有 Docker 時,Apache Beam Python 多語言包裝器可能會自動啟動轉換服務。
Beam 使用者也可以選擇手動啟動轉換服務,並將其用作多語言管道使用的擴展服務。
15.3. 手動啟動轉換服務
可以使用 Apache Beam SDK 提供的公用程式來手動啟動 Beam 轉換服務執行個體。
java -jar beam-sdks-java-transform-service-app-<Beam version for the jar>.jar --port <port> --beam_version <Beam version for the transform service> --project_name <a unique ID for the transform service> --command uppython -m apache_beam.utils.transform_service_launcher --port <port> --beam_version <Beam version for the transform service> --project_name <a unique ID for the transform service> --command upThis feature is currently in development.若要停止轉換服務,請使用以下命令。
java -jar beam-sdks-java-transform-service-app-<Beam version for the jar>.jar --port <port> --beam_version <Beam version for the transform service> --project_name <a unique ID for the transform service> --command downpython -m apache_beam.utils.transform_service_launcher --port <port> --beam_version <Beam version for the transform service> --project_name <a unique ID for the transform service> --command downThis feature is currently in development.15.4. 轉換服務中包含的可攜式轉換
Beam 轉換服務包含在 Apache Beam Java 和 Python SDK 中實作的許多轉換。
目前,轉換服務中包含以下轉換
Java 轉換:Google Cloud I/O 連接器、Kafka I/O 連接器和 JDBC I/O 連接器
Python 轉換:在 Apache Beam Python SDK 中實作的所有可攜式轉換,例如 RunInference 和 DataFrame 轉換。
如需可用轉換的更完整清單,請參閱轉換服務開發人員指南。
上次更新時間為 2024/10/31
您是否找到了您要尋找的所有內容?
所有內容是否實用且清楚?您有任何想要變更的內容嗎?請告訴我們!