


自訂視窗模式
本頁的範例示範常見的自訂視窗模式。您可以使用 WindowFn 函數建立自訂視窗。如需詳細資訊,請參閱 程式設計指南中關於視窗化的章節。
注意:Python (使用 fnapi) 不支援自訂合併視窗。
使用資料動態設定工作階段視窗間隔
您可以修改 assignWindows 函數來使用資料驅動的間隔,然後將傳入的資料視窗化為工作階段。
透過 WindowFn.AssignContext.element() 存取 assignWindows 函數。原始的固定持續時間 assignWindows 函數為
  public Collection<IntervalWindow> assignWindows(WindowFn.AssignContext c) {

    // Assign each element into a window from its timestamp until gapDuration in the
    // future.  Overlapping windows (representing elements within gapDuration of
    // each other) will be merged.
    return Arrays.asList(new IntervalWindow(c.timestamp(), gapDuration));
  }
建立資料驅動的間隔
若要建立資料驅動的間隔,請將下列程式碼片段新增至 assignWindows 函數
- 當資料中沒有自訂間隔時的預設值
- 一種將屬性從主要管線設定為自訂視窗方法的方式
例如,下列函數將每個元素指派到時間戳記和 gapDuration 之間的視窗
@Override
public Collection<IntervalWindow> assignWindows(AssignContext c) {
  // Assign each element into a window from its timestamp until gapDuration in the
  // future.  Overlapping windows (representing elements within gapDuration of
  // each other) will be merged.
  Duration dataDrivenGap;
  TableRow message = c.element();

  try {
    dataDrivenGap = Duration.standardSeconds(Long.parseLong(message.get("gap").toString()));
  } catch (Exception e) {
    dataDrivenGap = gapDuration;
  }
  return Arrays.asList(new IntervalWindow(c.timestamp(), dataDrivenGap));
}
然後,在視窗化函數中設定 gapDuration 欄位
public static class DynamicSessions extends WindowFn<TableRow, IntervalWindow> {
  /** Duration of the gaps between sessions. */
  private final Duration gapDuration;

  /** Creates a {@code DynamicSessions} {@link WindowFn} with the specified gap duration. */
  private DynamicSessions(Duration gapDuration) {
    this.gapDuration = gapDuration;
  }
將訊息視窗化為工作階段
建立資料驅動的間隔後,您可以將傳入的資料視窗化到新的自訂工作階段中。
首先,將工作階段長度設定為間隔持續時間
/** Creates a {@code DynamicSessions} {@link WindowFn} with the specified gap duration. */
public static DynamicSessions withDefaultGapDuration(Duration gapDuration) {
  return new DynamicSessions(gapDuration);
}
最後,在您的管線中將資料視窗化為工作階段
p.apply(
    "Window into sessions",
    Window.<TableRow>into(
        DynamicSessions.withDefaultGapDuration(Duration.standardSeconds(10))));
範例資料和視窗
下列測試資料會計算兩位使用者有或沒有 gap 屬性的分數
.apply("Create data", Create.timestamped(
            TimestampedValue.of("{\"user\":\"user-1\",\"score\":\"12\",\"gap\":\"5\"}", new Instant()),
            TimestampedValue.of("{\"user\":\"user-2\",\"score\":\"4\"}", new Instant()),
            TimestampedValue.of("{\"user\":\"user-1\",\"score\":\"-3\",\"gap\":\"5\"}", new Instant().plus(2000)),
            TimestampedValue.of("{\"user\":\"user-1\",\"score\":\"2\",\"gap\":\"5\"}", new Instant().plus(9000)),
            TimestampedValue.of("{\"user\":\"user-1\",\"score\":\"7\",\"gap\":\"5\"}", new Instant().plus(12000)),
            TimestampedValue.of("{\"user\":\"user-2\",\"score\":\"10\"}", new Instant().plus(12000)))
        .withCoder(StringUtf8Coder.of()))
下圖視覺化了測試資料
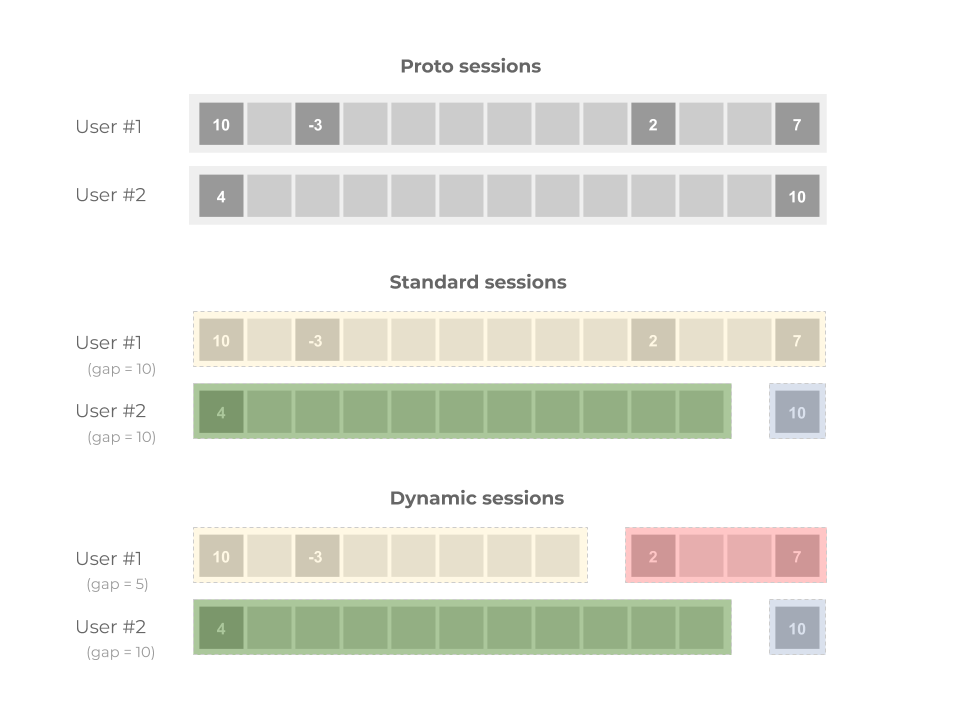
標準工作階段
標準工作階段使用下列視窗和分數
user=user-2, score=4, window=[2019-05-26T13:28:49.122Z..2019-05-26T13:28:59.122Z)
user=user-1, score=18, window=[2019-05-26T13:28:48.582Z..2019-05-26T13:29:12.774Z)
user=user-2, score=10, window=[2019-05-26T13:29:03.367Z..2019-05-26T13:29:13.367Z)
使用者 #1 看到兩個事件,相隔 12 秒。使用標準工作階段,間隔預設為 10 秒;兩個分數都位於不同的工作階段中,因此不會加總分數。
使用者 #2 看到四個事件,分別相隔兩秒、七秒和三秒。由於沒有任何間隔大於預設值,因此這四個事件位於同一個標準工作階段中並加總在一起 (18 分)。
動態工作階段
動態工作階段指定 5 秒間隔,因此它們使用下列視窗和分數
user=user-2, score=4, window=[2019-05-26T14:30:22.969Z..2019-05-26T14:30:32.969Z)
user=user-1, score=9, window=[2019-05-26T14:30:22.429Z..2019-05-26T14:30:30.553Z)
user=user-1, score=9, window=[2019-05-26T14:30:33.276Z..2019-05-26T14:30:41.849Z)
user=user-2, score=10, window=[2019-05-26T14:30:37.357Z..2019-05-26T14:30:47.357Z)
使用動態工作階段,使用者 #2 獲得不同的分數。第三則訊息在第二則訊息之後七秒到達,因此它會被分組到不同的工作階段。大型的 18 分工作階段會分割成兩個 9 分工作階段。
上次更新時間:2024/10/31
您是否已找到您要尋找的所有內容?
所有內容是否實用且清楚?您是否有任何想要變更的內容?請告訴我們!