


工作流程協調
此頁面提供 KFP 和 TFX 協調範例。它首先提供 KFP 範例,然後示範 TFX 如何管理在使用 KFP 時手動定義的功能。
了解 Beam DAG
Apache Beam 是一個開放原始碼的統一模型,用於定義批次和串流資料平行處理管線。Apache Beam 程式設計模型的核心概念是有向無環圖 (DAG)。每個 Apache Beam 管線都是一個 DAG,您可以使用您選擇的程式語言 (從一組支援的 Apache Beam SDK) 中的 Beam SDK 來建構它。此 DAG 的每個節點代表一個處理步驟 (PTransform),它接受資料集合作為輸入 (PCollection),然後輸出轉換後的資料集合 (PCollection)。邊緣定義資料如何從一個處理步驟流向另一個處理步驟。下圖顯示了一個範例管線工作流程。

定義管線和對應的 DAG 並不表示資料開始流經管線。要執行管線,您需要將其部署到其中一個支援的 Beam 執行器。這些分散式處理後端包括 Apache Flink、Apache Spark 和 Google Cloud Dataflow。為了在您的機器上本地執行管線以進行開發和偵錯,還提供了Direct Runner。檢視執行器功能矩陣以驗證您選擇的執行器是否支援您管線中定義的資料處理步驟,尤其是在使用 Direct Runner 時。
協調框架
成功交付機器學習專案不僅需要訓練模型。完整的 ML 工作流程通常包含一系列其他步驟,包括資料擷取、資料驗證、資料預處理、模型評估、模型部署、資料漂移偵測等等。此外,您需要追蹤實驗中的中繼資料和成品,以回答重要問題,例如
- 此模型是使用哪些資料和訓練參數訓練的?
- 此模型何時部署,以及在測試資料集上的準確度如何?如果沒有這些知識,當您的解決方案規模擴大時,對您的 ML 解決方案進行疑難排解、監控和改進會變得越來越困難。
解決方案:MLOps。MLOps 是一個總稱,用於描述旨在使機器學習系統的開發和維護無縫且有效率的最佳實務和指導原則。MLOps 通常需要自動化模型和資料生命週期中的機器學習工作流程。建立這些工作流程 DAG 的熱門框架是 Kubeflow Pipelines、Apache Airflow 和 TFX。
您可以將 Apache Beam 管線用作獨立的資料處理作業,或者可以將其作為工作流程中較大步驟序列的一部分。在後一種情況下,Apache Beam DAG 是工作流程協調器組成的總體 DAG 中的一個節點。因此,此工作流程包含一個 DAG 中的 DAG,如下圖所示。

Apache Beam DAG 和協調 DAG 之間的關鍵差異在於,Apache Beam DAG 處理資料並在其 DAG 的節點之間傳遞資料,而協調 DAG 排程和監控工作流程中的步驟,並在其 DAG 的節點之間傳遞執行參數、中繼資料和成品。
- Apache Beam 專注於平行化,並啟用批次和串流作業。
- 協調 DAG 成品的範例包括經過訓練的模型和資料集。這些成品通常通過參考 URI 而不是值來傳遞。
注意:TFX 會建立一個工作流程 DAG,它本身需要一個協調器才能執行。TFX 原生支援的協調器是 Airflow、Kubeflow Pipelines 和 Apache Beam 本身。正如 TFX 文件中所述
「幾個 TFX 元件依賴 Beam 進行分散式資料處理。此外,TFX 可以使用 Apache Beam 來協調和執行管線 DAG。Beam 協調器使用與元件資料處理所用不同的 BeamRunner。」
注意事項:Beam 協調器並非用於生產環境的 TFX 協調器。它只是讓您可以在 Beam 的 Direct Runner 上於本地偵錯 TFX 管線,而無需 Airflow 或 Kubeflow 所需的額外設定。
預處理範例
本節介紹兩個經過協調的 ML 工作流程,一個使用 Kubeflow Pipelines (KFP),另一個使用 Tensorflow Extended (TFX)。這兩個框架都建立工作流程,但它們有各自不同的優缺點
- KFP 要求您從頭開始建立工作流程元件,並要求使用者明確指出應該在元件之間傳遞哪些成品以及以何種方式傳遞。
- TFX 提供了一些預先建立的元件,並更隱式地處理成品傳遞。在選擇這兩個框架時,您需要考慮彈性與程式設計負擔之間的權衡。
為簡單起見,工作流程僅包含三個元件:資料擷取、資料預處理和模型訓練。根據情境,您可以新增一系列額外元件,例如模型評估和模型部署。此範例著重於預處理元件,因為它示範如何在 ML 工作流程中使用 Apache Beam 來有效率且平行地處理您的 ML 資料。
此資料集包含圖片,以及描述圖片內容的文字說明。這些配對取自 MSCOCO 2014 資料集的字幕子集。這種多模態資料(圖片和文字)讓我們有機會實驗兩種模態的預處理操作。
Kubeflow Pipelines (KFP)
為了使用 KFP 執行我們的 ML 工作流程,我們必須執行三個步驟
- 透過指定元件的介面,以及撰寫和容器化元件邏輯的實作來建立 KFP 元件。
- 透過連接已建立的元件、指定輸入和輸出如何在元件之間傳遞,並將管線定義編譯為完整的管線定義來建立 KFP 管線。
- 透過將 KFP 管線提交至 KFP 用戶端端點來執行 KFP 管線。
完整的範例程式碼可在 GitHub 儲存庫中找到
建立 KFP 元件
下圖顯示我們的目標檔案結構
    kfp
    ├── pipeline.py
    ├── components
    │   ├── ingestion
    │   │   ├── Dockerfile
    │   │   ├── component.yaml
    │   │   ├── requirements.txt
    │   │   └── src
    │   │       └── ingest.py
    │   ├── preprocessing
    │   │   ├── Dockerfile
    │   │   ├── component.yaml
    │   │   ├── requirements.txt
    │   │   └── src
    │   │       └── preprocess.py
    │   └── train
    │       ├── Dockerfile
    │       ├── component.yaml
    │       ├── requirements.txt
    │       └── src
    │           └── train.py
    └── requirements.txt
完整的預處理元件規格如下圖所示。輸入是攝取元件儲存已攝取資料集的路徑,以及元件可以儲存構件的目錄路徑。此外,一些輸入指定 Apache Beam 管線的執行方式和位置。攝取和訓練元件的規格類似,可在 ingestion component.yaml 檔案和 train component.yaml 檔案中找到。
注意:我們使用的是 KFP v1 SDK,因為 v2 仍在 測試版。v2 SDK 引入了一些新選項,用於指定元件介面,並提供對輸入和輸出構件的更多原生支援。要了解如何將元件從 v1 遷移到 v2,請查閱 KFP 文件。
name: preprocessing
description: Component that mimicks scraping data from the web and outputs it to a jsonlines format file
inputs:
  - name: ingested_dataset_path
    description: source uri of the data to scrape
    type: String
  - name: base_artifact_path
    description: base path to store data
    type: String
  - name: gcp_project_id
    description: ID for the google cloud project to deploy the pipeline to.
    type: String
  - name: region
    description: Region in which to deploy the Dataflow pipeline.
    type: String
  - name: dataflow_staging_root
    description: Path to staging directory for the dataflow runner.
    type: String
  - name: beam_runner
    description: Beam runner, DataflowRunner or DirectRunner.
    type: String
outputs:
  - name: preprocessed_dataset_path
    description: target uri for the ingested dataset
    type: String
implementation:
  container:
    image: <your-docker-registry/preprocessing-image-name:latest>
    command: [
      python3,
      preprocess.py,
      --ingested-dataset-path,
      {inputValue: ingested_dataset_path},
      --base-artifact-path,
      {inputValue: base_artifact_path},
      --preprocessed-dataset-path,
      {outputPath: preprocessed_dataset_path},
      --gcp-project-id,
      {inputValue: gcp_project_id},
      --region,
      {inputValue: region},
      --dataflow-staging-root,
      {inputValue: dataflow_staging_root},
      --beam-runner,
      {inputValue: beam_runner},
    ]
在此範例中,每個元件都共用相同的 Dockerfile,但您可以在需要時新增額外的元件特定相依性。
FROM python:3.9-slim

# (Optional) install extra dependencies

# install pypi dependencies
COPY requirements.txt /
RUN python3 -m pip install --no-cache-dir -r requirements.txt

# copy src files and set working directory
COPY src /src
WORKDIR /src
完成元件規格和容器化後,實作預處理元件。
由於 KFP 以命令列引數的形式提供輸入和輸出引數,因此需要使用 argumentparser。
def parse_args():
  """Parse preprocessing arguments."""
  parser = argparse.ArgumentParser()
  parser.add_argument(
      "--ingested-dataset-path",
      type=str,
      help="Path to the ingested dataset",
      required=True)
  parser.add_argument(
      "--preprocessed-dataset-path",
      type=str,
      help="The target directory for the ingested dataset.",
      required=True)
  parser.add_argument(
      "--base-artifact-path",
      type=str,
      help="Base path to store pipeline artifacts.",
      required=True)
  parser.add_argument(
      "--gcp-project-id",
      type=str,
      help="ID for the google cloud project to deploy the pipeline to.",
      required=True)
  parser.add_argument(
      "--region",
      type=str,
      help="Region in which to deploy the pipeline.",
      required=True)
  parser.add_argument(
      "--dataflow-staging-root",
      type=str,
      help="Path to staging directory for dataflow.",
      required=True)
  parser.add_argument(
      "--beam-runner",
      type=str,
      help="Beam runner: DataflowRunner or DirectRunner.",
      default="DirectRunner")

  return parser.parse_args()
preprocess_dataset 函式的實作包含 Apache Beam 管線程式碼和選擇執行器的 Beam 管線選項。執行的預處理包括從其 URL 下載圖片位元組、將它們轉換為 Torch 張量,並調整為所需的大小。字幕會經過一系列的字串操作,以確保我們的模型接收到統一的圖片描述。此處未進行符號化,但如果詞彙已知,則可以包含在此處。最後,每個元素都會被序列化並寫入 Avro 檔案。您可以使用其他檔案格式,例如 TFRecords。
# We use the save_main_session option because one or more DoFn's in this
# workflow rely on global context (e.g., a module imported at module level).
pipeline_options = PipelineOptions(
    runner=beam_runner,
    project=gcp_project_id,
    job_name=f'preprocessing-{int(time.time())}',
    temp_location=dataflow_staging_root,
    region=region,
    requirements_file="/requirements.txt",
    save_main_session=True,
)

with beam.Pipeline(options=pipeline_options) as pipeline:
  (
      pipeline
      | "Read input jsonlines file" >>
      beam.io.ReadFromText(ingested_dataset_path)
      | "Load json" >> beam.Map(json.loads)
      | "Filter licenses" >> beam.Filter(valid_license)
      | "Download image from URL" >> beam.FlatMap(download_image_from_url)
      | "Resize image" >> beam.Map(resize_image, size=IMAGE_SIZE)
      | "Clean Text" >> beam.Map(clean_text)
      | "Serialize Example" >> beam.Map(serialize_example)
      | "Write to Avro files" >> beam.io.WriteToAvro(
          file_path_prefix=target_path,
          schema={
              "namespace": "preprocessing.example",
              "type": "record",
              "name": "Sample",
              "fields": [{
                  "name": "id", "type": "int"
              }, {
                  "name": "caption", "type": "string"
              }, {
                  "name": "image", "type": "bytes"
              }]
          },
          file_name_suffix=".avro"))
它還包含執行元件 I/O 的必要程式碼。首先,會根據元件輸入參數 base_artifact_path 和時間戳記建立目標路徑,以儲存預處理的資料集。元件的輸出值僅以檔案形式傳回,因此我們會將已建構目標路徑的值寫入 KFP 提供給我們元件的輸出檔案。
timestamp = time.time()
target_path = f"{base_artifact_path}/preprocessing/preprocessed_dataset_{timestamp}"

# the directory where the output file is created may or may not exists
# so we have to create it.
Path(preprocessed_dataset_path).parent.mkdir(parents=True, exist_ok=True)
with open(preprocessed_dataset_path, 'w') as f:
  f.write(target_path)
由於我們主要感興趣的是預處理元件,以展示如何將 Beam 管線整合到更大的 ML 工作流程中,因此本節不深入探討攝取和訓練元件的實作。完整的範例程式碼中提供了模擬其行為的虛擬元件的實作。
建立管線定義
pipeline.py 首先從其規格 .yaml 檔案載入已建立的元件。
# load the kfp components from their yaml files
DataIngestOp = comp.load_component('components/ingestion/component.yaml')
DataPreprocessingOp = comp.load_component(
    'components/preprocessing/component.yaml')
TrainModelOp = comp.load_component('components/train/component.yaml')
之後,建立管線,並手動指定所需的元件輸入和輸出。
@dsl.pipeline(
    pipeline_root=PIPELINE_ROOT,
    name="beam-preprocessing-kfp-example",
    description="Pipeline to show an apache beam preprocessing example in KFP")
def pipeline(
    gcp_project_id: str,
    region: str,
    component_artifact_root: str,
    dataflow_staging_root: str,
    beam_runner: str):
  """KFP pipeline definition.

  Args:
      gcp_project_id (str): ID for the google cloud project to deploy the pipeline to.
      region (str): Region in which to deploy the pipeline.
      component_artifact_root (str): Path to artifact repository where Kubeflow Pipelines
        components can store artifacts.
      dataflow_staging_root (str): Path to staging directory for the dataflow runner.
      beam_runner (str): Beam runner: DataflowRunner or DirectRunner.
  """

  ingest_data_task = DataIngestOp(base_artifact_path=component_artifact_root)

  data_preprocessing_task = DataPreprocessingOp(
      ingested_dataset_path=ingest_data_task.outputs["ingested_dataset_path"],
      base_artifact_path=component_artifact_root,
      gcp_project_id=gcp_project_id,
      region=region,
      dataflow_staging_root=dataflow_staging_root,
      beam_runner=beam_runner)

  train_model_task = TrainModelOp(
      preprocessed_dataset_path=data_preprocessing_task.
      outputs["preprocessed_dataset_path"],
      base_artifact_path=component_artifact_root)
最後,編譯定義的管線,並產生 pipeline.json 規格檔案。
Compiler().compile(pipeline_func=pipeline, package_path="pipeline.json")執行 KFP 管線
使用以下規格檔案和程式碼片段(其中安裝了必要的 需求),您現在可以執行管線。有關更多資訊,請參閱 run_pipeline 文件。在執行管線之前,必須建置每個元件的容器,並將其推送至您的管線可以存取的容器登錄檔。此外,元件規格 .yaml 檔案必須指向正確的容器映像檔。
client = kfp.Client()
experiment = client.create_experiment("KFP orchestration example")
run_result = client.run_pipeline(
    experiment_id=experiment.id,
    job_name="KFP orchestration job",
    pipeline_package_path="pipeline.json",
    params=run_arguments)
Tensorflow Extended (TFX)
使用 TFX 的方式與先前說明的 KFP 方法類似:定義個別的工作流程元件、將它們連接到管線物件中,並在目標環境中執行管線。TFX 的不同之處在於它已經建置了一組 Python 套件,這些套件是用於建立工作流程元件的程式庫。與 KFP 範例不同,您不需要從頭開始編寫和容器化程式碼。
使用 TFX 時,您需要選擇哪些 TFX 元件與您的工作流程相關,並使用程式庫來調整其功能以符合您的使用案例。下圖顯示了可用的元件及其對應的程式庫。
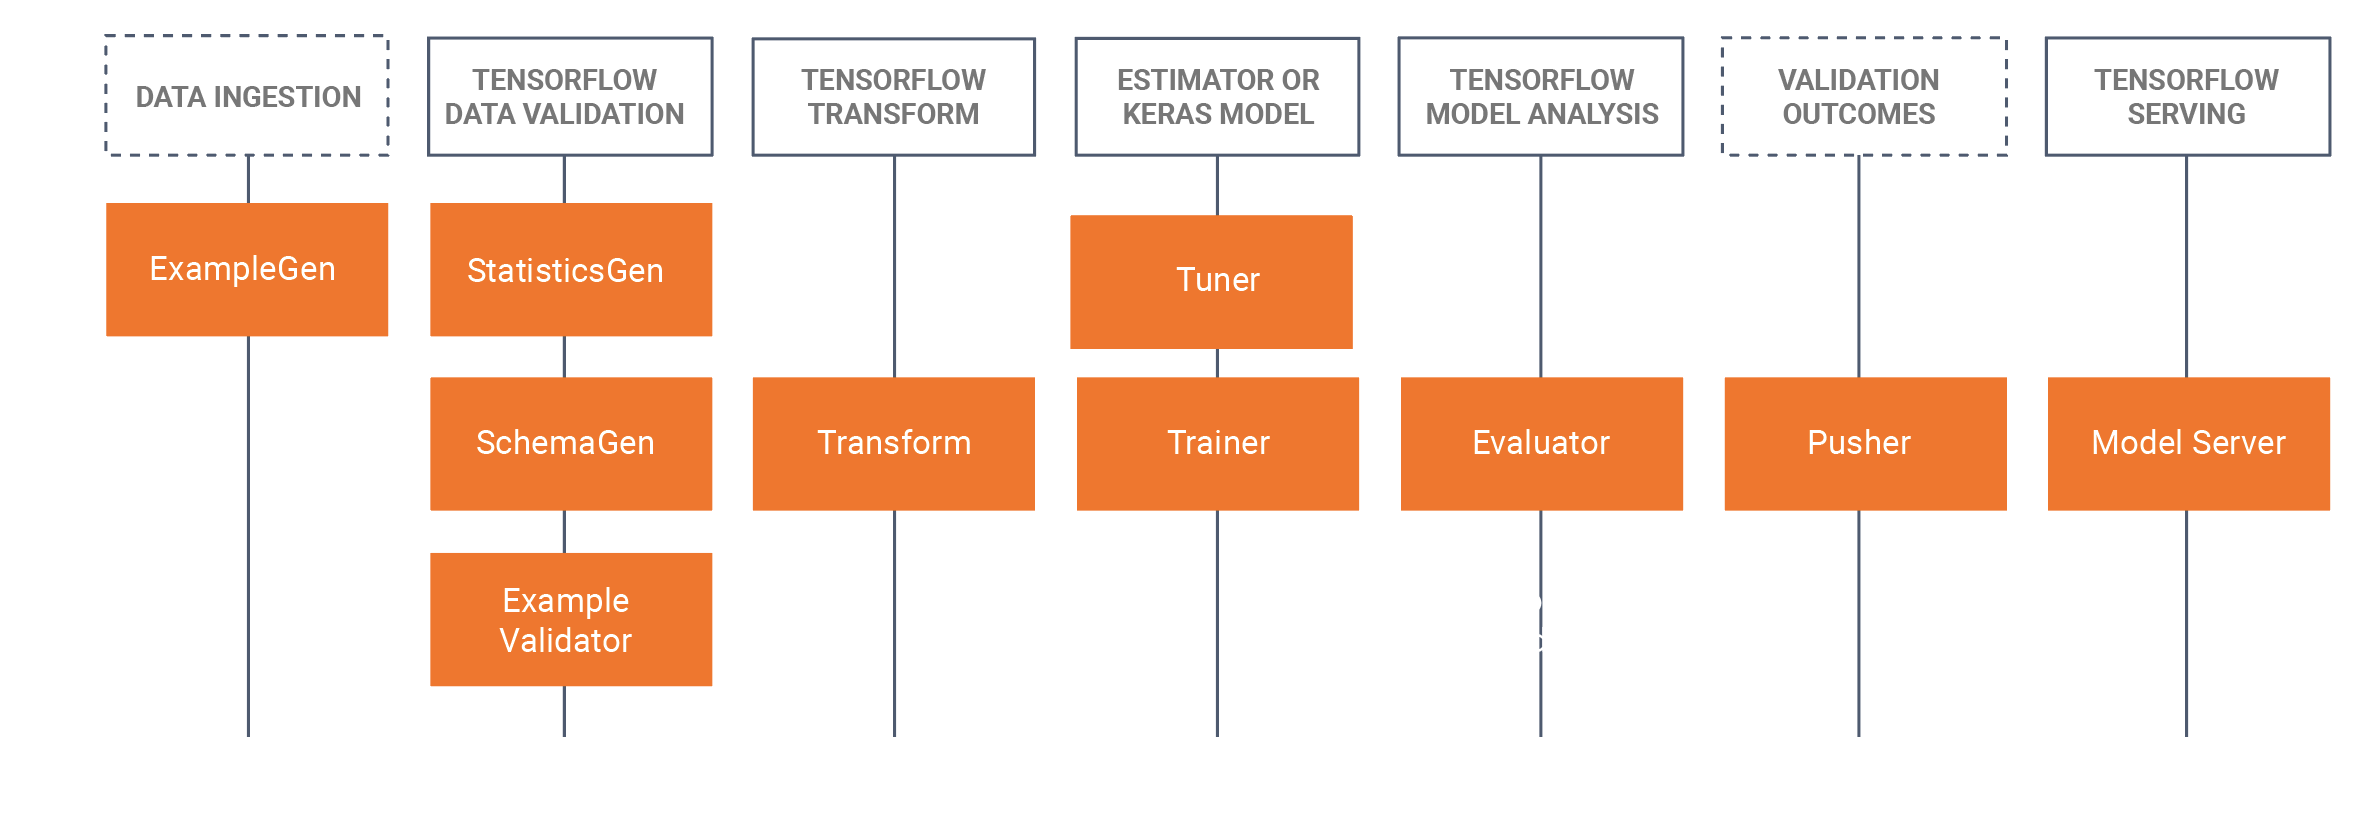
TFX 大量依賴 Apache Beam 在這些程式庫中實作資料平行管線。您需要使用其中一個受支援的 Apache Beam 執行器來執行使用這些程式庫建立的元件。完整的 TFX 範例程式碼同樣可以在 GitHub 儲存庫中找到。
在 KFP 範例中,我們使用了攝取、預處理和訓練器元件。在此 TFX 範例中,我們使用 ExampleGen、Transform 和 Trainer 程式庫。
首先,檢閱管線定義。請注意,此定義看起來與我們先前的範例類似。
def create_pipeline(
    gcp_project_id,
    region,
    pipeline_name,
    pipeline_root,
    csv_file,
    module_file,
    beam_runner,
    metadata_file):
  """Create the TFX pipeline.

  Args:
      gcp_project_id (str): ID for the google cloud project to deploy the pipeline to.
      region (str): Region in which to deploy the pipeline.
      pipeline_name (str): Name for the Beam pipeline
      pipeline_root (str): Path to artifact repository where TFX
        stores a pipeline’s artifacts.
      csv_file (str): Path to the csv input file.
      module_file (str): Path to module file containing the preprocessing_fn and run_fn.
      beam_runner (str): Beam runner: DataflowRunner or DirectRunner.
      metadata_file (str): Path to store a metadata file as a mock metadata database.
  """
  example_gen = tfx.components.CsvExampleGen(input_base=csv_file)

  # Computes statistics over data for visualization and example validation.
  statistics_gen = tfx.components.StatisticsGen(
      examples=example_gen.outputs['examples'])

  schema_gen = tfx.components.SchemaGen(
      statistics=statistics_gen.outputs['statistics'], infer_feature_shape=True)

  transform = tfx.components.Transform(
      examples=example_gen.outputs['examples'],
      schema=schema_gen.outputs['schema'],
      module_file=module_file)

  trainer = tfx.components.Trainer(
      module_file=module_file,
      examples=transform.outputs['transformed_examples'],
      transform_graph=transform.outputs['transform_graph'])

  components = [example_gen, statistics_gen, schema_gen, transform, trainer]

  beam_pipeline_args_by_runner = {
      'DirectRunner': [],
      'DataflowRunner': [
          '--runner=DataflowRunner',
          '--project=' + gcp_project_id,
          '--temp_location=' + os.path.join(pipeline_root, 'tmp'),
          '--region=' + region,
      ]
  }

  return tfx.dsl.Pipeline(
      pipeline_name=pipeline_name,
      pipeline_root=pipeline_root,
      components=components,
      enable_cache=True,
      metadata_connection_config=tfx.orchestration.metadata.
      sqlite_metadata_connection_config(metadata_file),
      beam_pipeline_args=beam_pipeline_args_by_runner[beam_runner])
我們使用相同的資料輸入,也就是從 MSCOCO 2014 資料集中提取的圖片字幕配對。然而,這次我們使用 CSV 格式的資料,因為 ExampleGen 元件預設不支援 jsonlines。TensorFlow 文件中的 資料來源和格式頁面中列出了現成支援的格式。或者,您可以編寫 自訂 ExampleGen。
將以下程式碼片段複製到輸入資料 CSV 檔案
image_id,id,caption,image_url,image_name,image_license
318556,255,"An angled view of a beautifully decorated bathroom.","http://farm4.staticflickr.com/3133/3378902101_3c9fa16b84_z.jpg","COCO_train2014_000000318556.jpg","Attribution-NonCommercial-ShareAlike License"
476220,14,"An empty kitchen with white and black appliances.","http://farm7.staticflickr.com/6173/6207941582_b69380c020_z.jpg","COCO_train2014_000000476220.jpg","Attribution-NonCommercial License"
到目前為止,我們僅匯入了標準 TFX 元件並將它們串連成管線。Transform 和 Trainer 元件都定義了一個 module_file 引數。這就是我們定義希望這些標準元件具有的行為的地方。
預處理
Transform 元件會在 module_file 中搜尋 preprocessing_fn 函式的定義。此函式是 tf.transform 程式庫的核心概念。TFX 文件描述了此函式
預處理函式是 tf.Transform 最重要的概念。預處理函式是對資料集轉換的邏輯描述。預處理函式接受並傳回張量字典,其中張量表示 Tensor 或 SparseTensor。有兩種函式用於定義預處理函式
- 任何接受並傳回張量的函式。這些函式會將 TensorFlow 運算新增至圖形,以將原始資料轉換為轉換後的資料。
- 任何由 tf.Transform 提供的分析器。分析器也接受並傳回張量,但與 TensorFlow 函式不同,它們不會將運算新增至圖形。相反地,分析器會導致 tf.Transform 在 TensorFlow 外部計算完整遍歷運算。它們使用整個資料集的輸入張量值來產生一個常數張量,該常數張量會作為輸出傳回。例如,tft.min 會計算資料集上張量的最小值。tf.Transform 提供一組固定的分析器,但這將在未來的版本中擴充。
因此,preprocesing_fn 可以包含所有接受並傳回張量的 tf 運算,以及特定的 tf.transform 運算。在以下範例中,我們使用前者將所有傳入的字幕轉換為僅小寫字母,而後者則對我們資料集中的所有資料進行完整遍歷,以計算字幕的平均長度,以用於後續的預處理步驟。
def preprocessing_fn(inputs):
  """Transform raw data."""
  # convert the captions to lowercase
  # split the captions into separate words
  lower = tf.strings.lower(inputs['caption'])

  # compute the vocabulary of the captions during a full pass
  # over the dataset and use this to tokenize.
  mean_length = tft.mean(tf.strings.length(lower))
  # <do some preprocessing with the mean length>

  return {
      'caption_lower': lower,
}此函式僅定義預處理期間必須執行的邏輯步驟。該函式需要在執行之前進行具體實作。tf.Transform 使用 Apache Beam 提供了一種這樣的實作,它提供了一個 PTransform tft_beam.AnalyzeAndTransformDataset 來處理資料。我們可以使用此 PTransform 明確測試 TFX Transform 元件外部的此 preproccesing_fn。當結合 TFX Transform 元件使用 tf.Transform 時,不需要以這種方式呼叫 processing_fn。
if __name__ == "__main__":
  # Test processing_fn directly without the tfx pipeline
  raw_data = [
      {
          "caption": "A bicycle replica with a clock as the front wheel."
      }, {
          "caption": "A black Honda motorcycle parked in front of a garage."
      }, {
          "caption": "A room with blue walls and a white sink and door."
      }
  ]

  # define the feature_spec (in a tfx pipeline this would be generated by a SchemaGen component)
  feature_spec = dict(caption=tf.io.FixedLenFeature([], tf.string))
  raw_data_metadata = tft.DatasetMetadata.from_feature_spec(feature_spec)

  # test out the beam implementation of the
  # processing_fn with AnalyzeAndTransformDataset
  with tft_beam.Context(temp_dir=tempfile.mkdtemp()):
    transformed_dataset, transform_fn = (
      (raw_data, raw_data_metadata)
      | tft_beam.AnalyzeAndTransformDataset(preprocessing_fn))
  transformed_data, transformed_metadata = transformed_dataset
訓練
Trainer 元件的行為類似於 Transform 元件,但它不是尋找 preprocessing_fn,而是需要指定 module_file 中的 run_fn 函式。我們簡單的實作使用 tf.Keras 建立一個虛擬模型,並將產生的模型儲存到目錄中。
def run_fn(fn_args: tfx.components.FnArgs) -> None:
  """Build the TF model, train it and export it."""
  # create a model
  model = tf.keras.Sequential()
  model.add(tf.keras.layers.Dense(1, input_dim=10))
  model.compile()

  # train the model on the preprocessed data
  # model.fit(...)

  # Save model to fn_args.serving_model_dir.
  model.save(fn_args.serving_model_dir)
執行管線
若要啟動管線,請提供兩個組態:TFX 管線的協調器和執行 Apache Beam 管線的管線選項。若要在沒有額外設定相依性的情況下在本機執行管線,此範例會使用 LocalDagRunner 進行協調。建立的管線可以透過 beam_pipeline_args 引數指定 Apache Beam 的管線選項。
args = parse_args()
tfx.orchestration.LocalDagRunner().run(create_pipeline(**vars(args)))
上次更新於 2024/10/31
您是否找到了您要找的所有資訊?
所有資訊都有用且清楚嗎?您是否有任何想要變更的地方?請告訴我們!